

The DS-160 form is the online application for almost every US nonimmigrant visa. You complete it on the US Department of State's CEAC website before your visa interview, and it gathers your personal, travel, and background information. When you submit it, you get a confirmation page with a barcode, and you need that page to book your visa appointment.
Key Takeaways
- The DS-160 is the required online form for most nonimmigrant US visas, including B-1/B-2, F-1, J-1, H-1B, L-1, and O-1. Every applicant, including children, needs their own.
- The DS-160 must be submitted online before the interview, and the confirmation page it generates is required for booking interviews.
- Make sure your social media profiles are public before you submit. A private profile, or answers that do not match your passport or petition, can send your case into administrative processing and delay your visa.
- Submitting the DS-160 does not guarantee visa approval, because a consular officer makes the final decision at your visa interview.
What is the DS-160 form?
The DS-160, officially the Online Nonimmigrant Visa Application, is the form people use to apply for a temporary visa to the United States. It is submitted online through the US Department of State's Consular Electronic Application Center (CEAC) website.
Federal rules require every nonimmigrant visa applicant to apply online for the DS-160. A paper DS-156 is used only when a consular officer specifically directs it. The DS-160 replaced older paper forms like the DS-156, DS-157, and DS-158.
The DS-160 gathers personal, travel, and background information from applicants. That includes your passport details, travel plans, family, work and education history, and answers to security questions. For work and study visas, it also collects details about your employer or school.
Consular officers use DS-160 data to formulate questions during interviews, and the State Department uses it to run security checks with other agencies.
Who needs to fill out a DS-160?
Almost everyone applying for a temporary US visa needs a DS-160. Common categories include:
- Visitor visas (B-1/B-2)
- Student visas (F-1, M-1)
- Exchange visitor visas (J-1)
- Work visas such as H-1B, L-1, O-1, TN, and E-1/E-2
- K-1 fiancé(e) visas
Each applicant must have their own DS-160 form. A family traveling together still files one form per person, including infants. For a child under 16, a parent or guardian can fill out and sign the form on the child's behalf.
Nationals of some countries face extra limits. Since January 1, 2026, Proclamation 10998 fully or partly suspends visa issuance for nationals of 39 countries, and for partly restricted countries the suspension covers B-1/B-2, F, M, and J visas. Applicants from these countries can still face a refusal even with a complete DS-160.
People applying for a green card from abroad use a different form, the DS-260, not the DS-160.
Employer-sponsored workers often ask whether they still need a DS-160 after USCIS approves their petition. They do. USCIS approves the petition (for example, Form I-129 for an H-1B), which gives permission to work for that employer. The consulate then uses the DS-160 to decide whether to issue the visa stamp in your passport.
What do you need before you start the DS-160 form?
Most applicants gather the following:
- Passport: Your current passport number, issue date, expiration date, and place of issue, plus old passports for your travel history.
- Travel plans: Your expected arrival date, length of stay, and US address, if you know them.
- US contact: The full name and address of your US employer, school, host, or hotel.
- Work and education history: Employer and school names, addresses, job titles, and dates, generally covering at least the past five years.
- Student details: Your SEVIS ID from your Form I-20 or DS-2019.
- Petition details: For work visas, the receipt number from the I-797 approval notice you received, plus the employer name, job title, salary, and worksite address exactly as they appear on the petition and the Labor Condition Application (LCA).
- Social media: Every platform and username you have used in the last five years. Make sure each profile is set to public before you submit, since private profiles can lead to delays.
- Digital photo: A recent photo that meets State Department rules (see requirements below).
For HR teams, a common practice is to send employees the exact job title, salary, and worksite address before they fill out the form. Consular officers compare the DS-160 against the LCA, the I-129, and employer records, and mismatches get noticed.
How do you fill out the DS-160 form step by step?
It typically takes around 90 minutes to complete the DS-160 form. Applicants with long travel or work histories often need more time. Here is how the process works.
Heads up: The CEAC site can be glitchy. It often freezes, logs you out, or crashes partway through. Click Save on every page as you go, and be patient if you have to redo a page. When you finish, save the full application as a PDF before you click Sign Application.
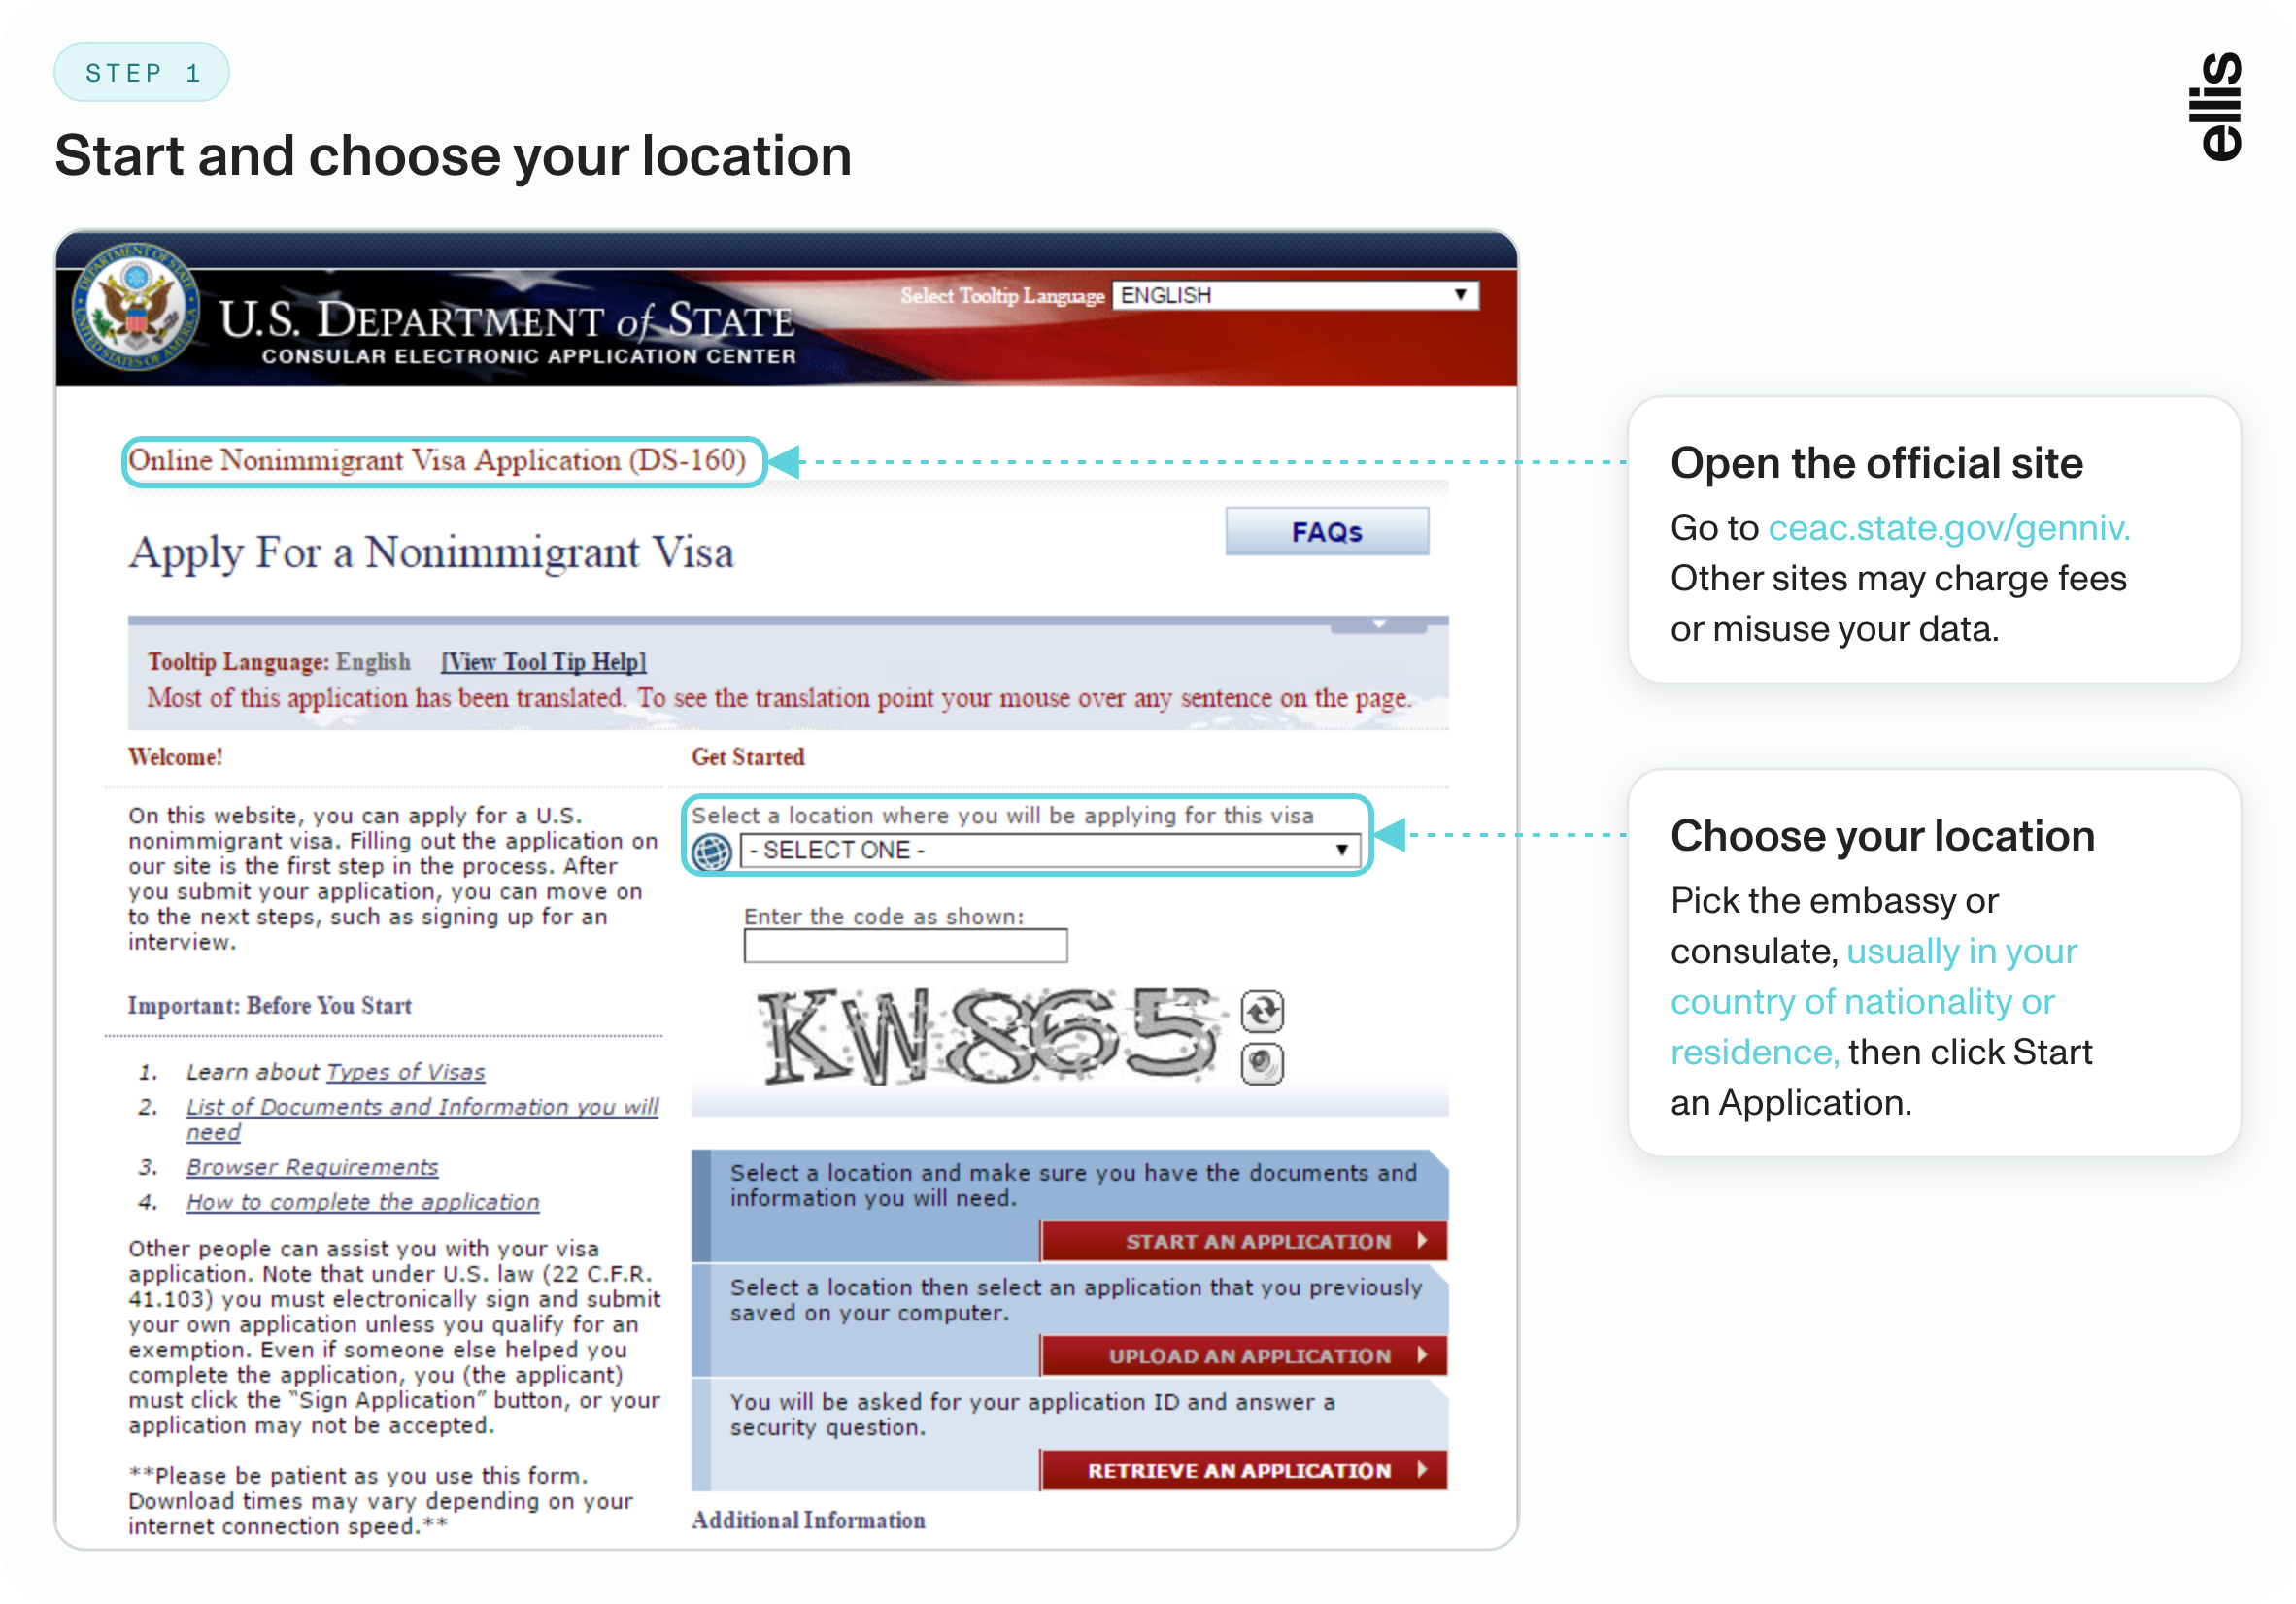
- Open the official site and choose your location. Go to ceac.state.gov/genniv and pick the embassy or consulate in your country of nationality or residence.
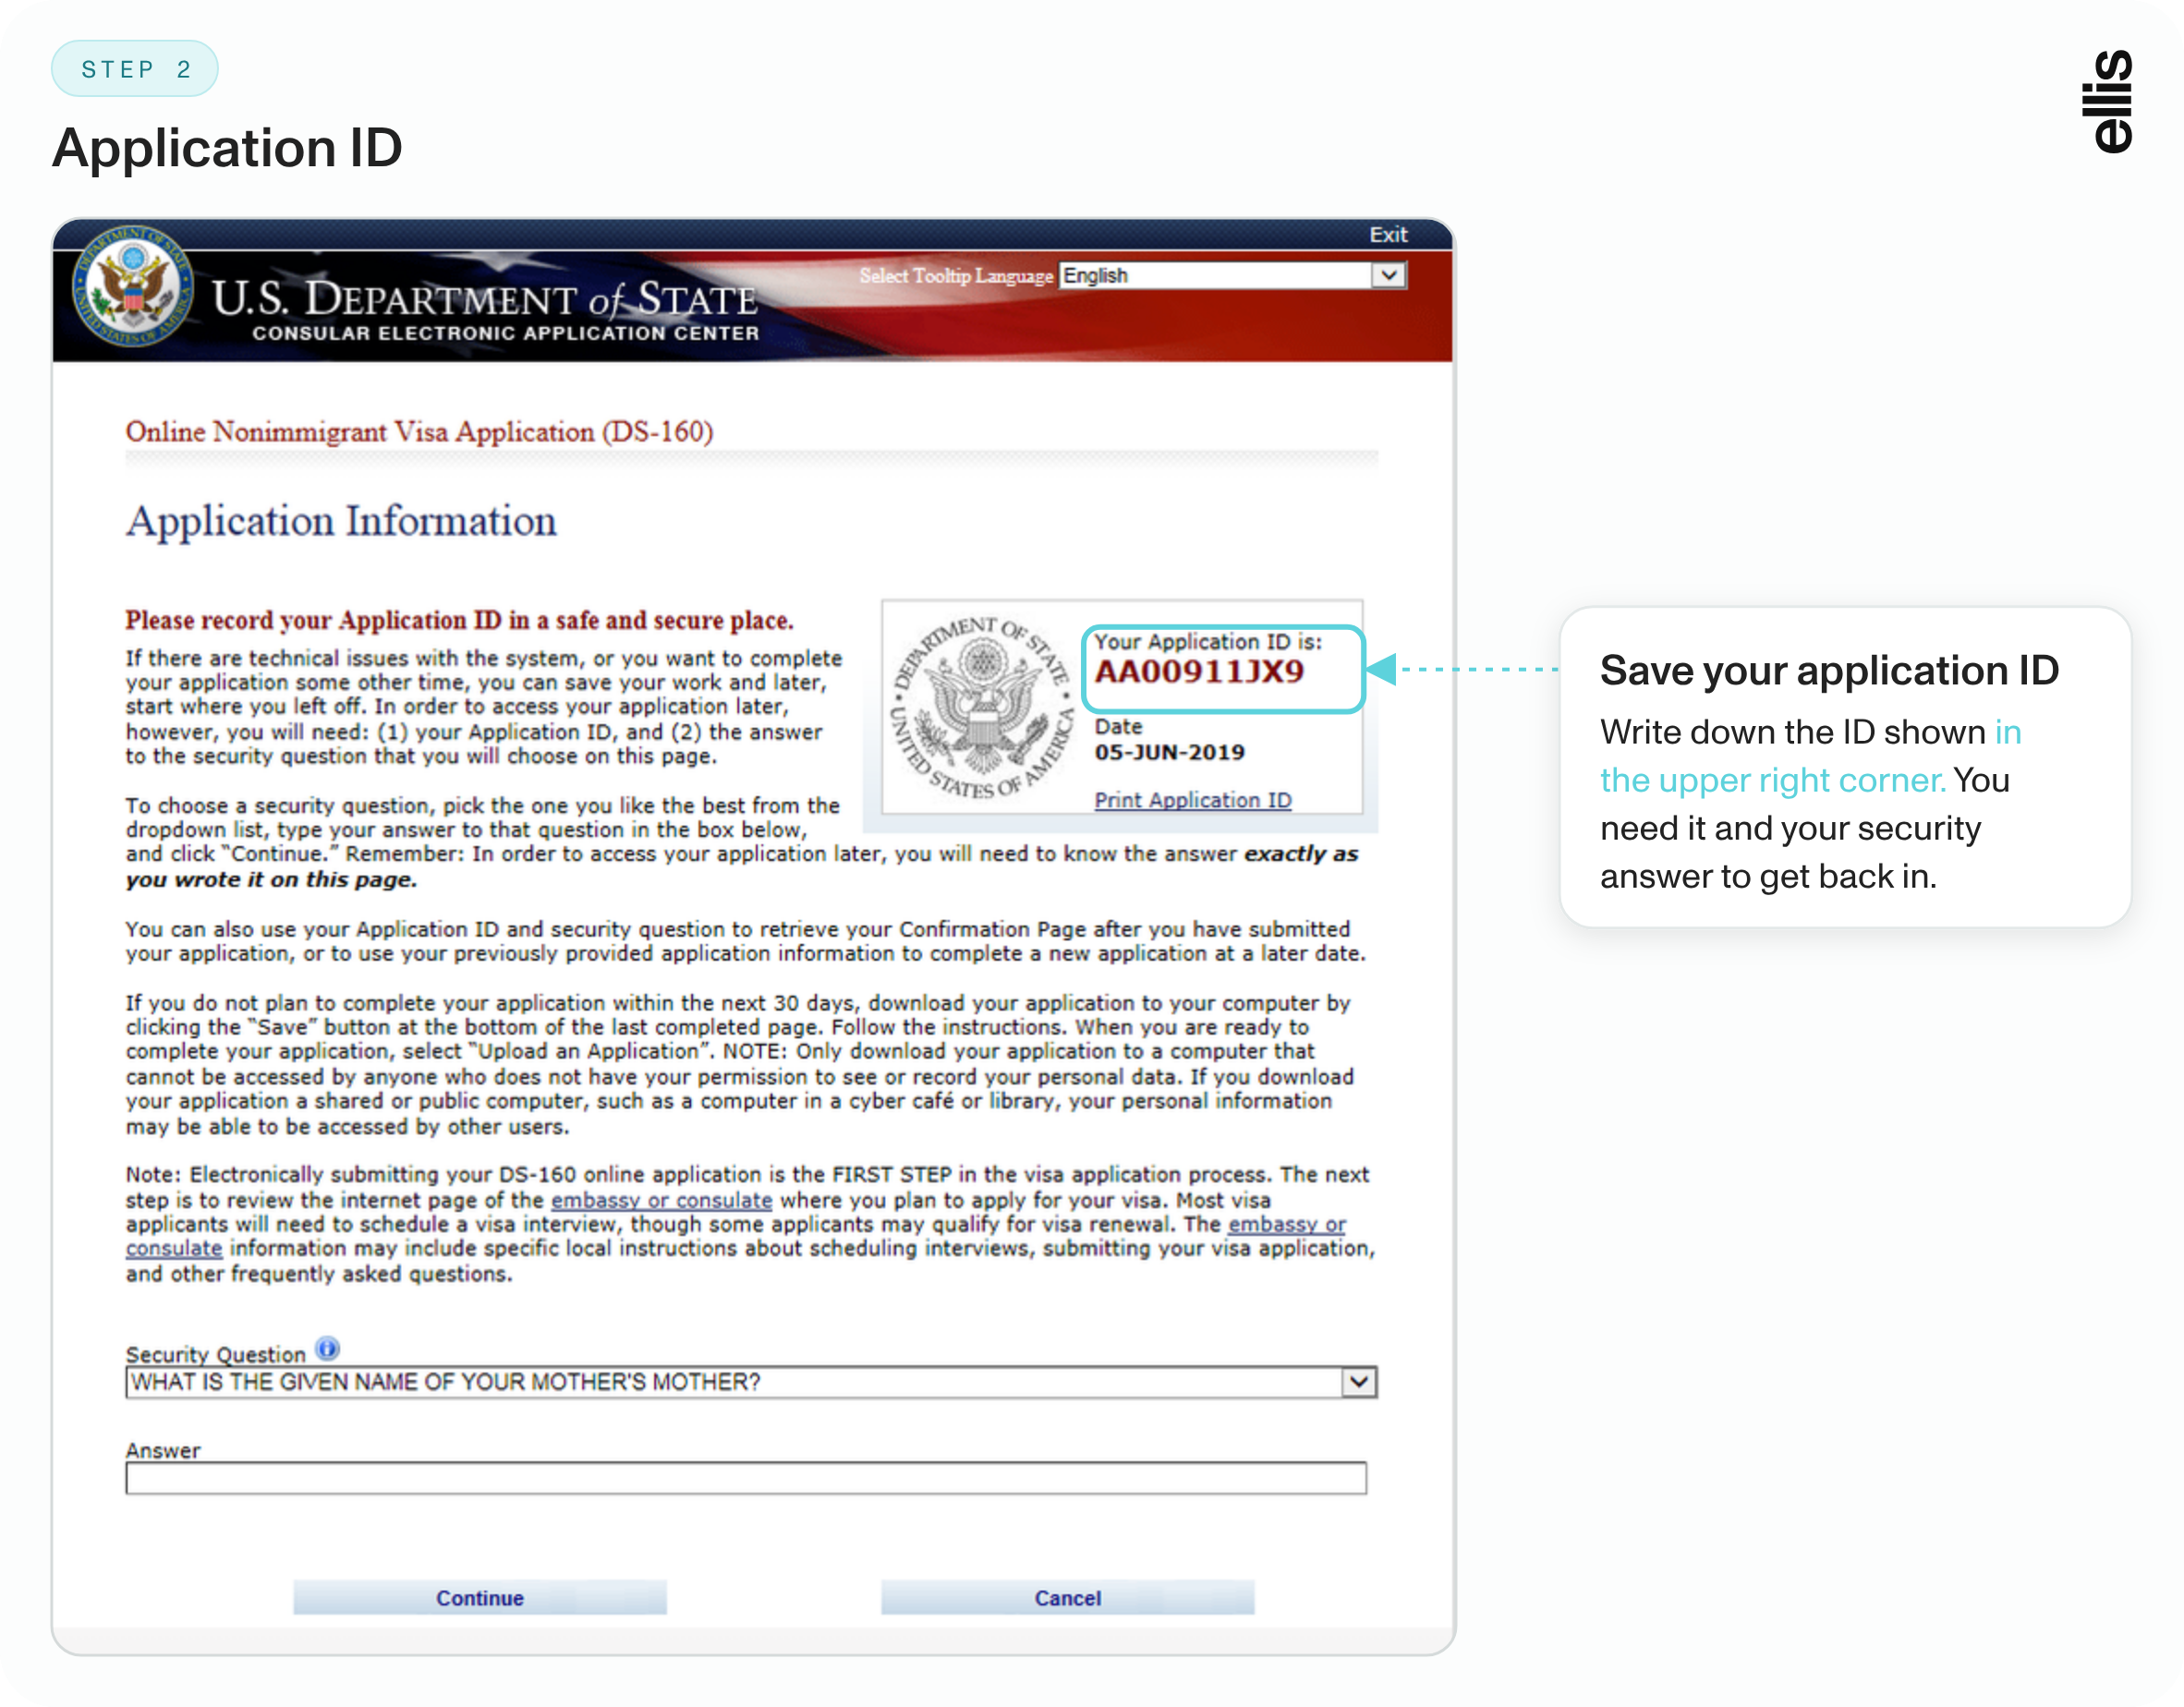
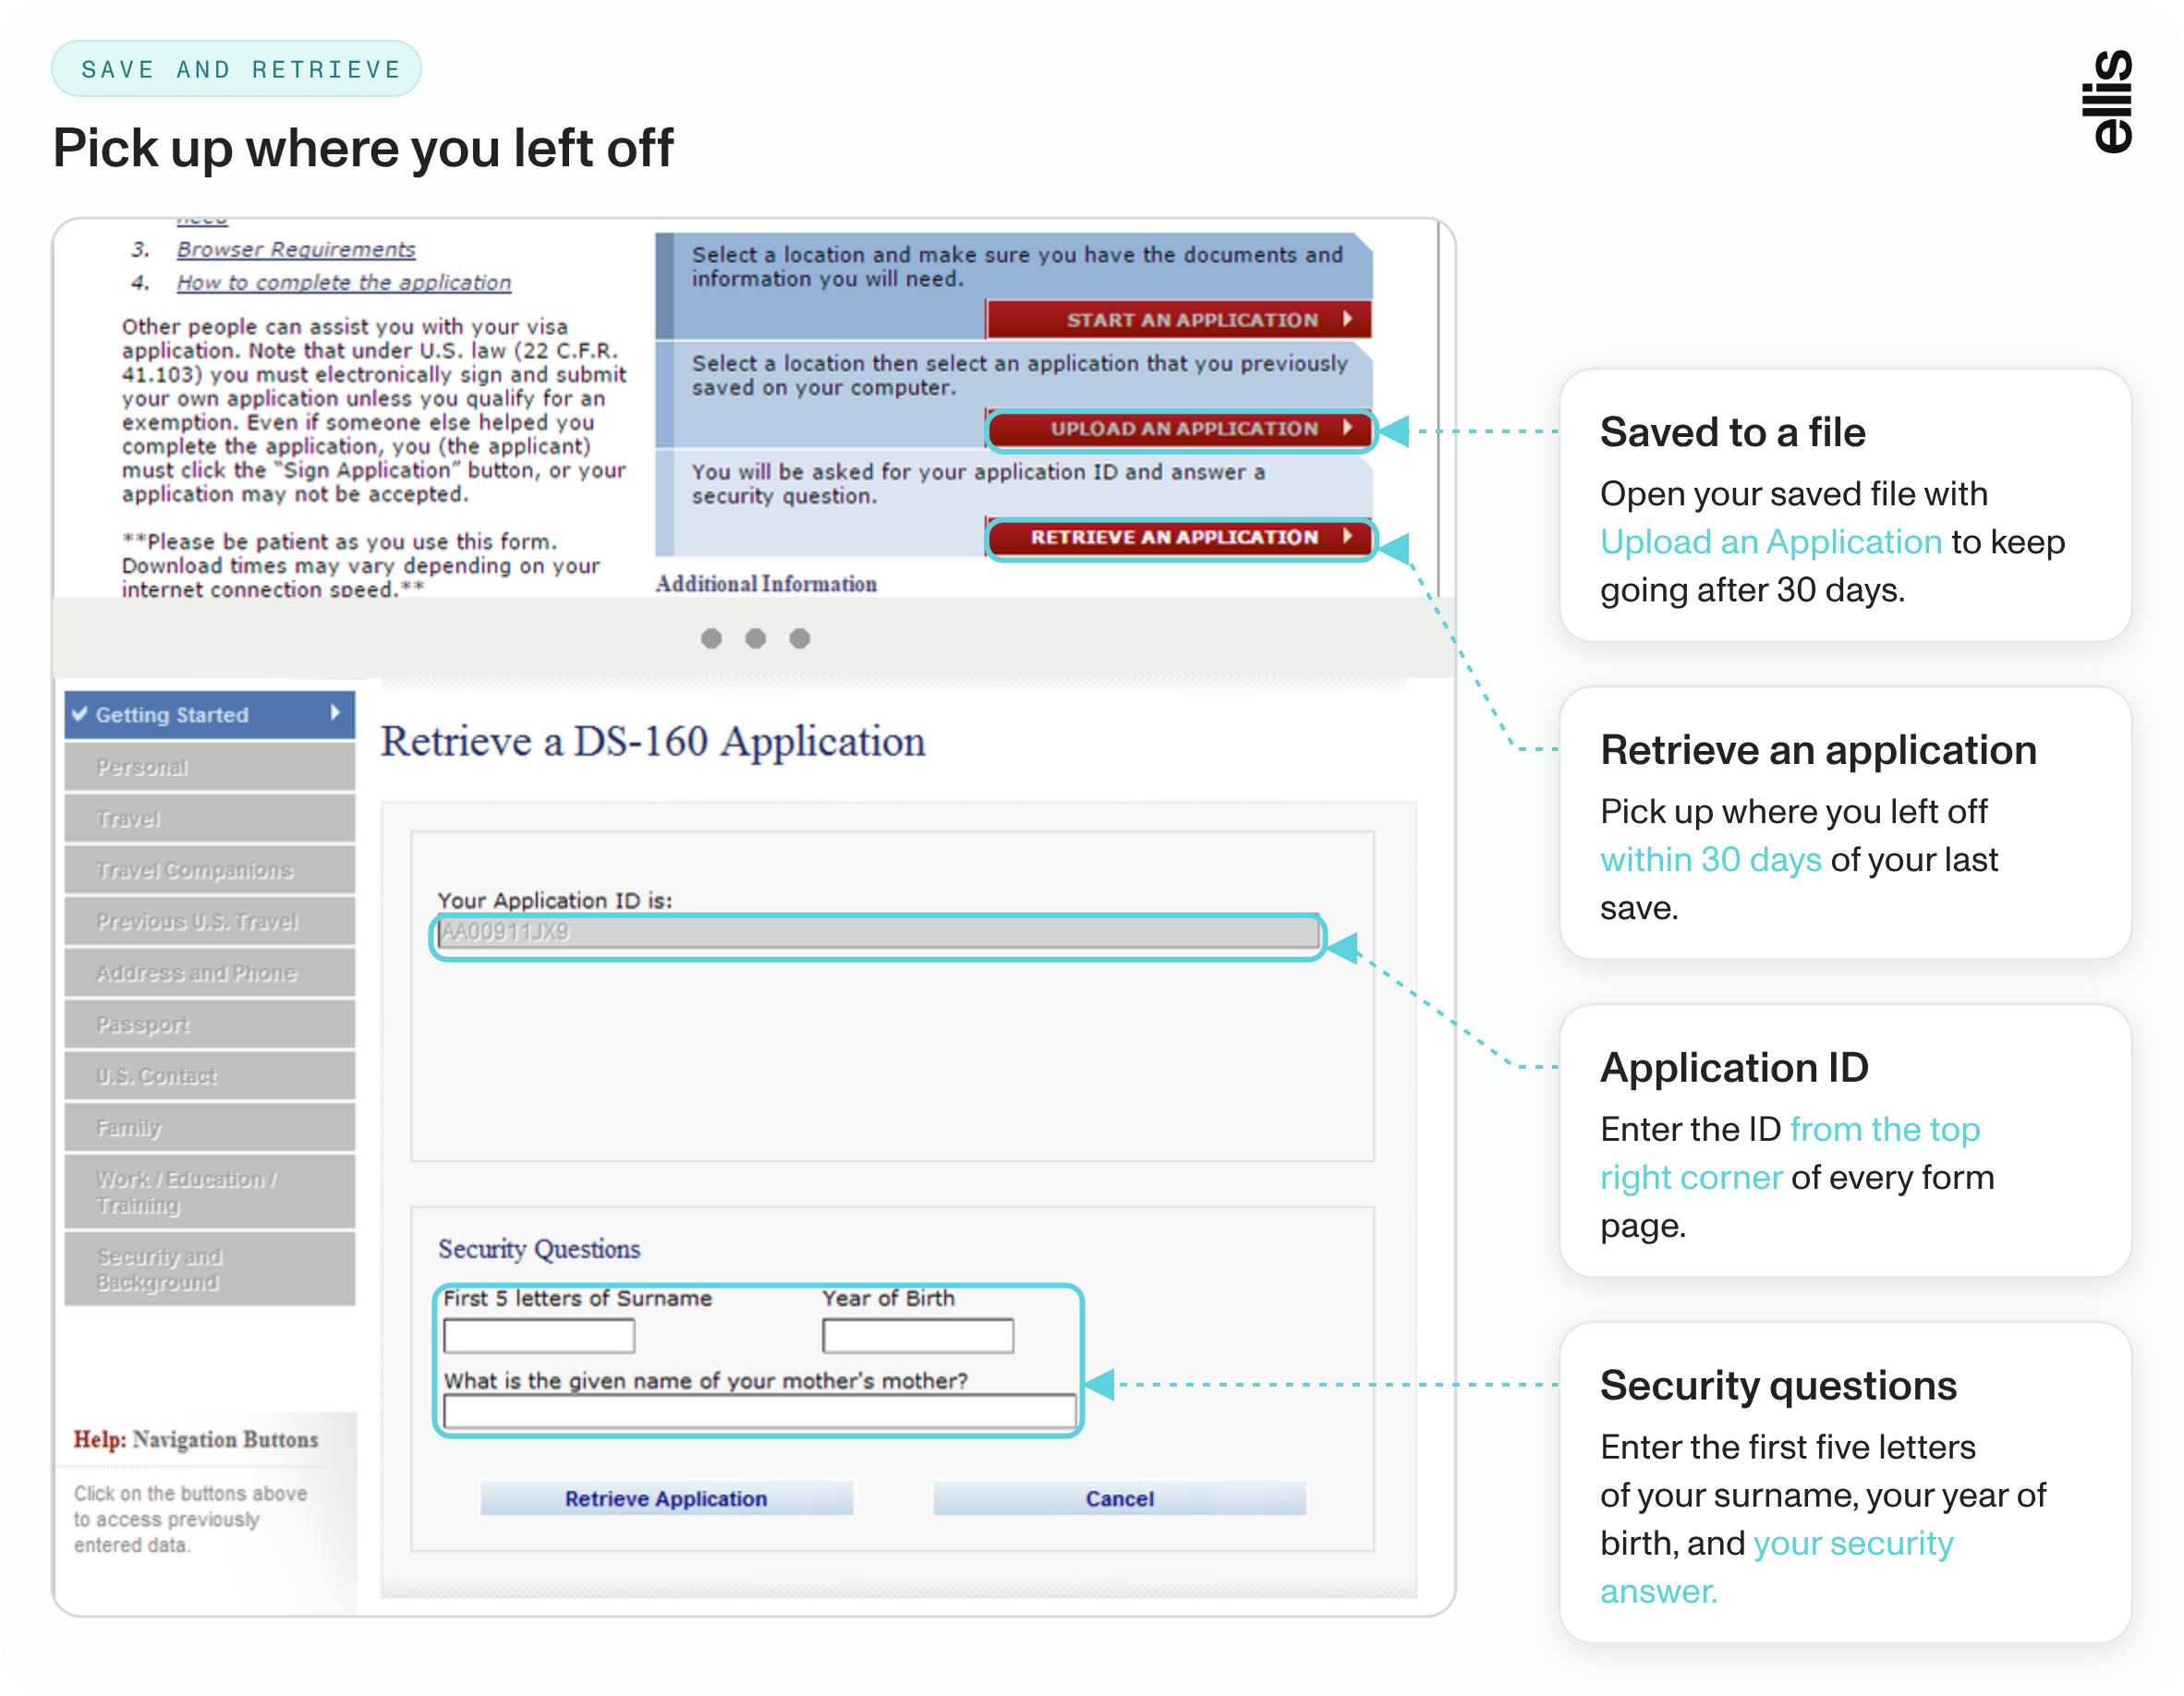
- Save your application ID. The system assigns an application ID number, shown in the upper right corner of each page. You also pick a security question. You need both, plus your year of birth, to return to your form later.
Two rules apply to every page of the form:
- Answer in English. The DS-160 must be completed in English without jargon, using English letters. The one exception is the field for your full name in your native alphabet. Translated help text is available in a language menu, but your answers must be in English.
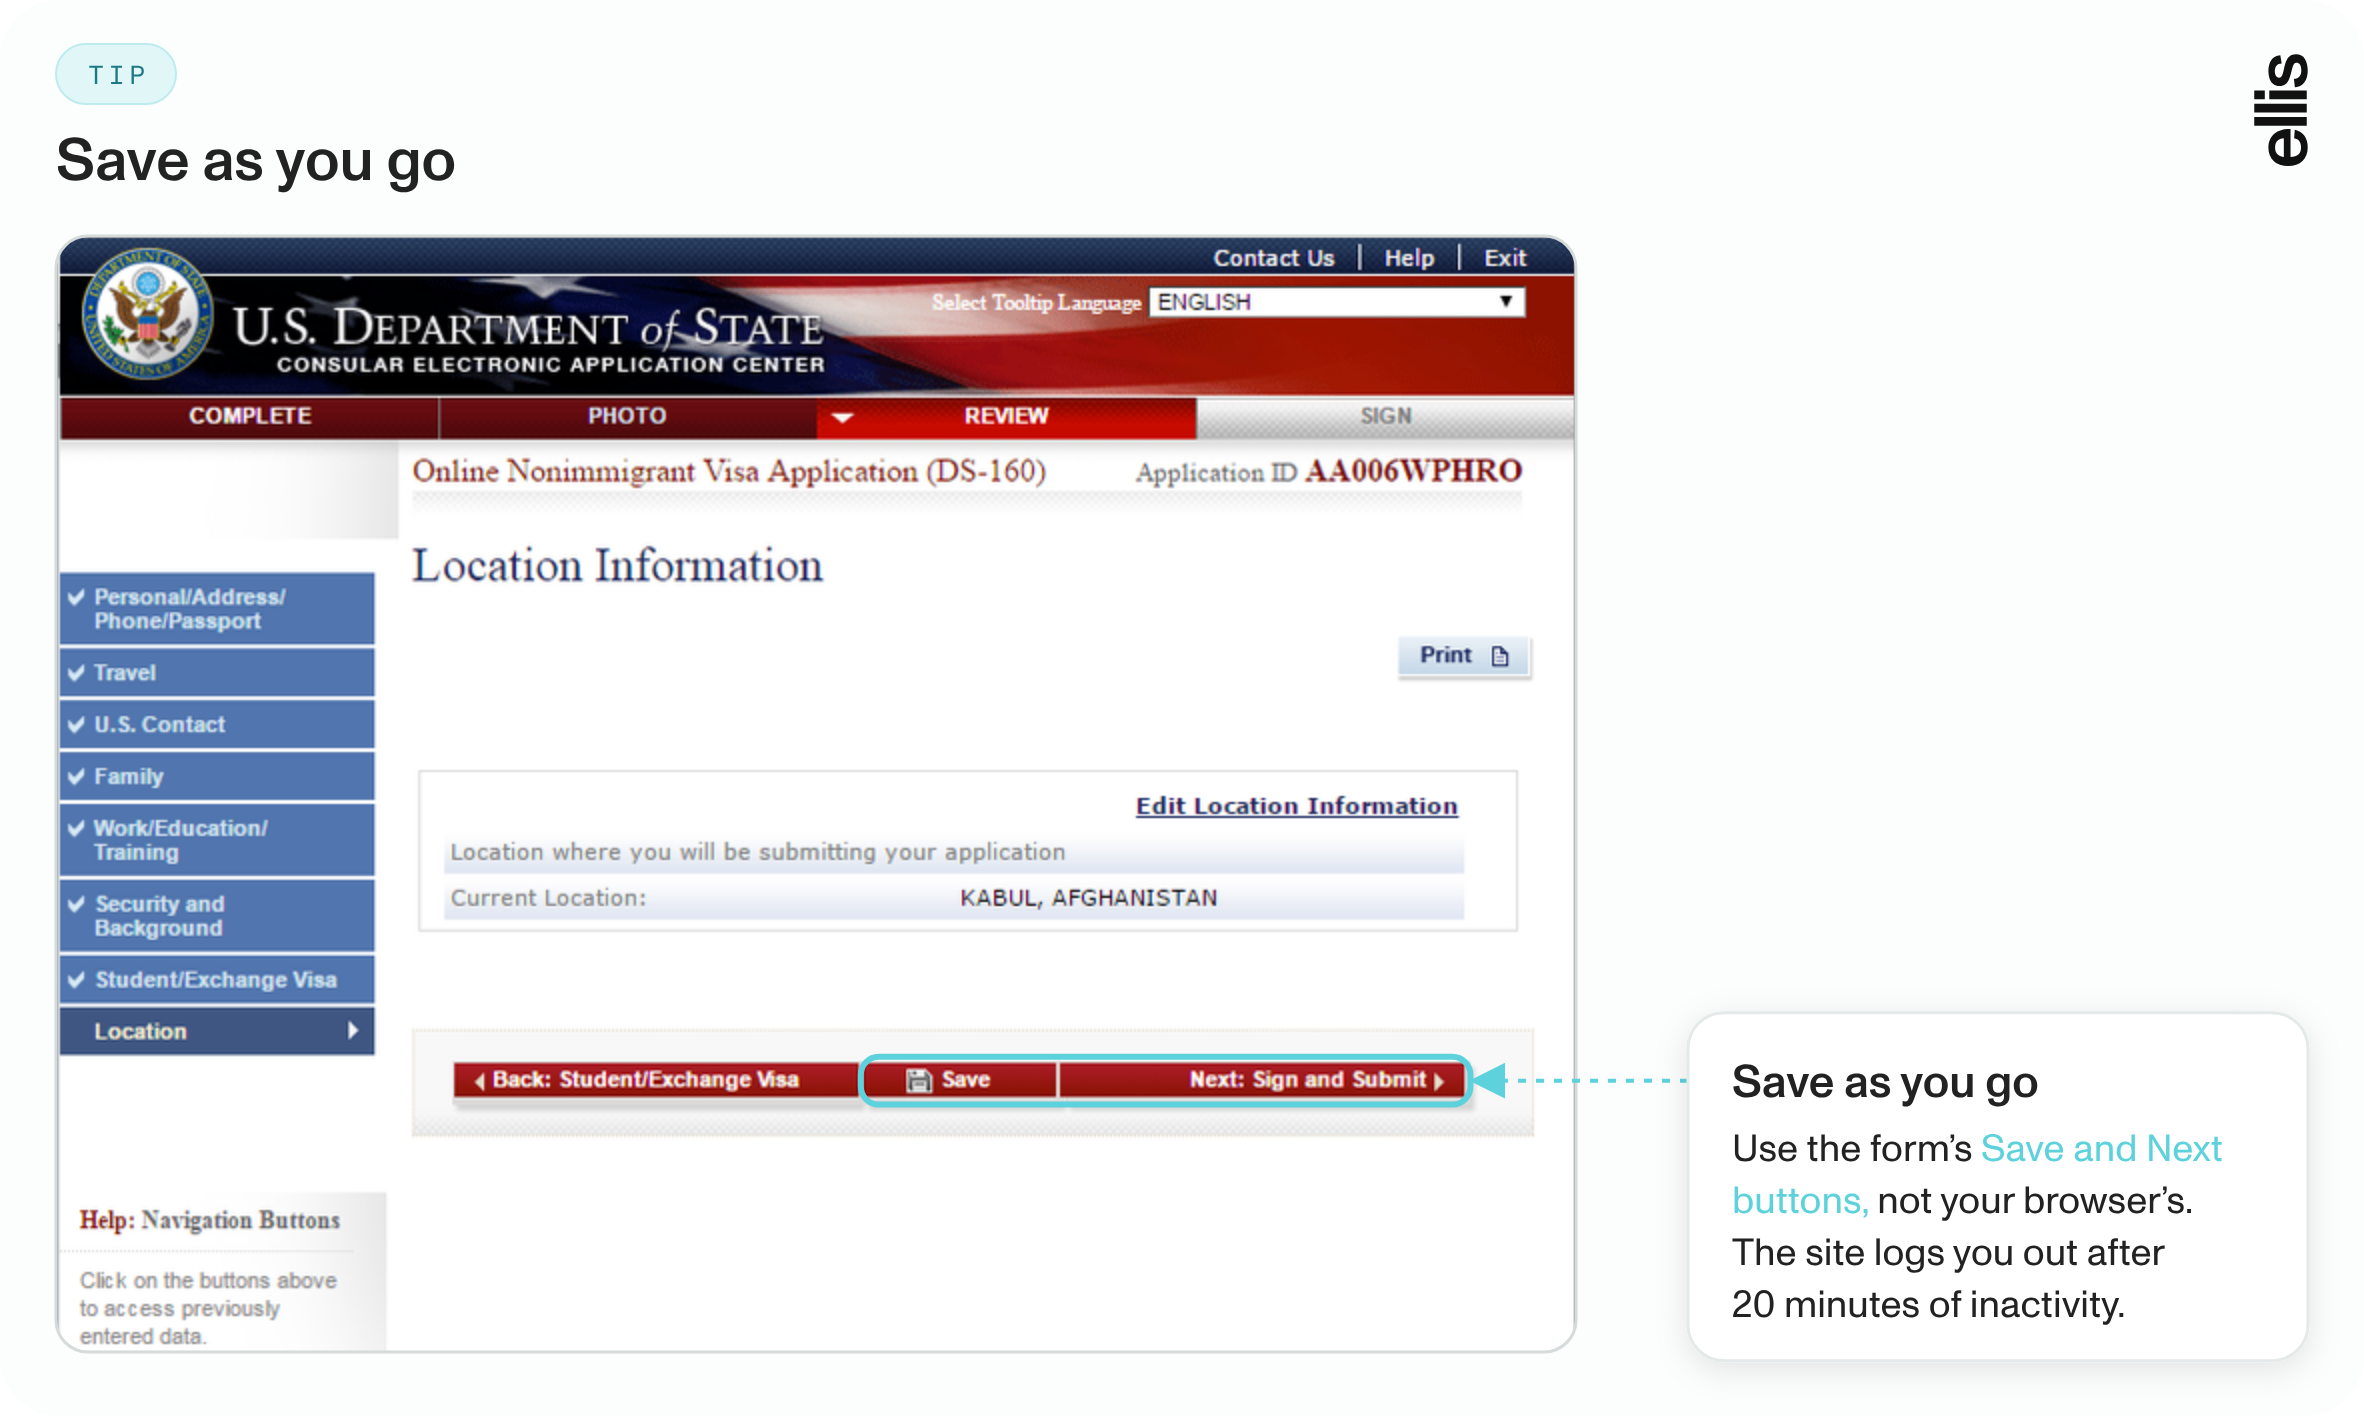
- Save as you go. The site logs you out after 20 minutes of inactivity, and anything unsaved is lost. Use the Next and Back buttons on the form itself, not your browser's buttons.
The CEAC site is designed for Chrome, Edge, or Firefox. Using a different browser can cause errors partway through the form.
- Fill out each section in order. The form goes through personal information, travel, contacts, passport, US contact, family, work and education, and security and background questions.
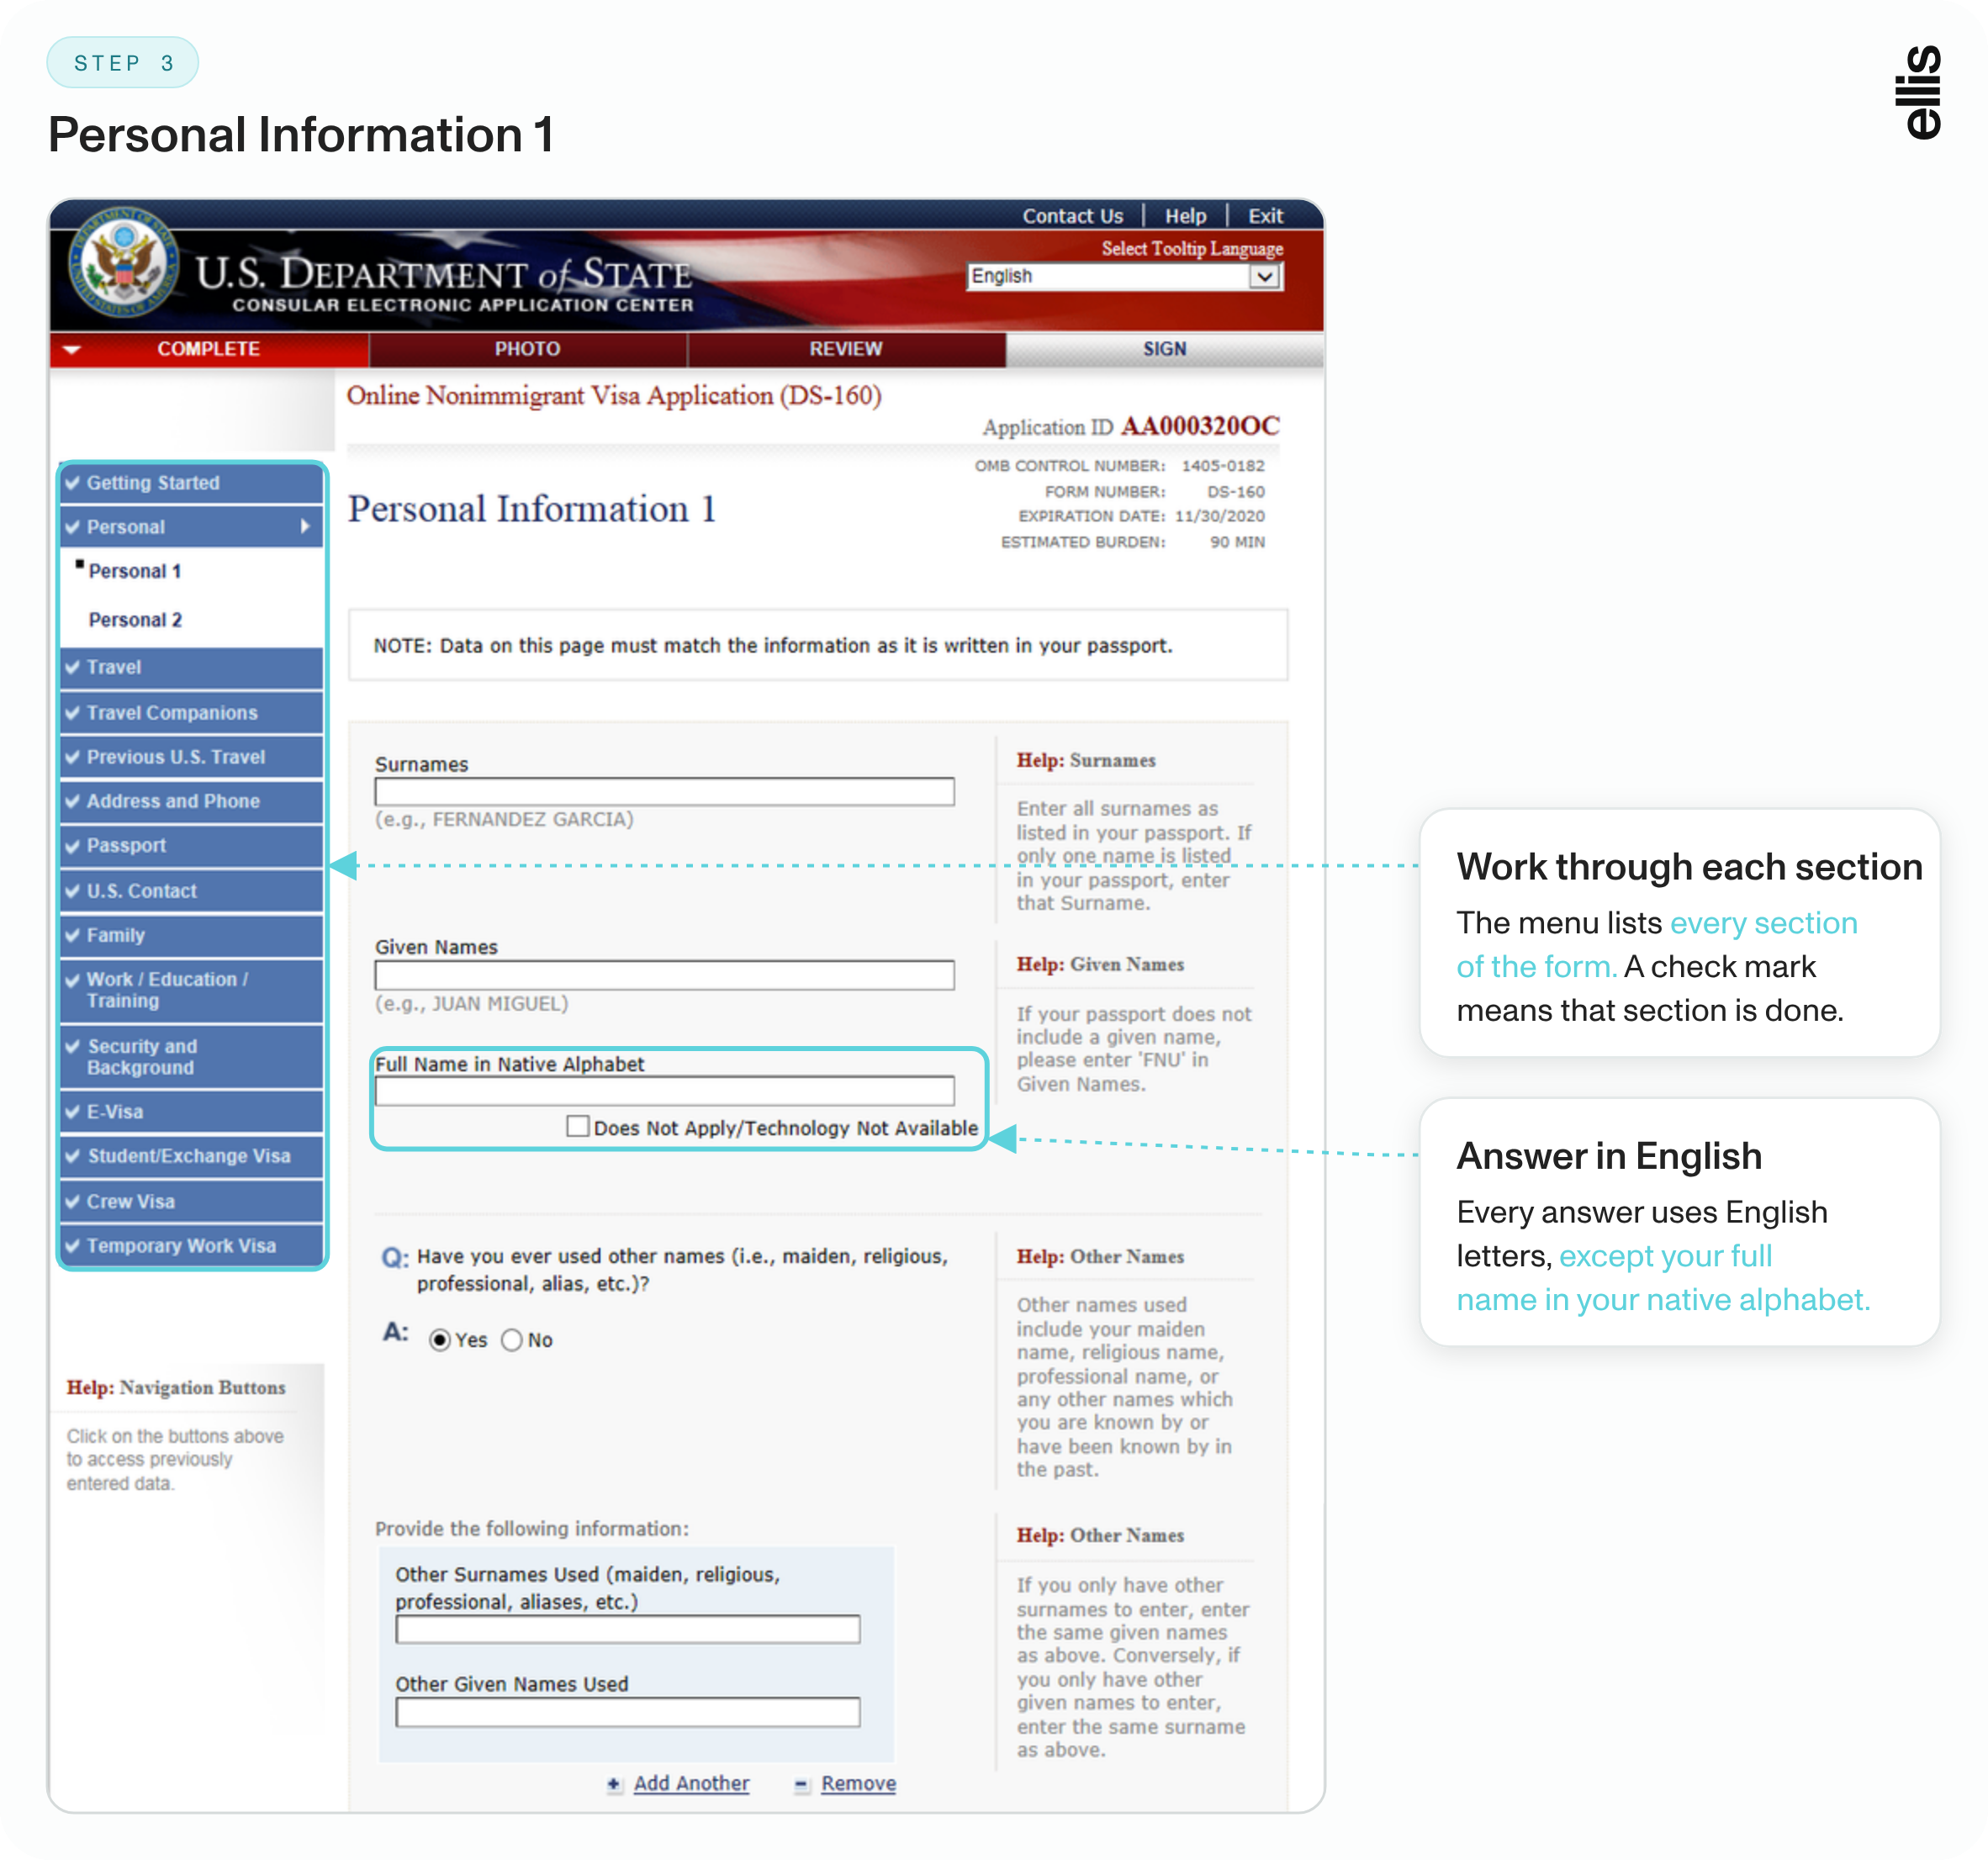
What does each section of the DS-160 ask?
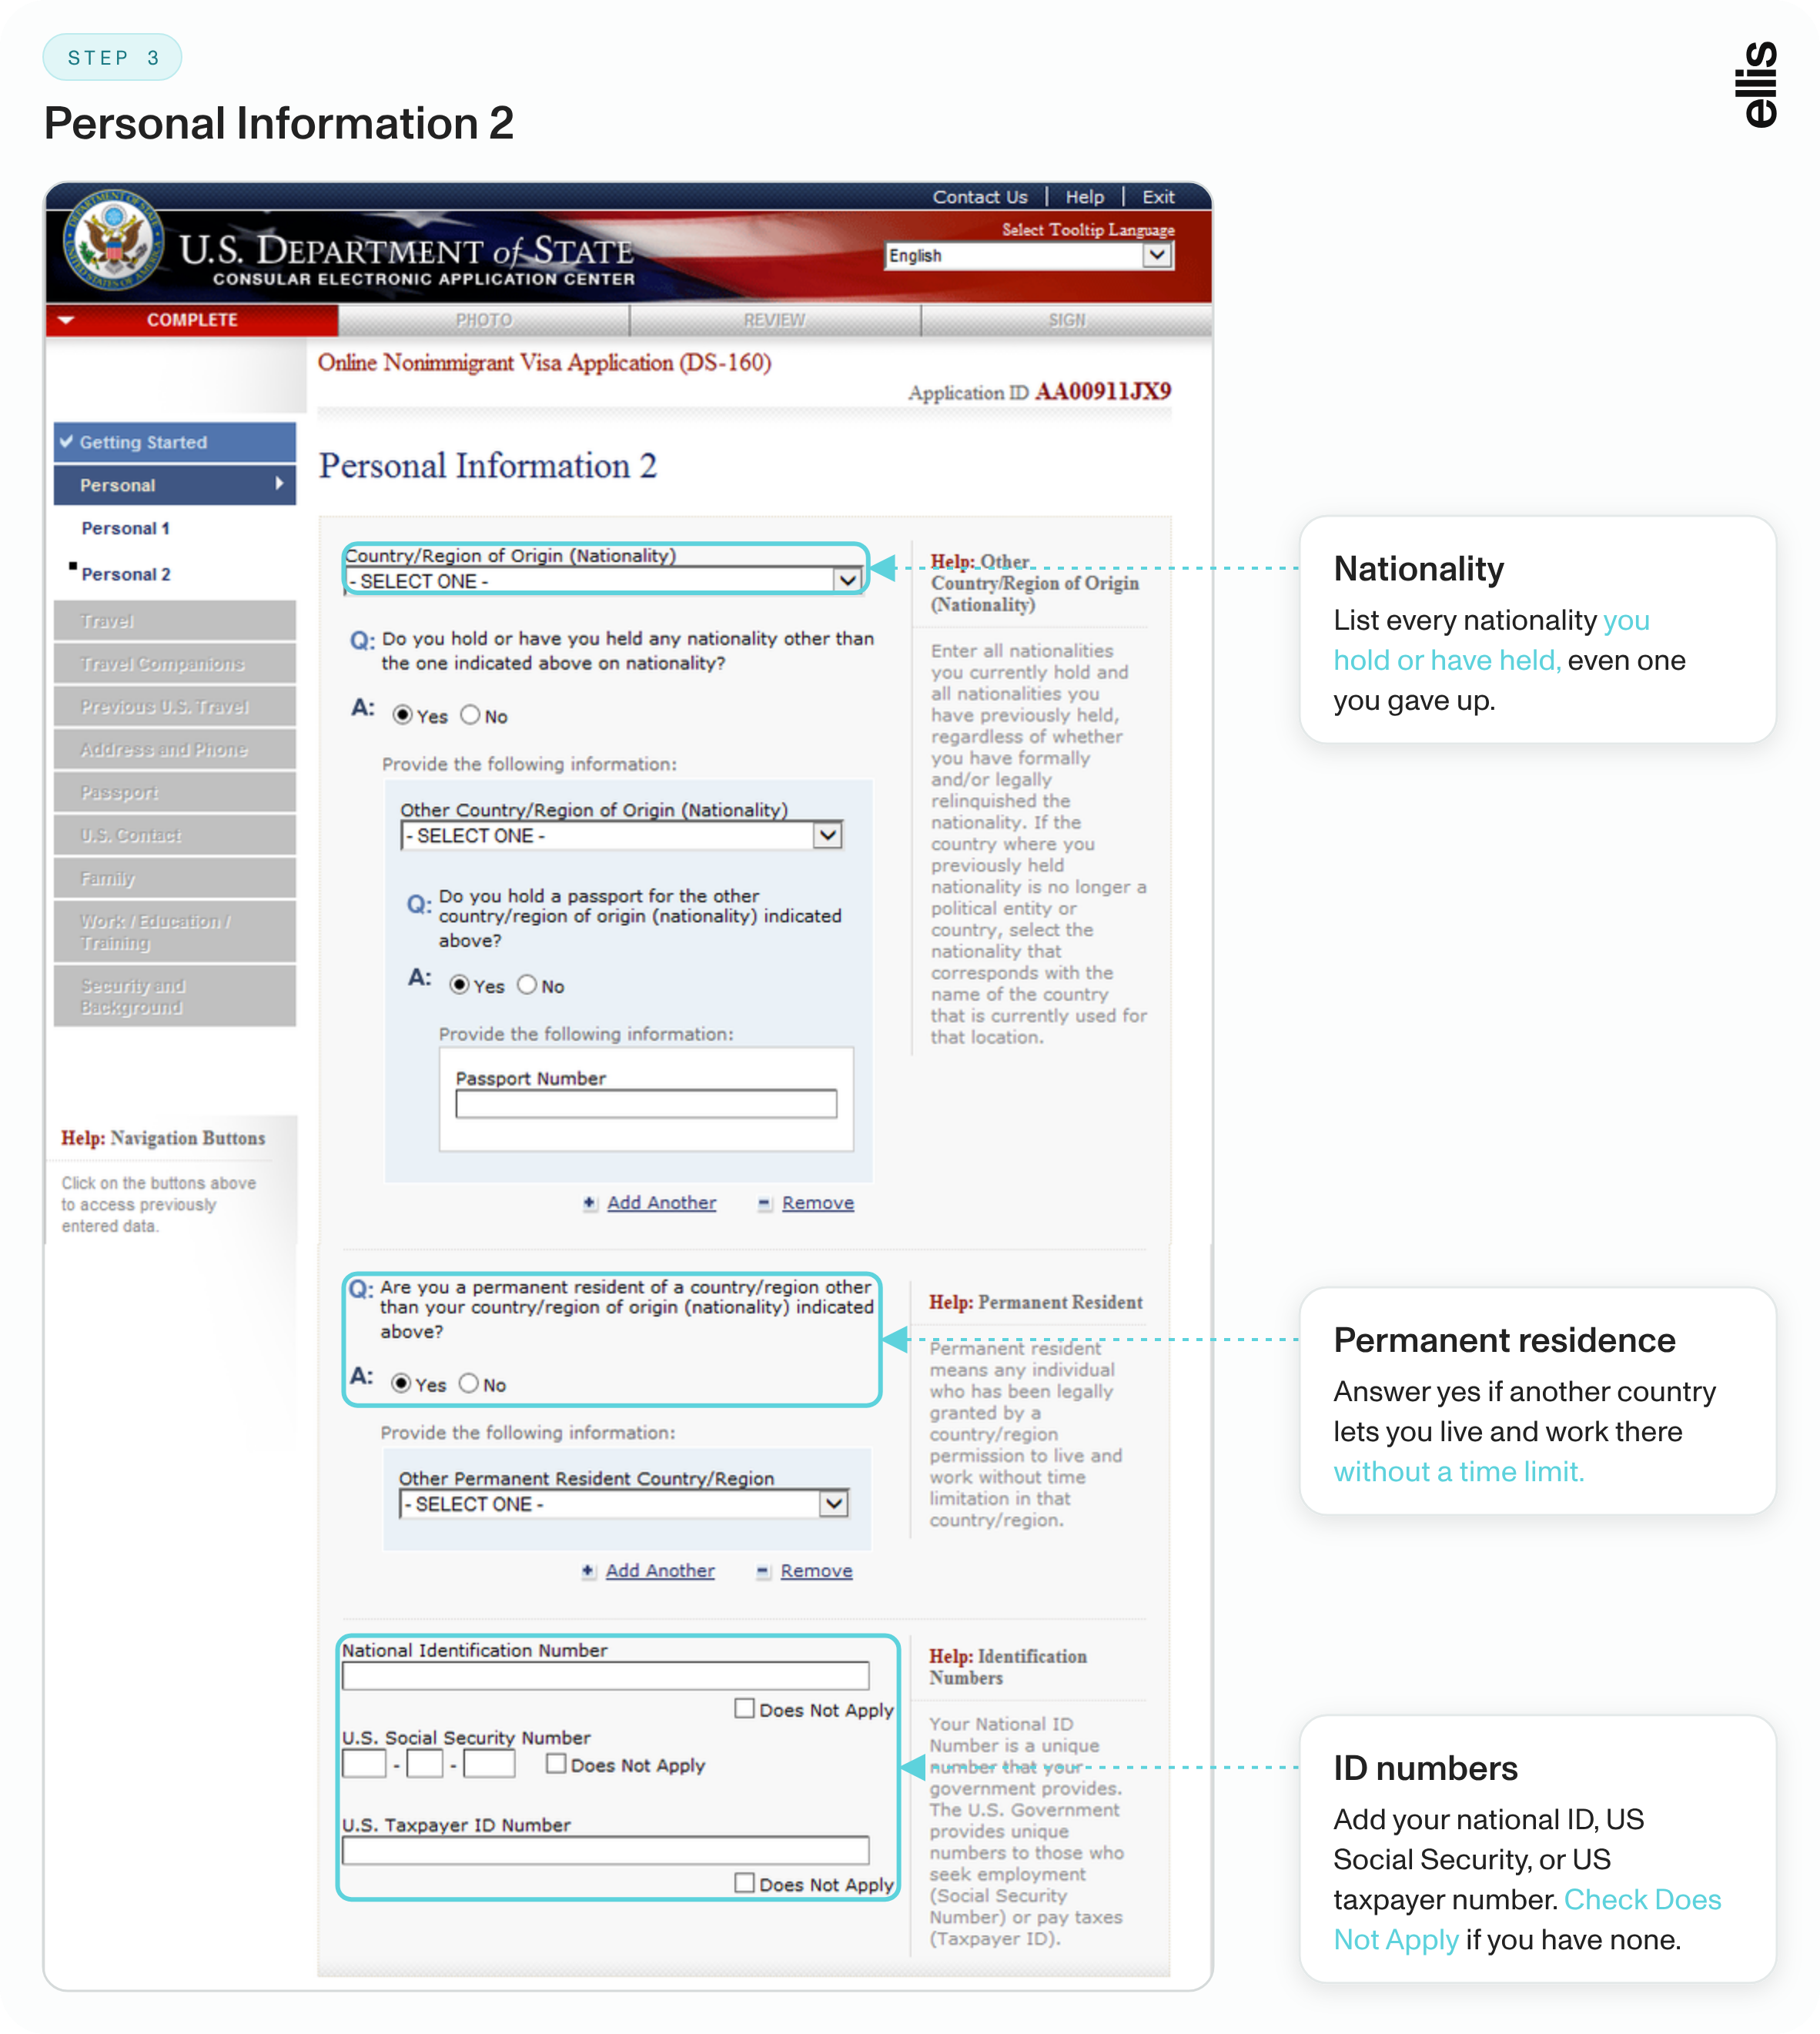
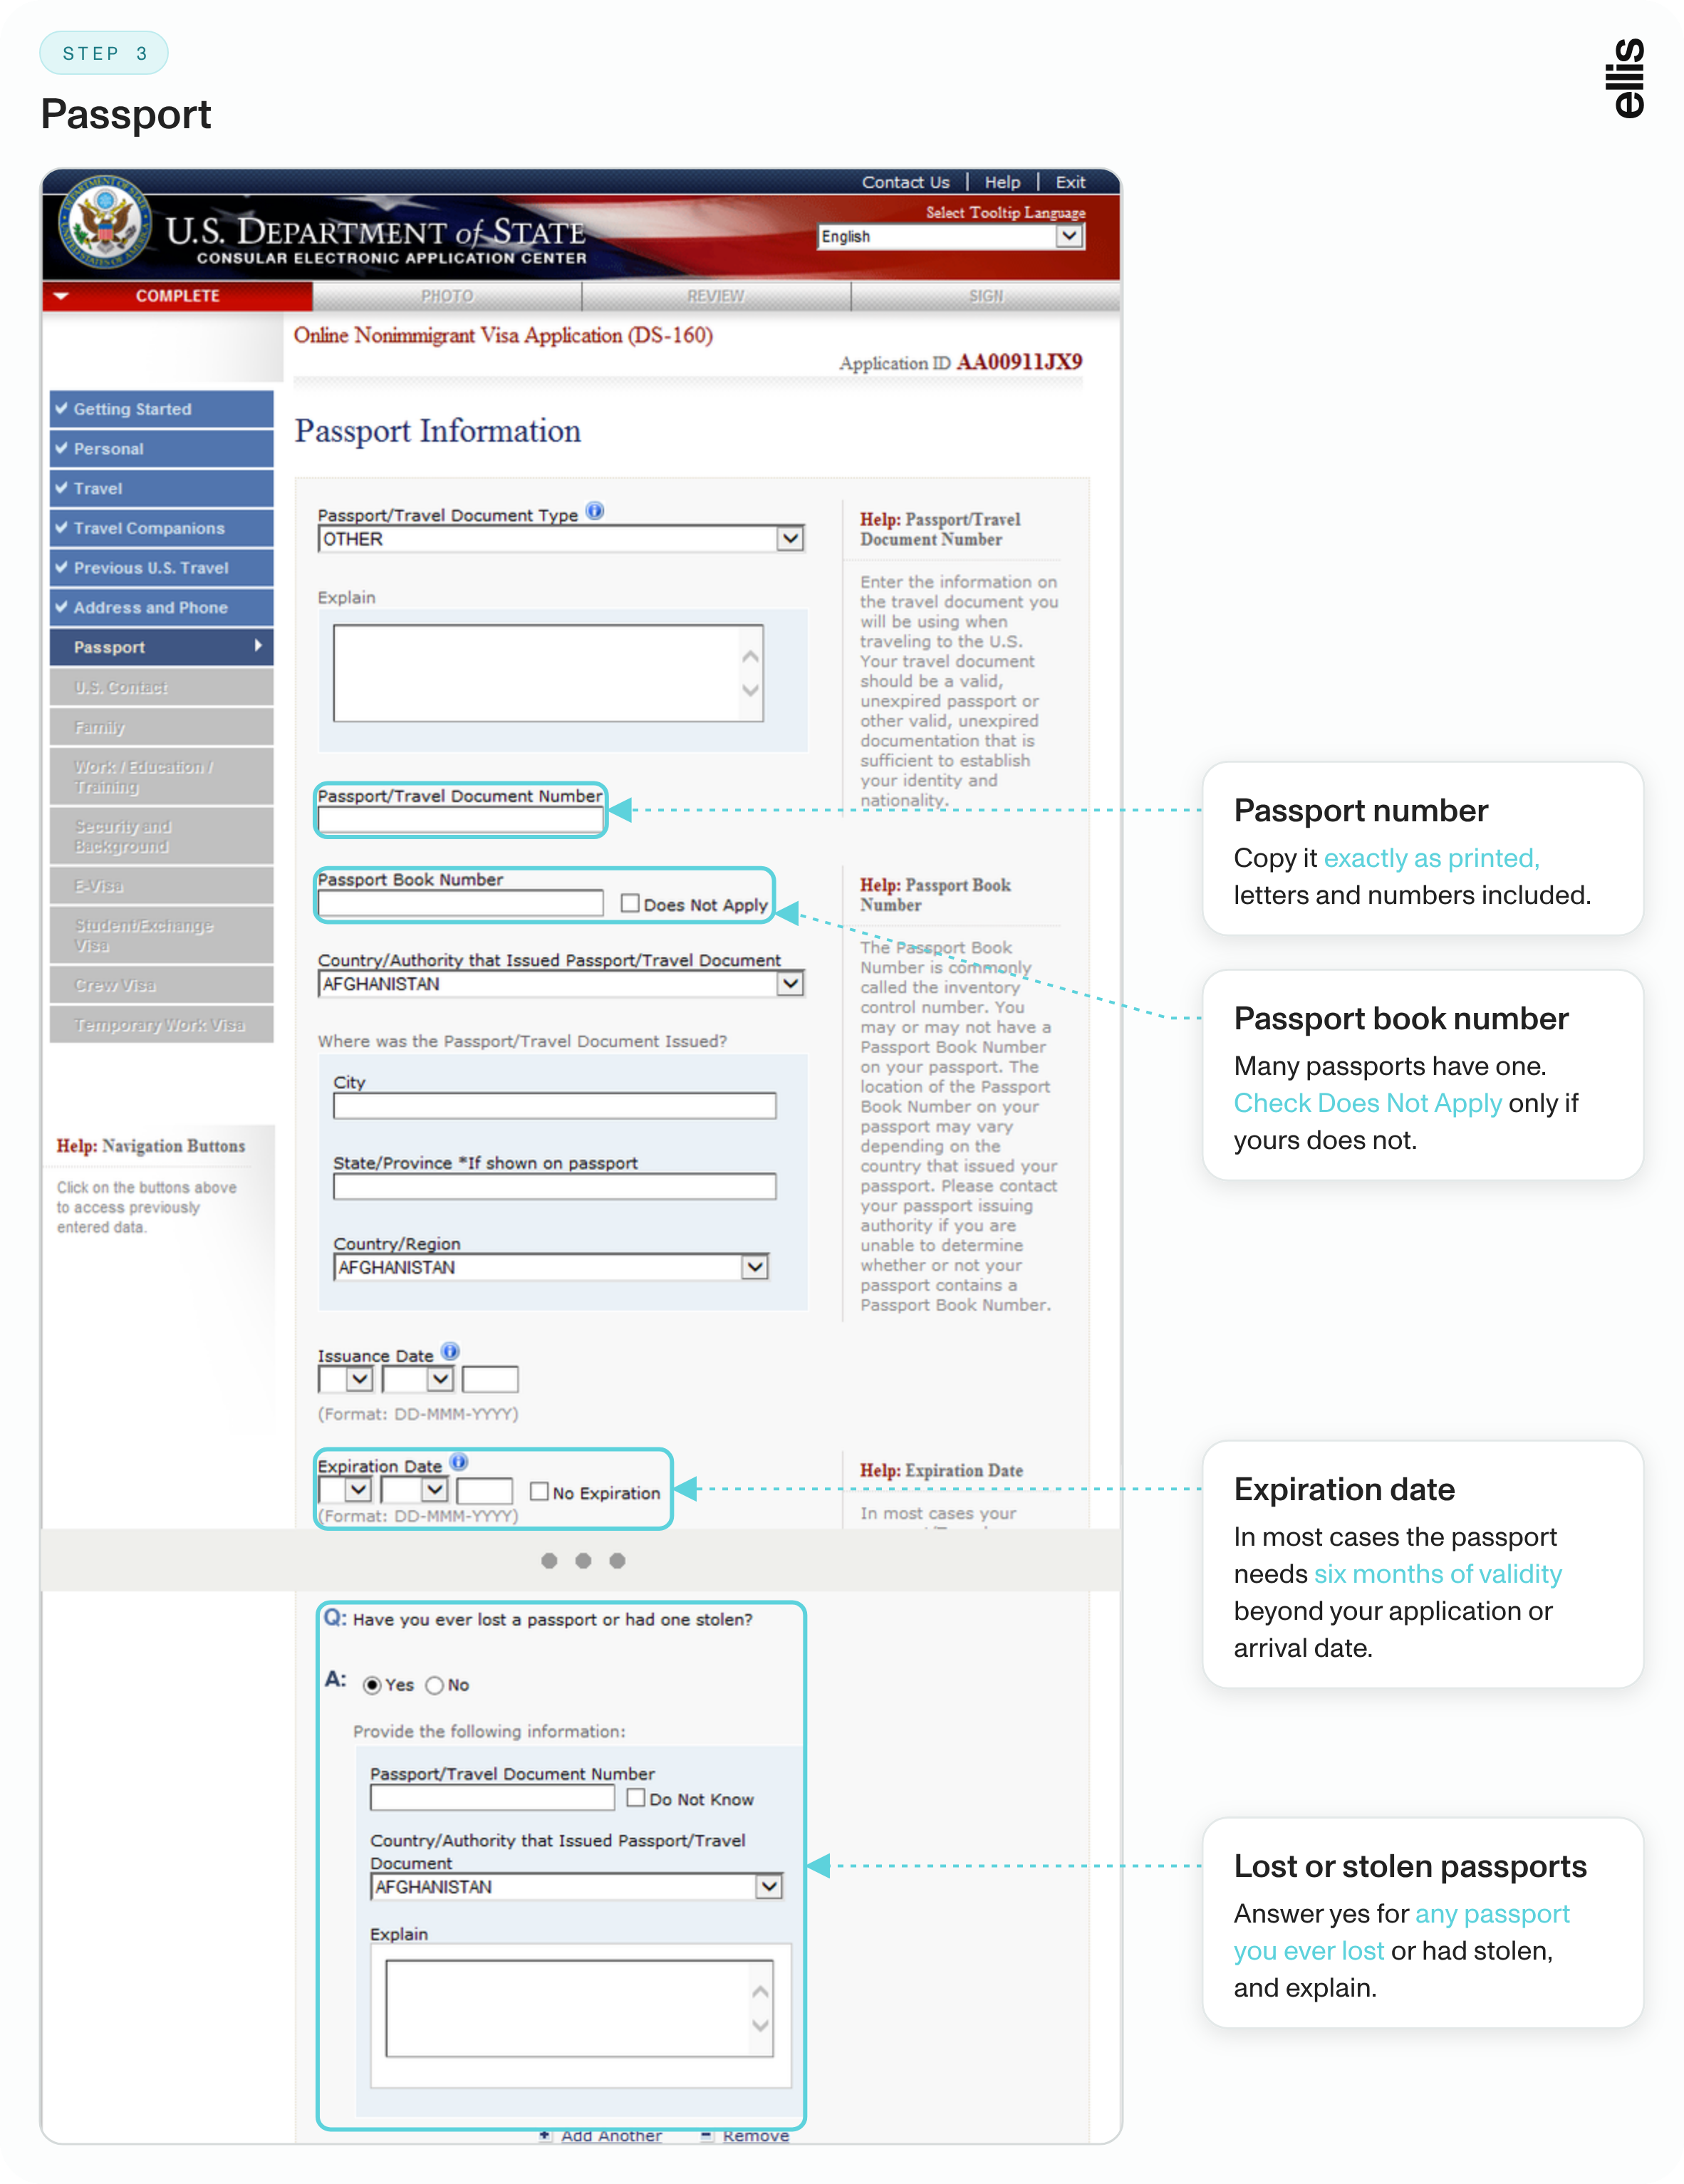
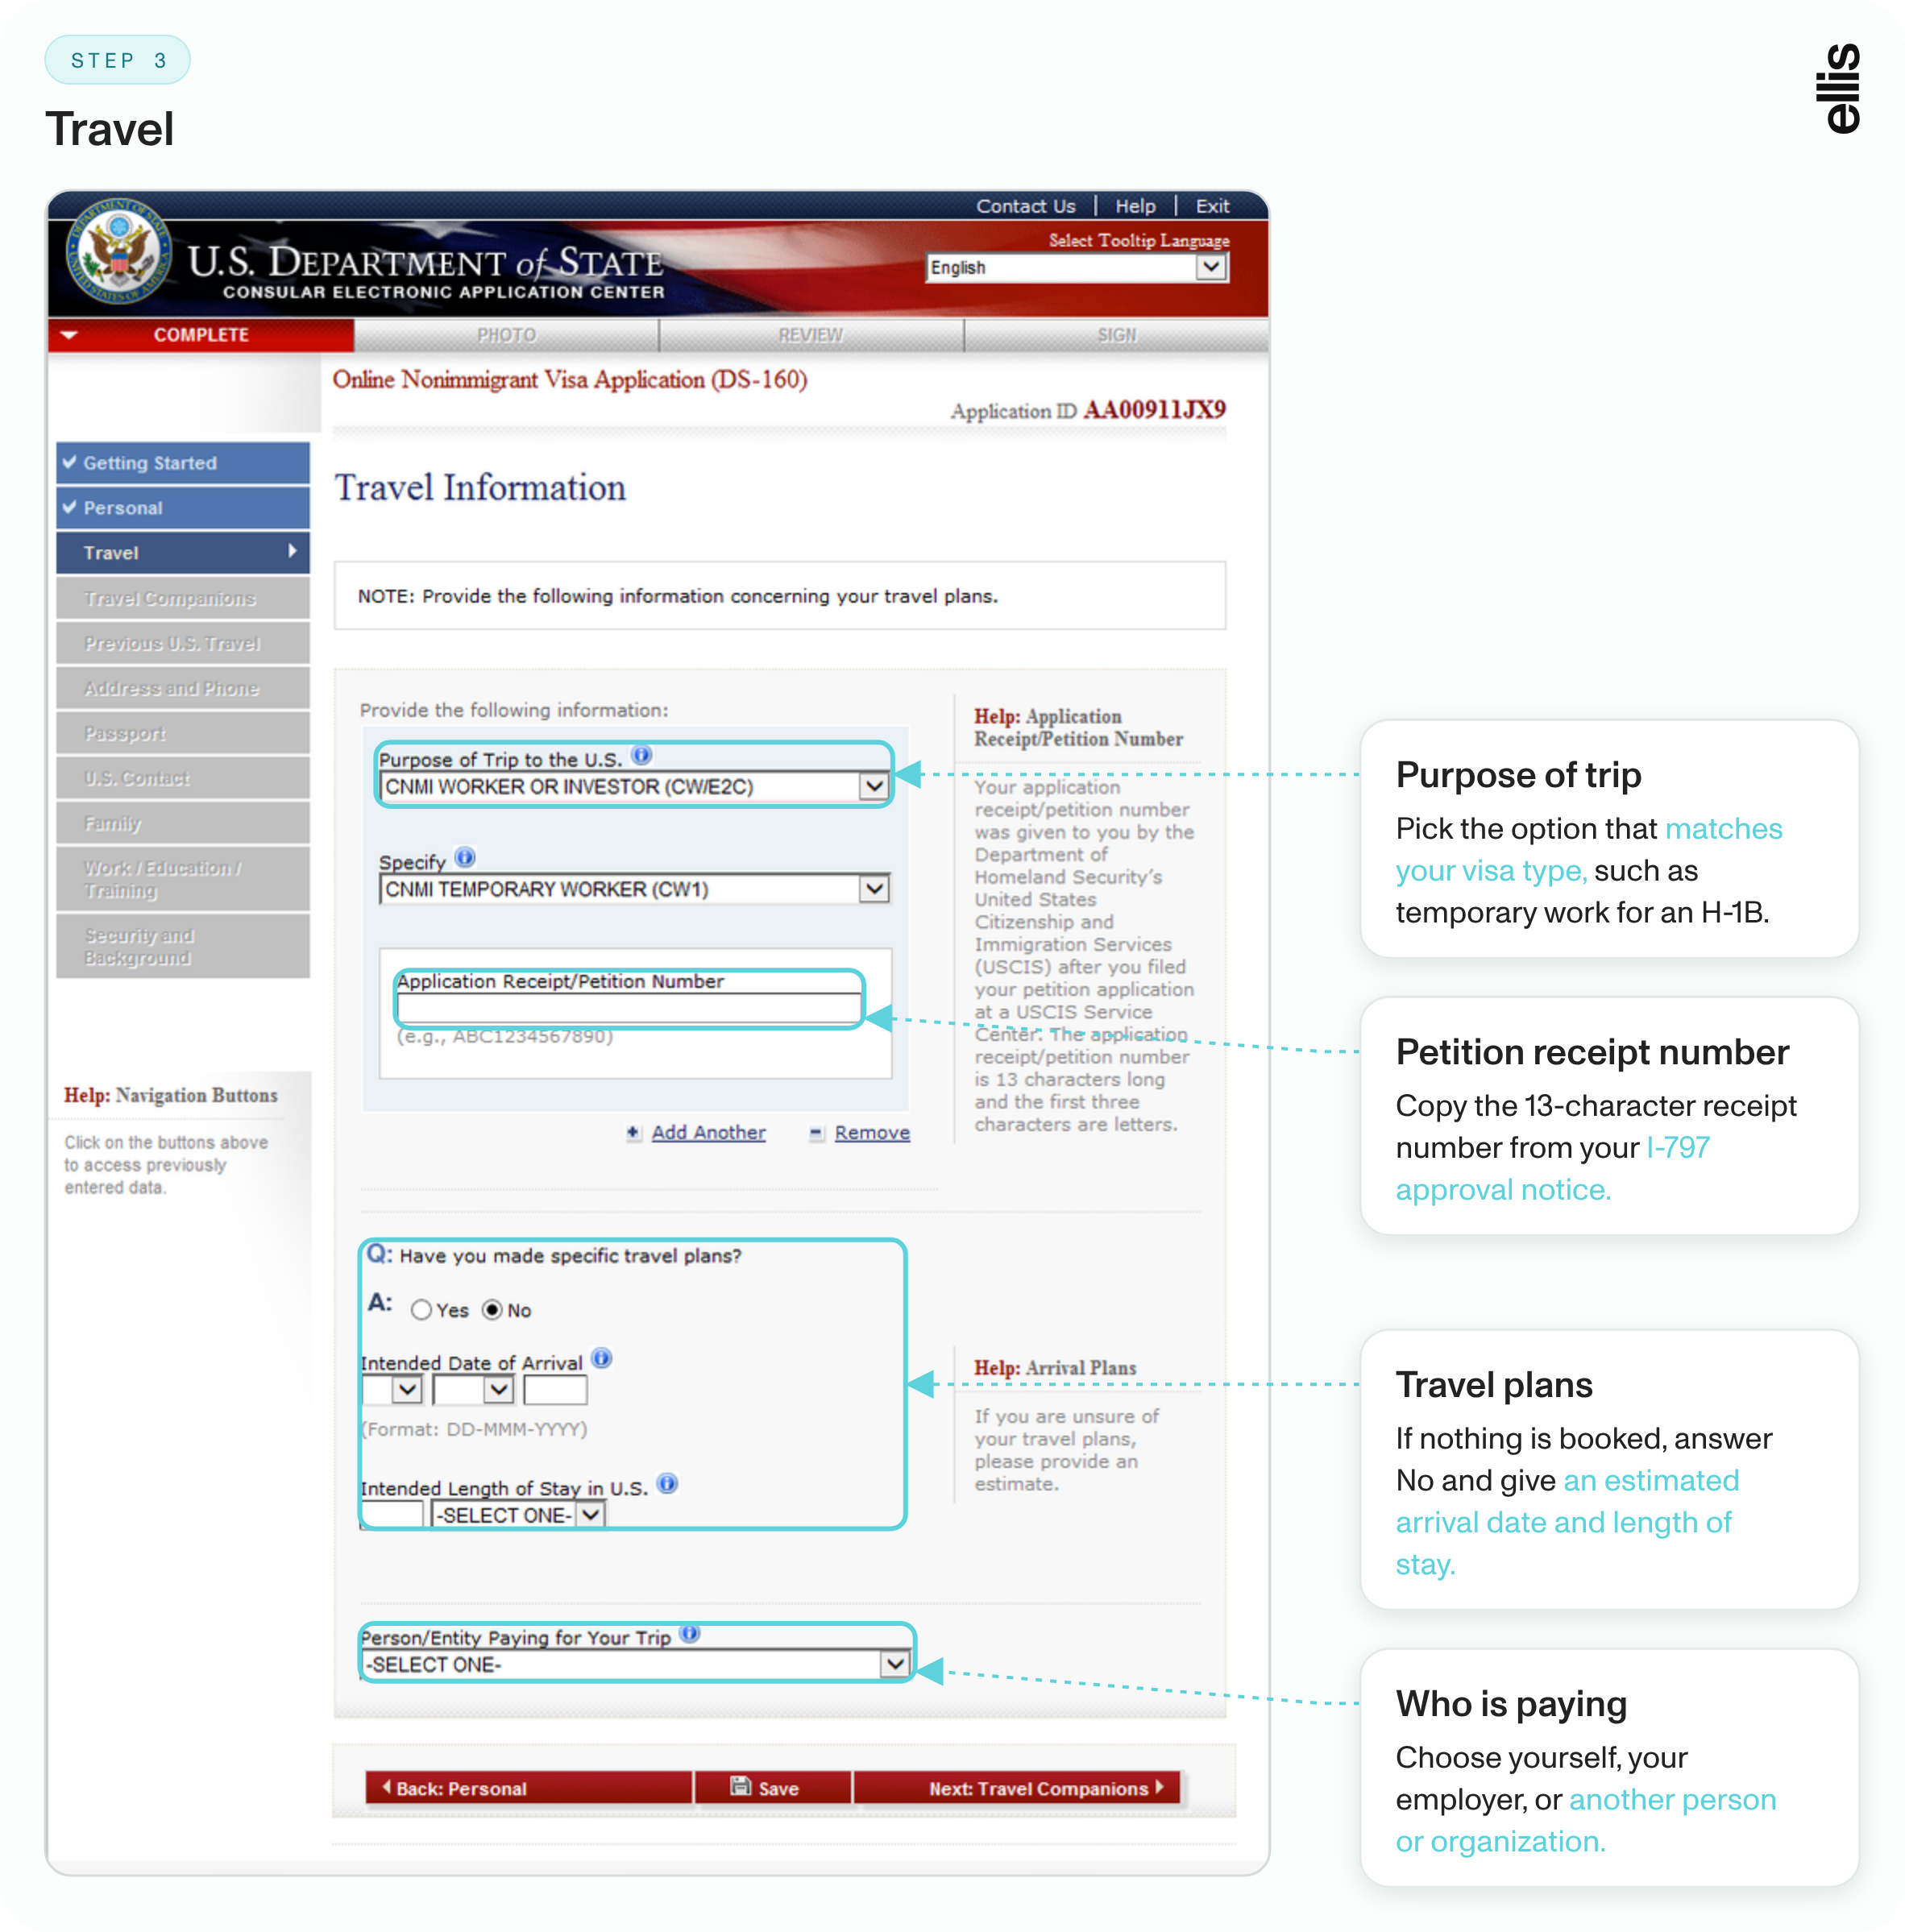
The DS-160 asks about your identity, travel plans, past US visits, contact details, passport, US contact, family, work and education history, and security background. Here is what to do on each page, with a screenshot of each one.
Personal and passport information
Personal Information 2: List every nationality you hold or have held and any permanent residence in another country. Enter your national ID, US Social Security, or US taxpayer number if you have one. If not, check "Does Not Apply."
Passport: Copy the number, book number, and dates exactly as printed. Report any passport that was ever lost or stolen.
Your full name, date of birth, and passport number must match your passport exactly. A single letter out of place or a missing middle name is one of the most common causes of delays.
List any other names you have used, such as a maiden name or a different spelling, exactly as they appear on official documents. Officers check these against past visas, I-797 notices, and petitions. If your country of birth has changed names, list it as your passport shows it and be ready to explain at the interview.
Travel plans and purpose of trip
Travel: Say who is paying for the trip. Work visa applicants enter the petition receipt number from their I-797.
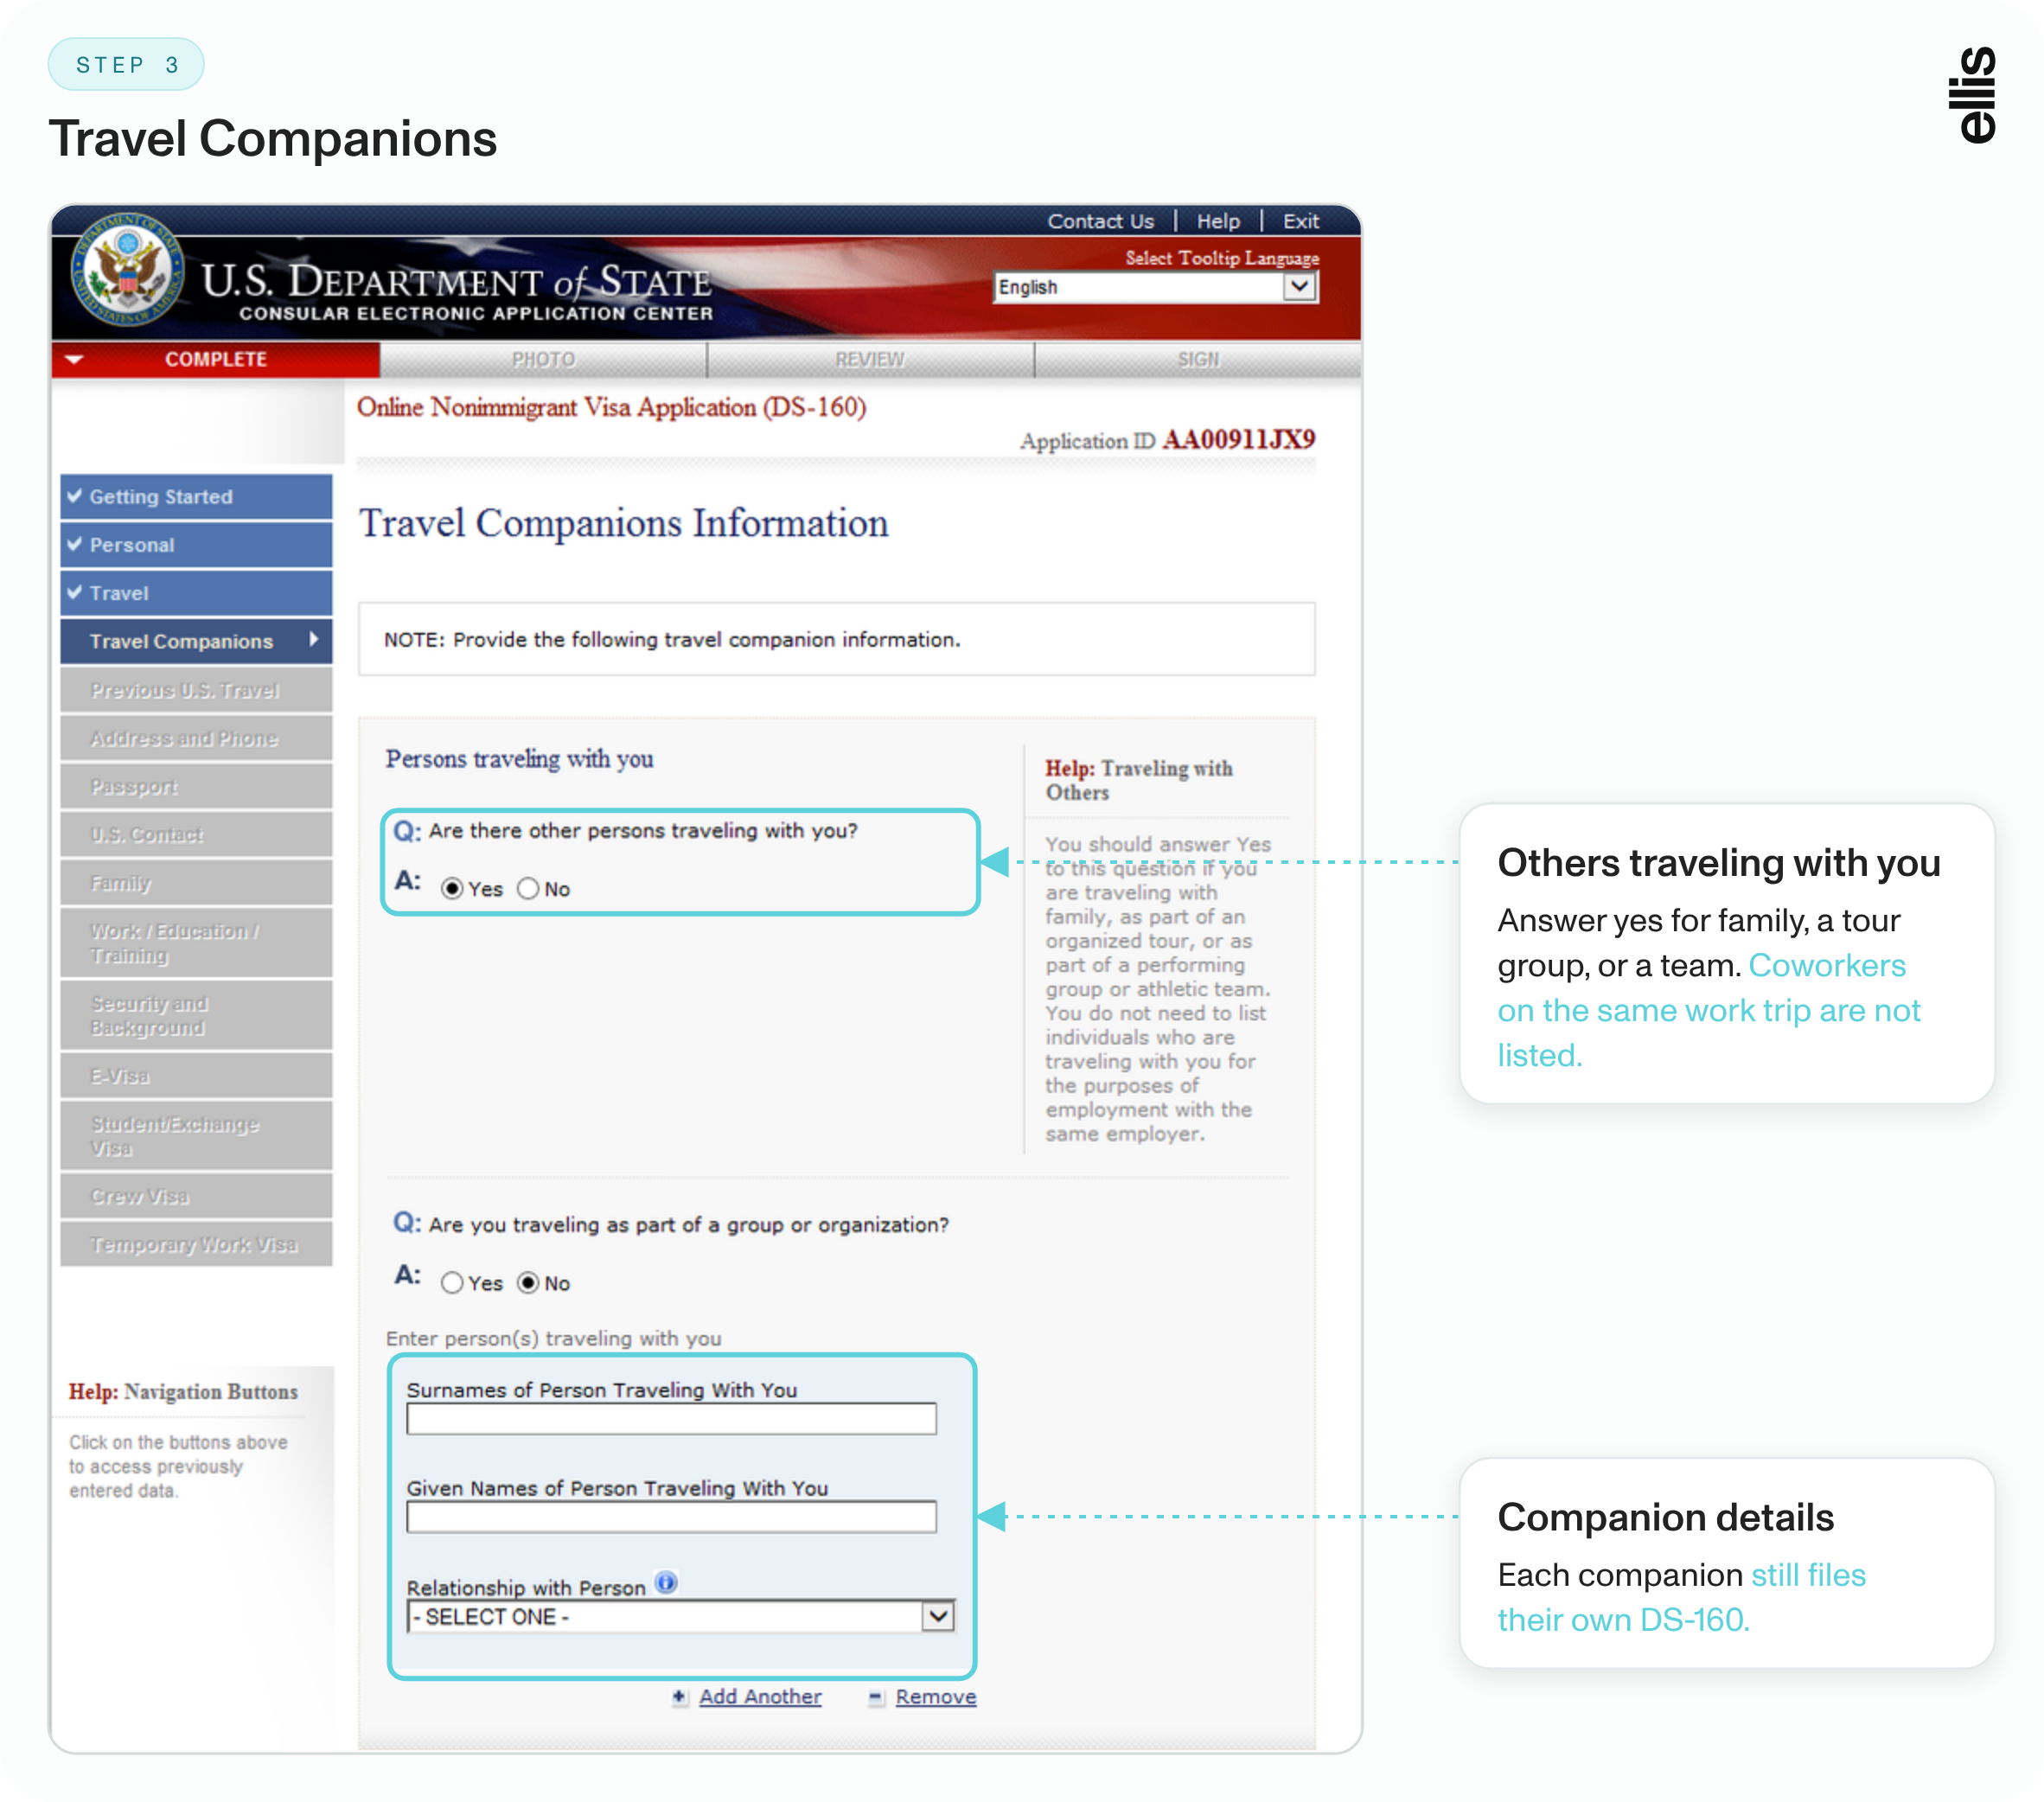
Travel Companions: List anyone traveling with you. Each person still files their own DS-160.
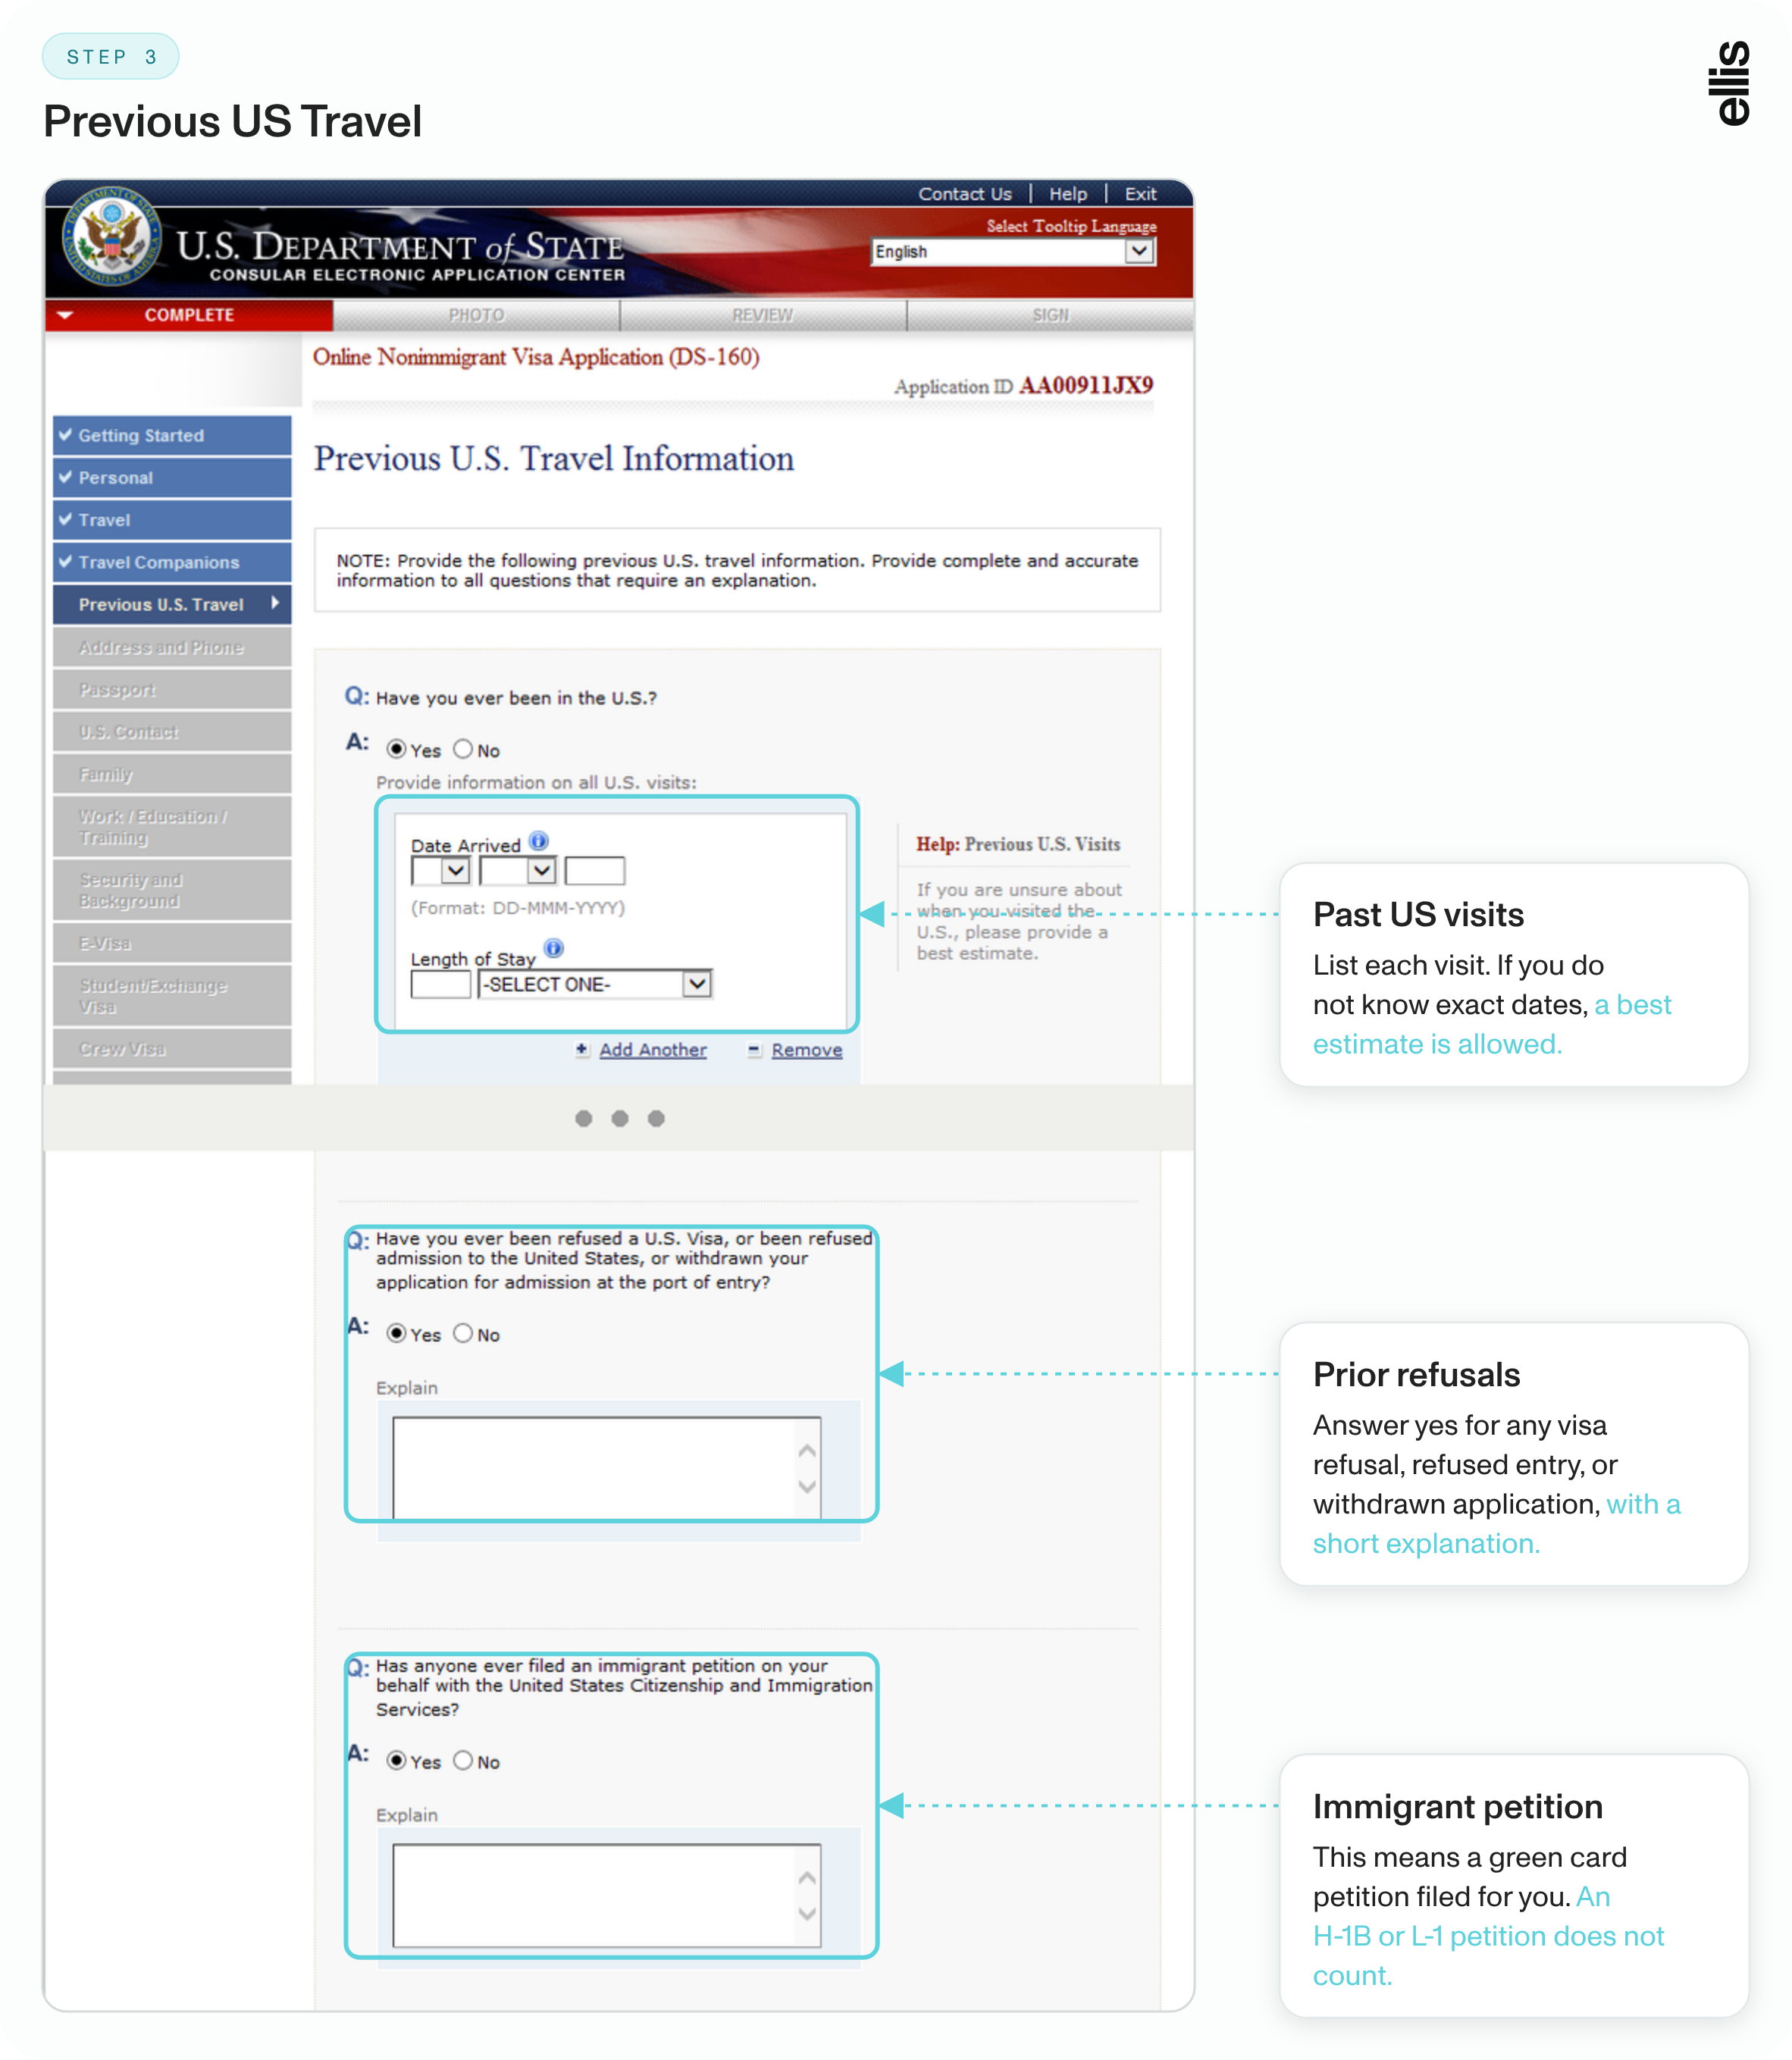
Previous US Travel: List every past visit and its length of stay, using best guesses if needed. Add past visa numbers, any refusal, and whether an immigrant petition was ever filed for you.
The "Principal purpose of trip" field needs to match your visa type. An H-1B applicant selects temporary work, an F-1 applicant selects study, and a visitor selects business or tourism.
US contact and address
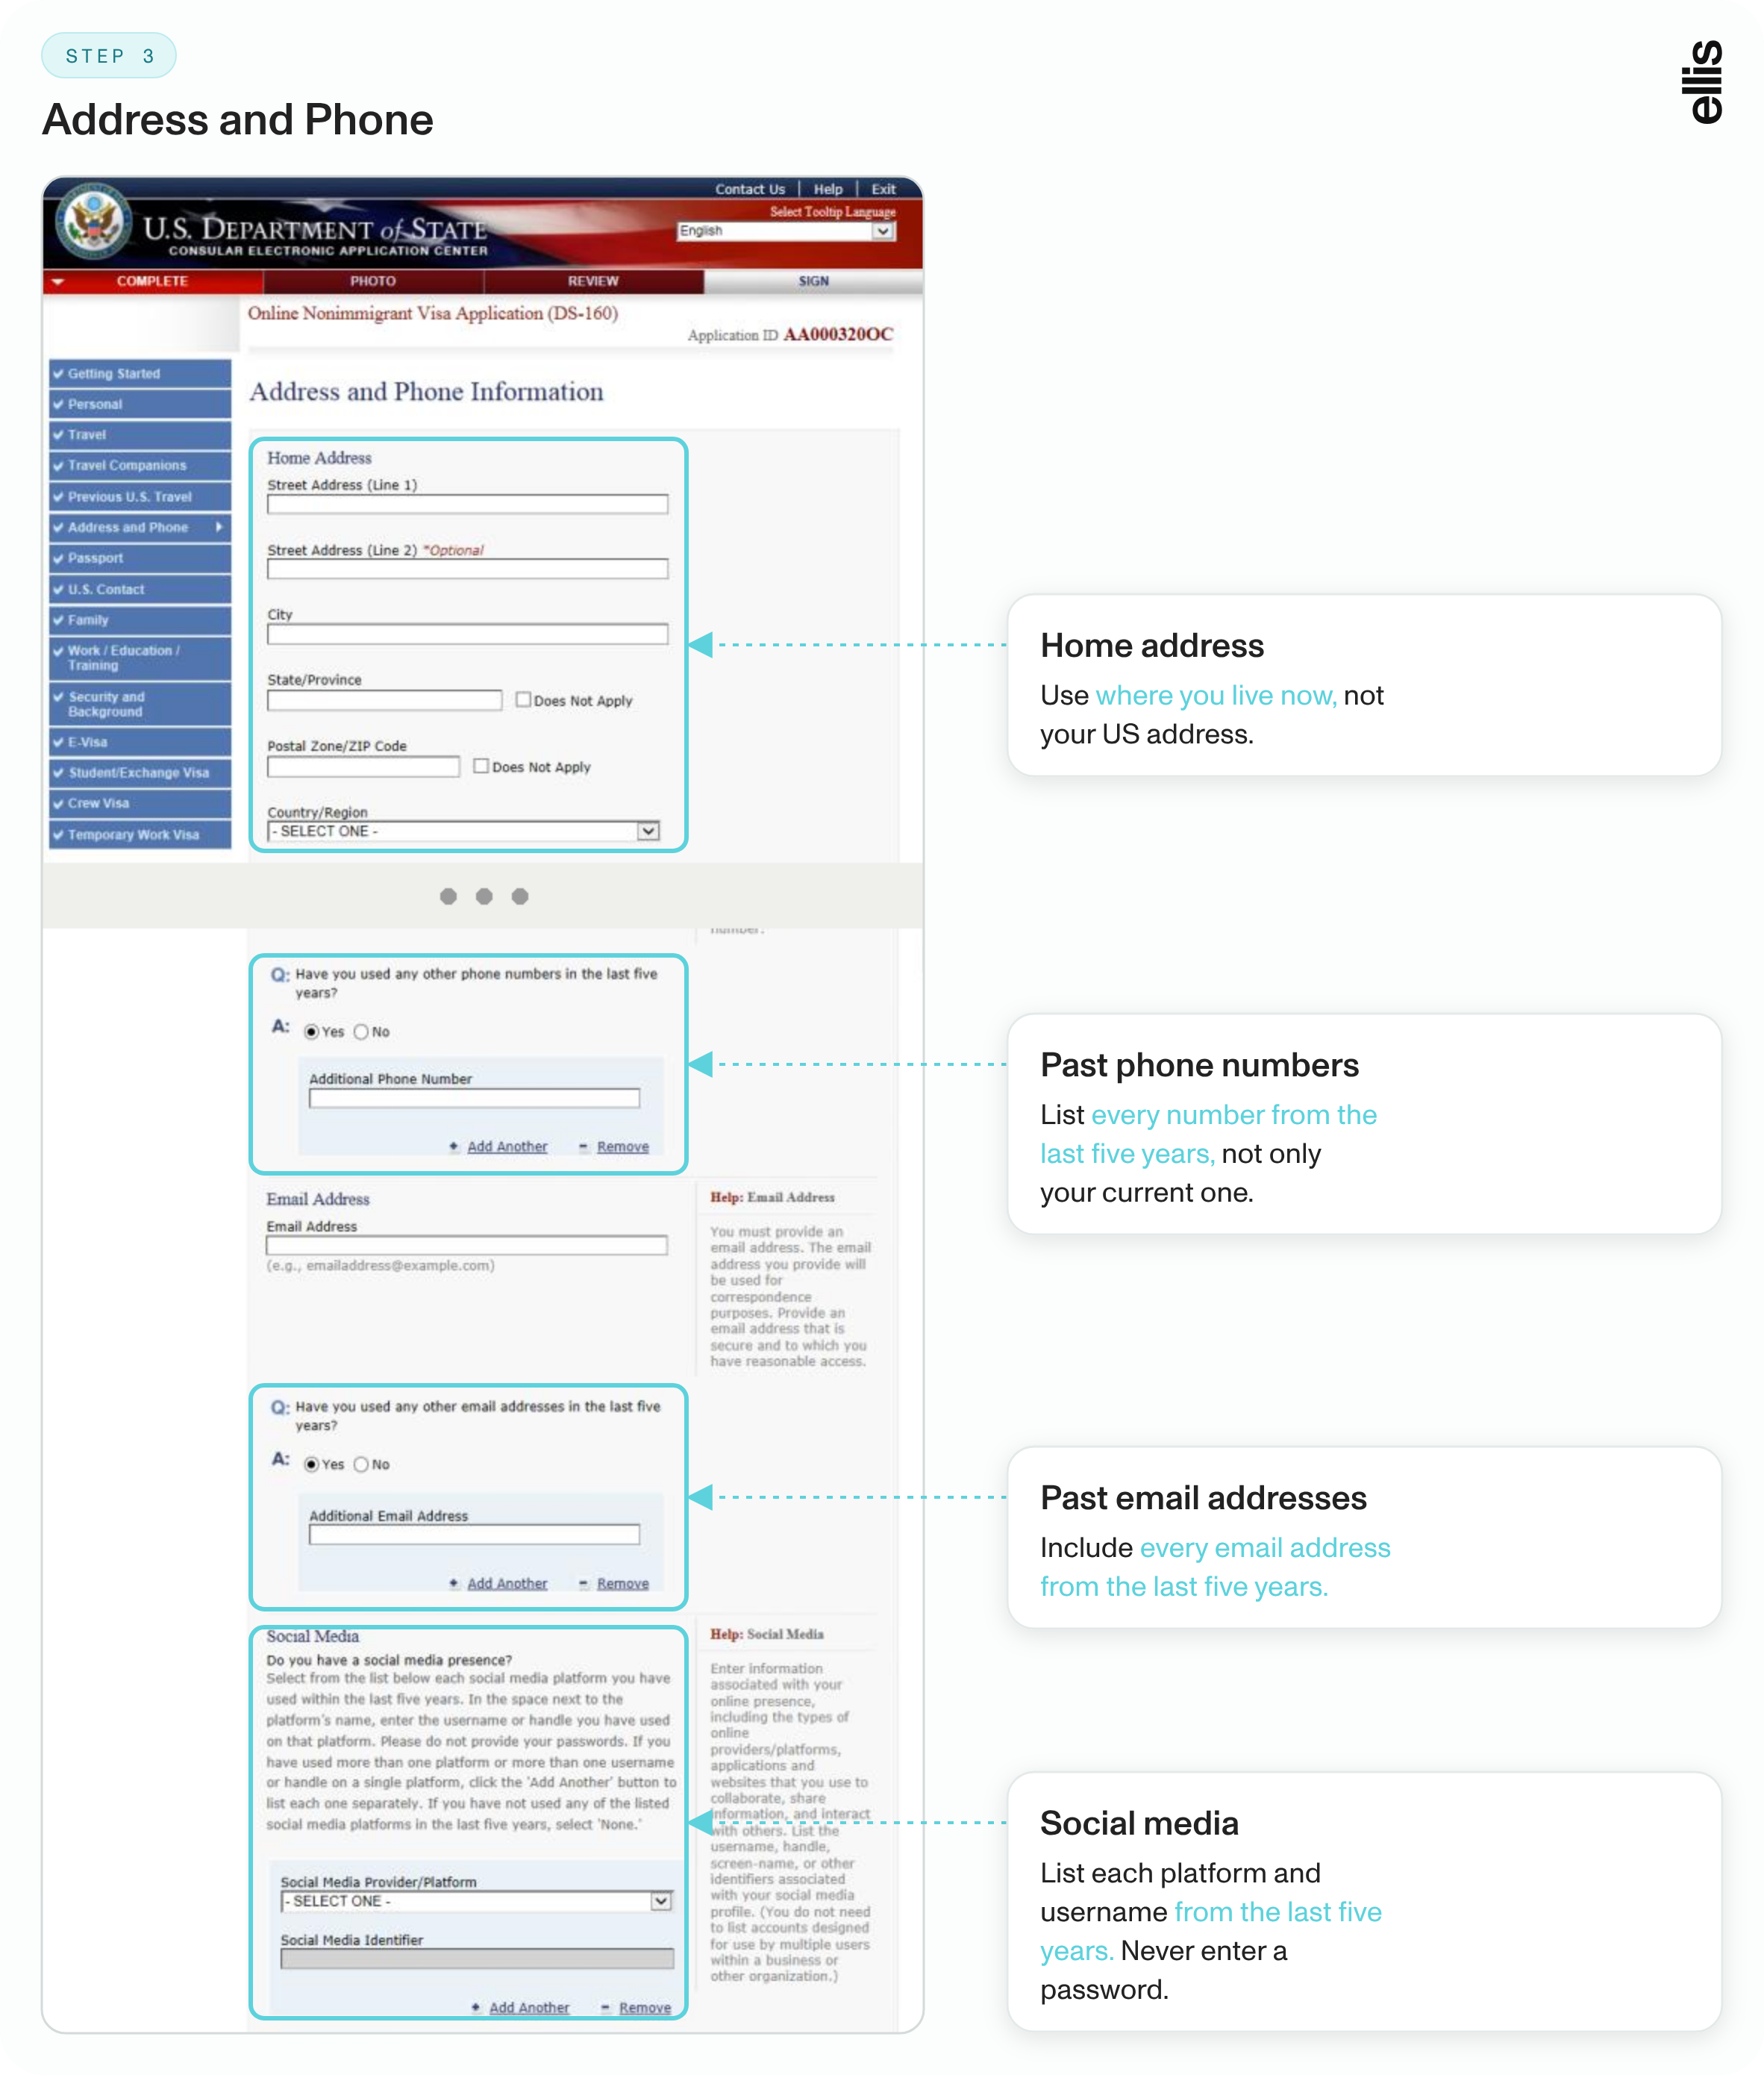
Address and Phone: Use the address where you live now. List every phone number, email, and social media handle from the last five years.
Important: Set every social media account to public before you submit. A private account can send your case into administrative processing, which means extra background checks and delays.
US Point of Contact: Pick one person or organization tied to your trip and give their full details.
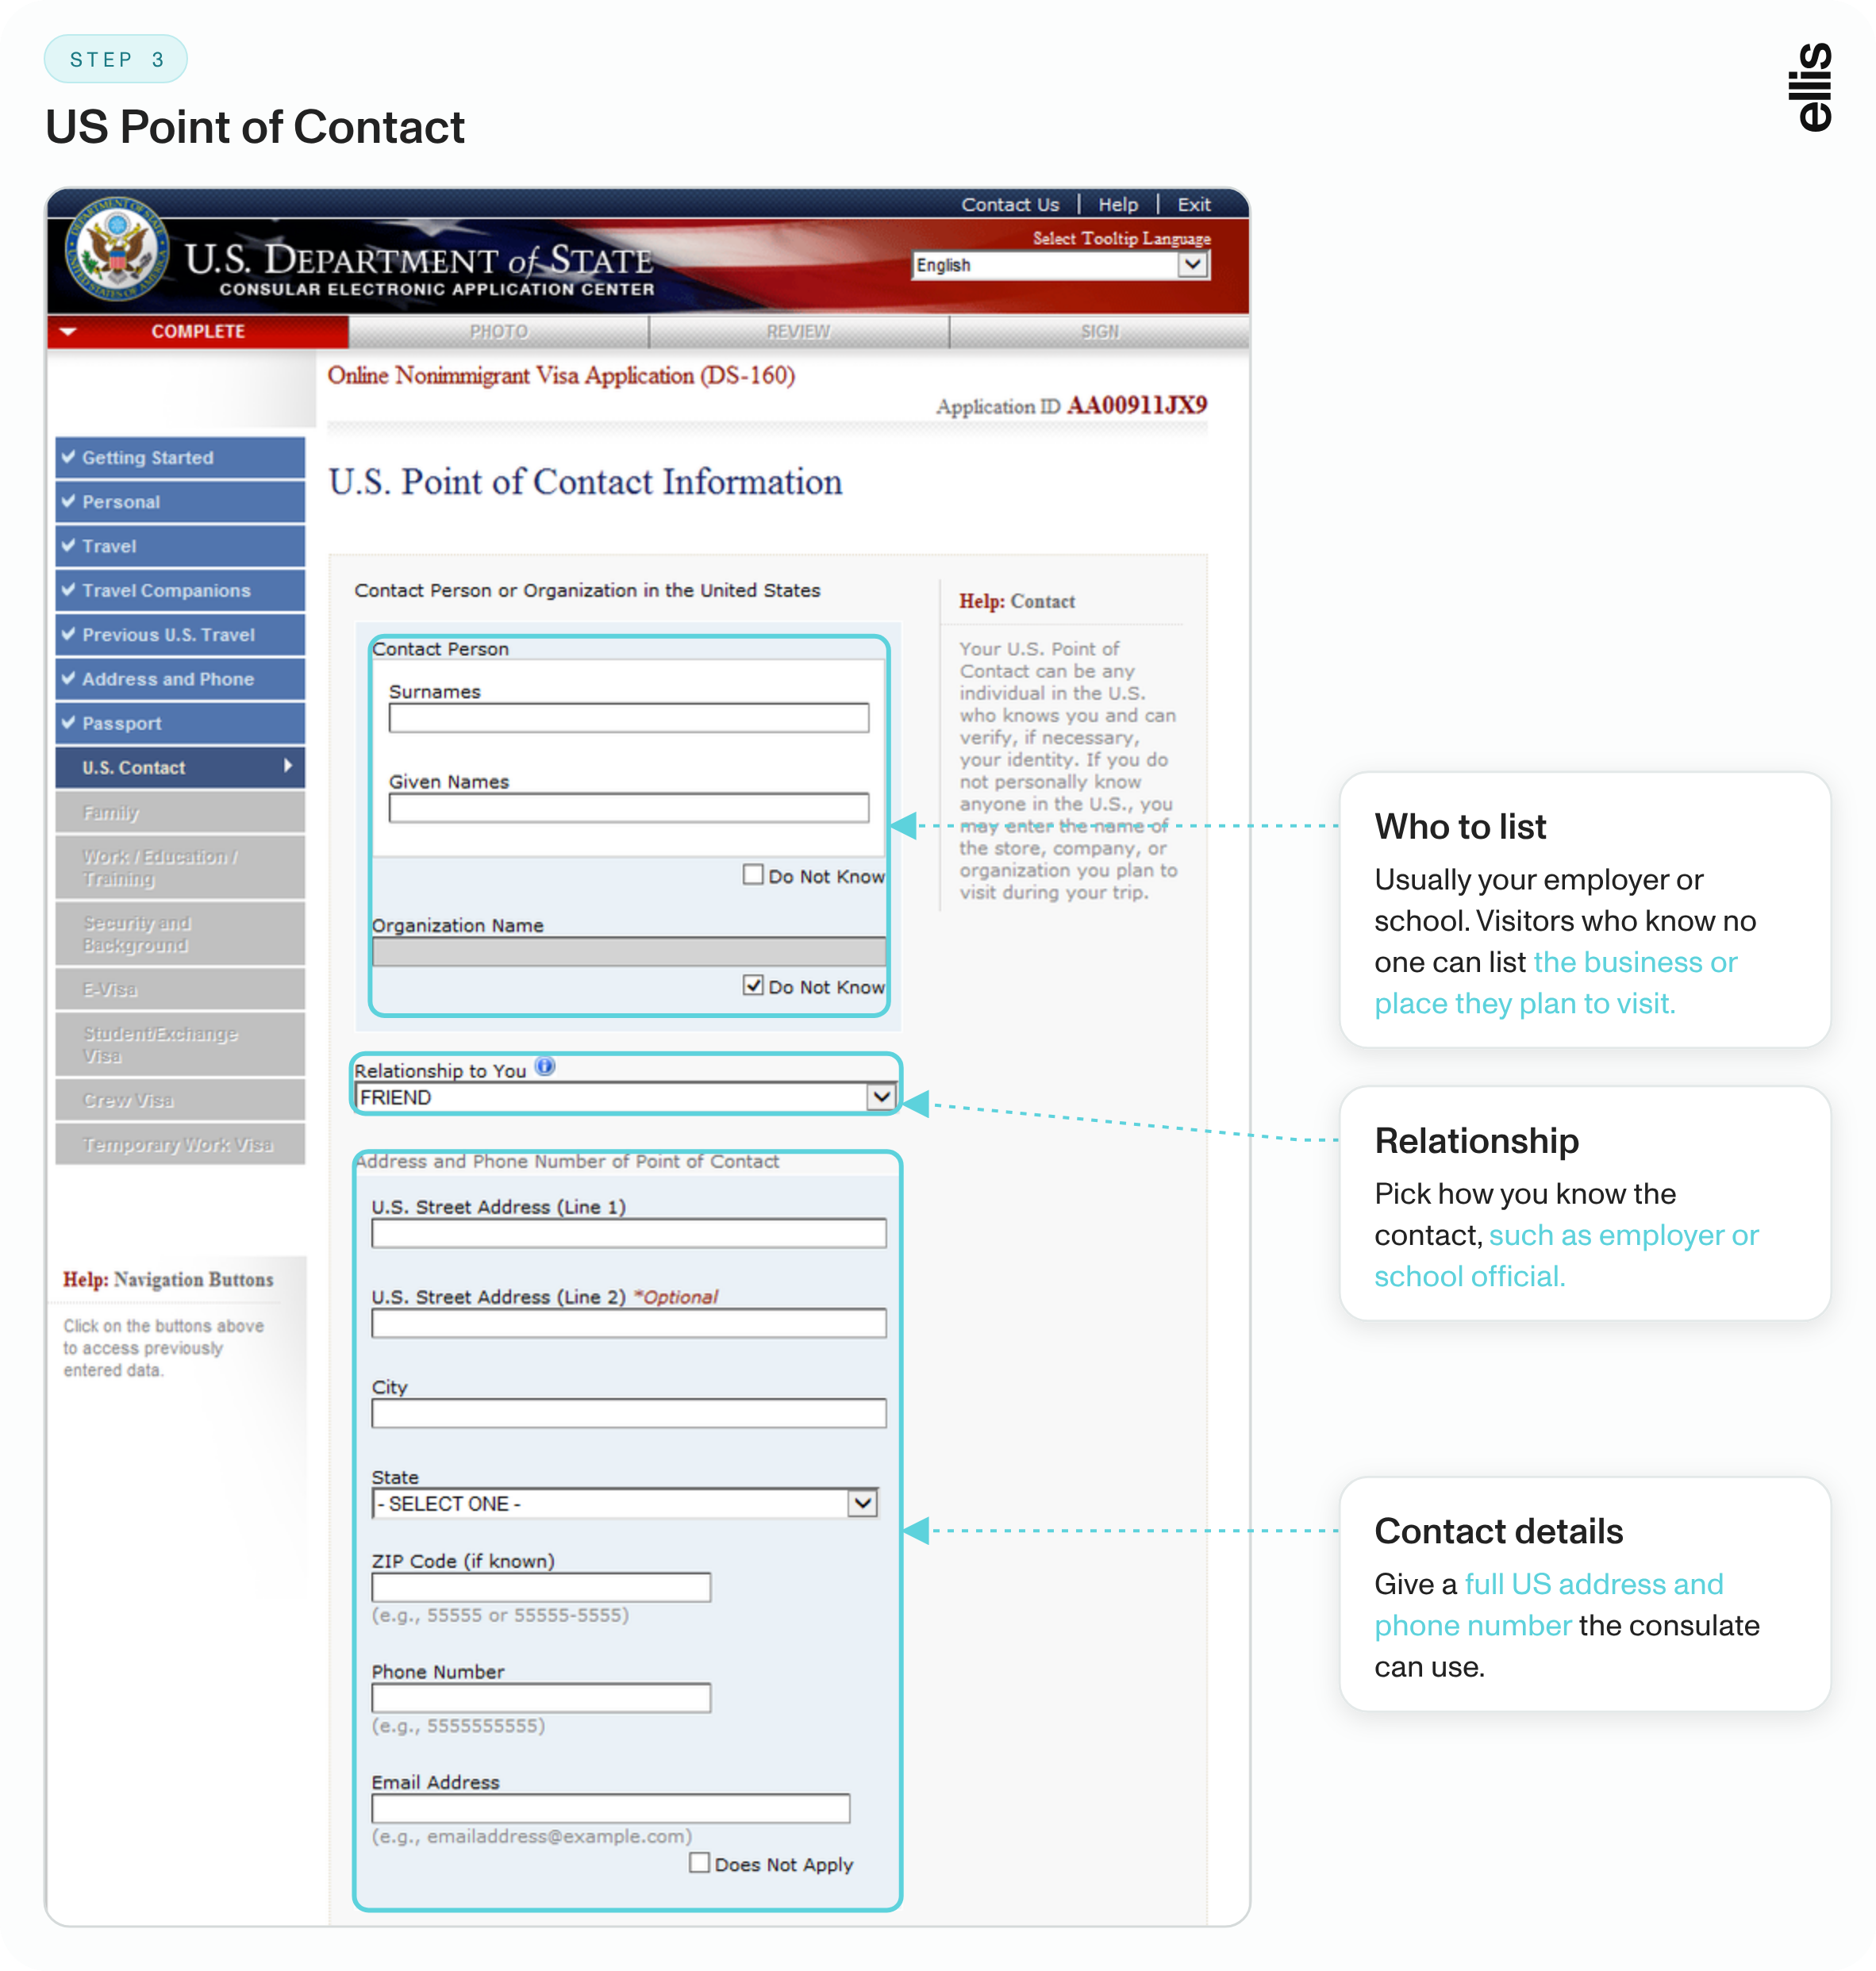
Your US contact is the person or organization connected to your visit. For work visas, that is usually your employer, listed by its full legal name and complete address. For students, it is the school. Tourists without a personal contact can list a hotel. A full street address and zip code help the consulate verify your information faster.
Family, work, and education history
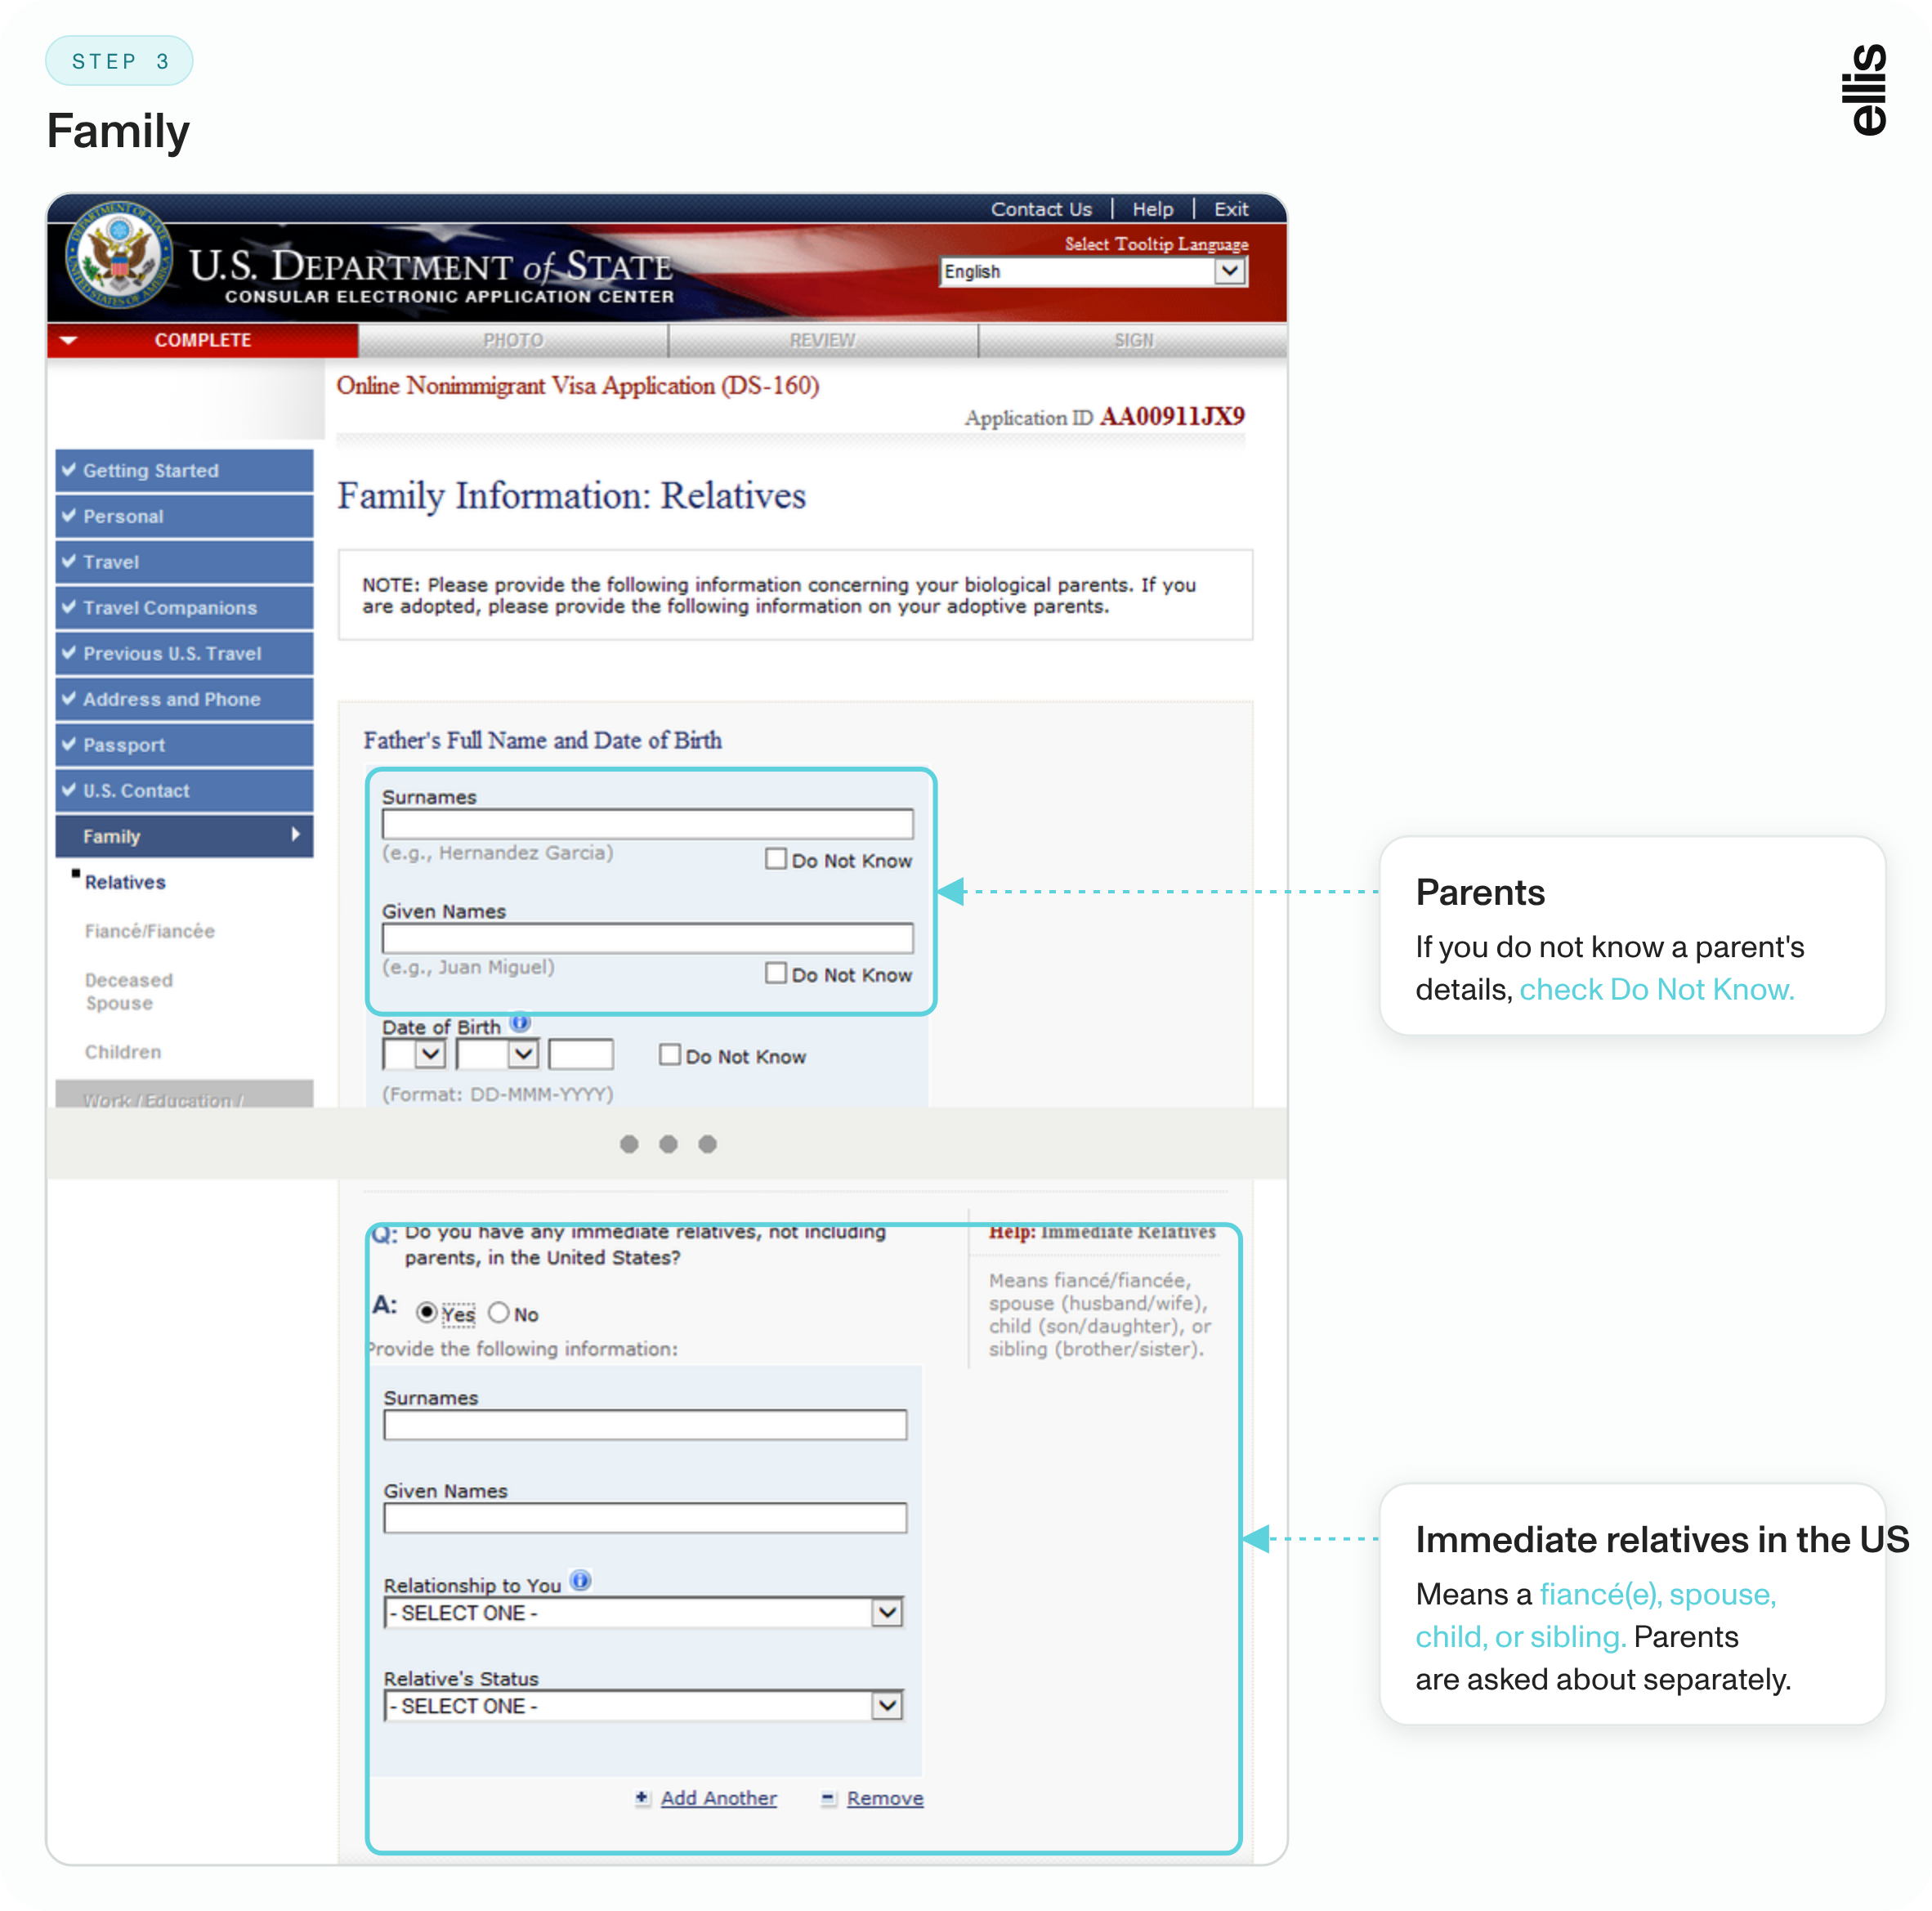
Family: Enter your parents' names and birth dates, or check "Do Not Know." List any spouse, fiancé(e), child, or sibling in the US and their status. Spouse details should match your marriage records.
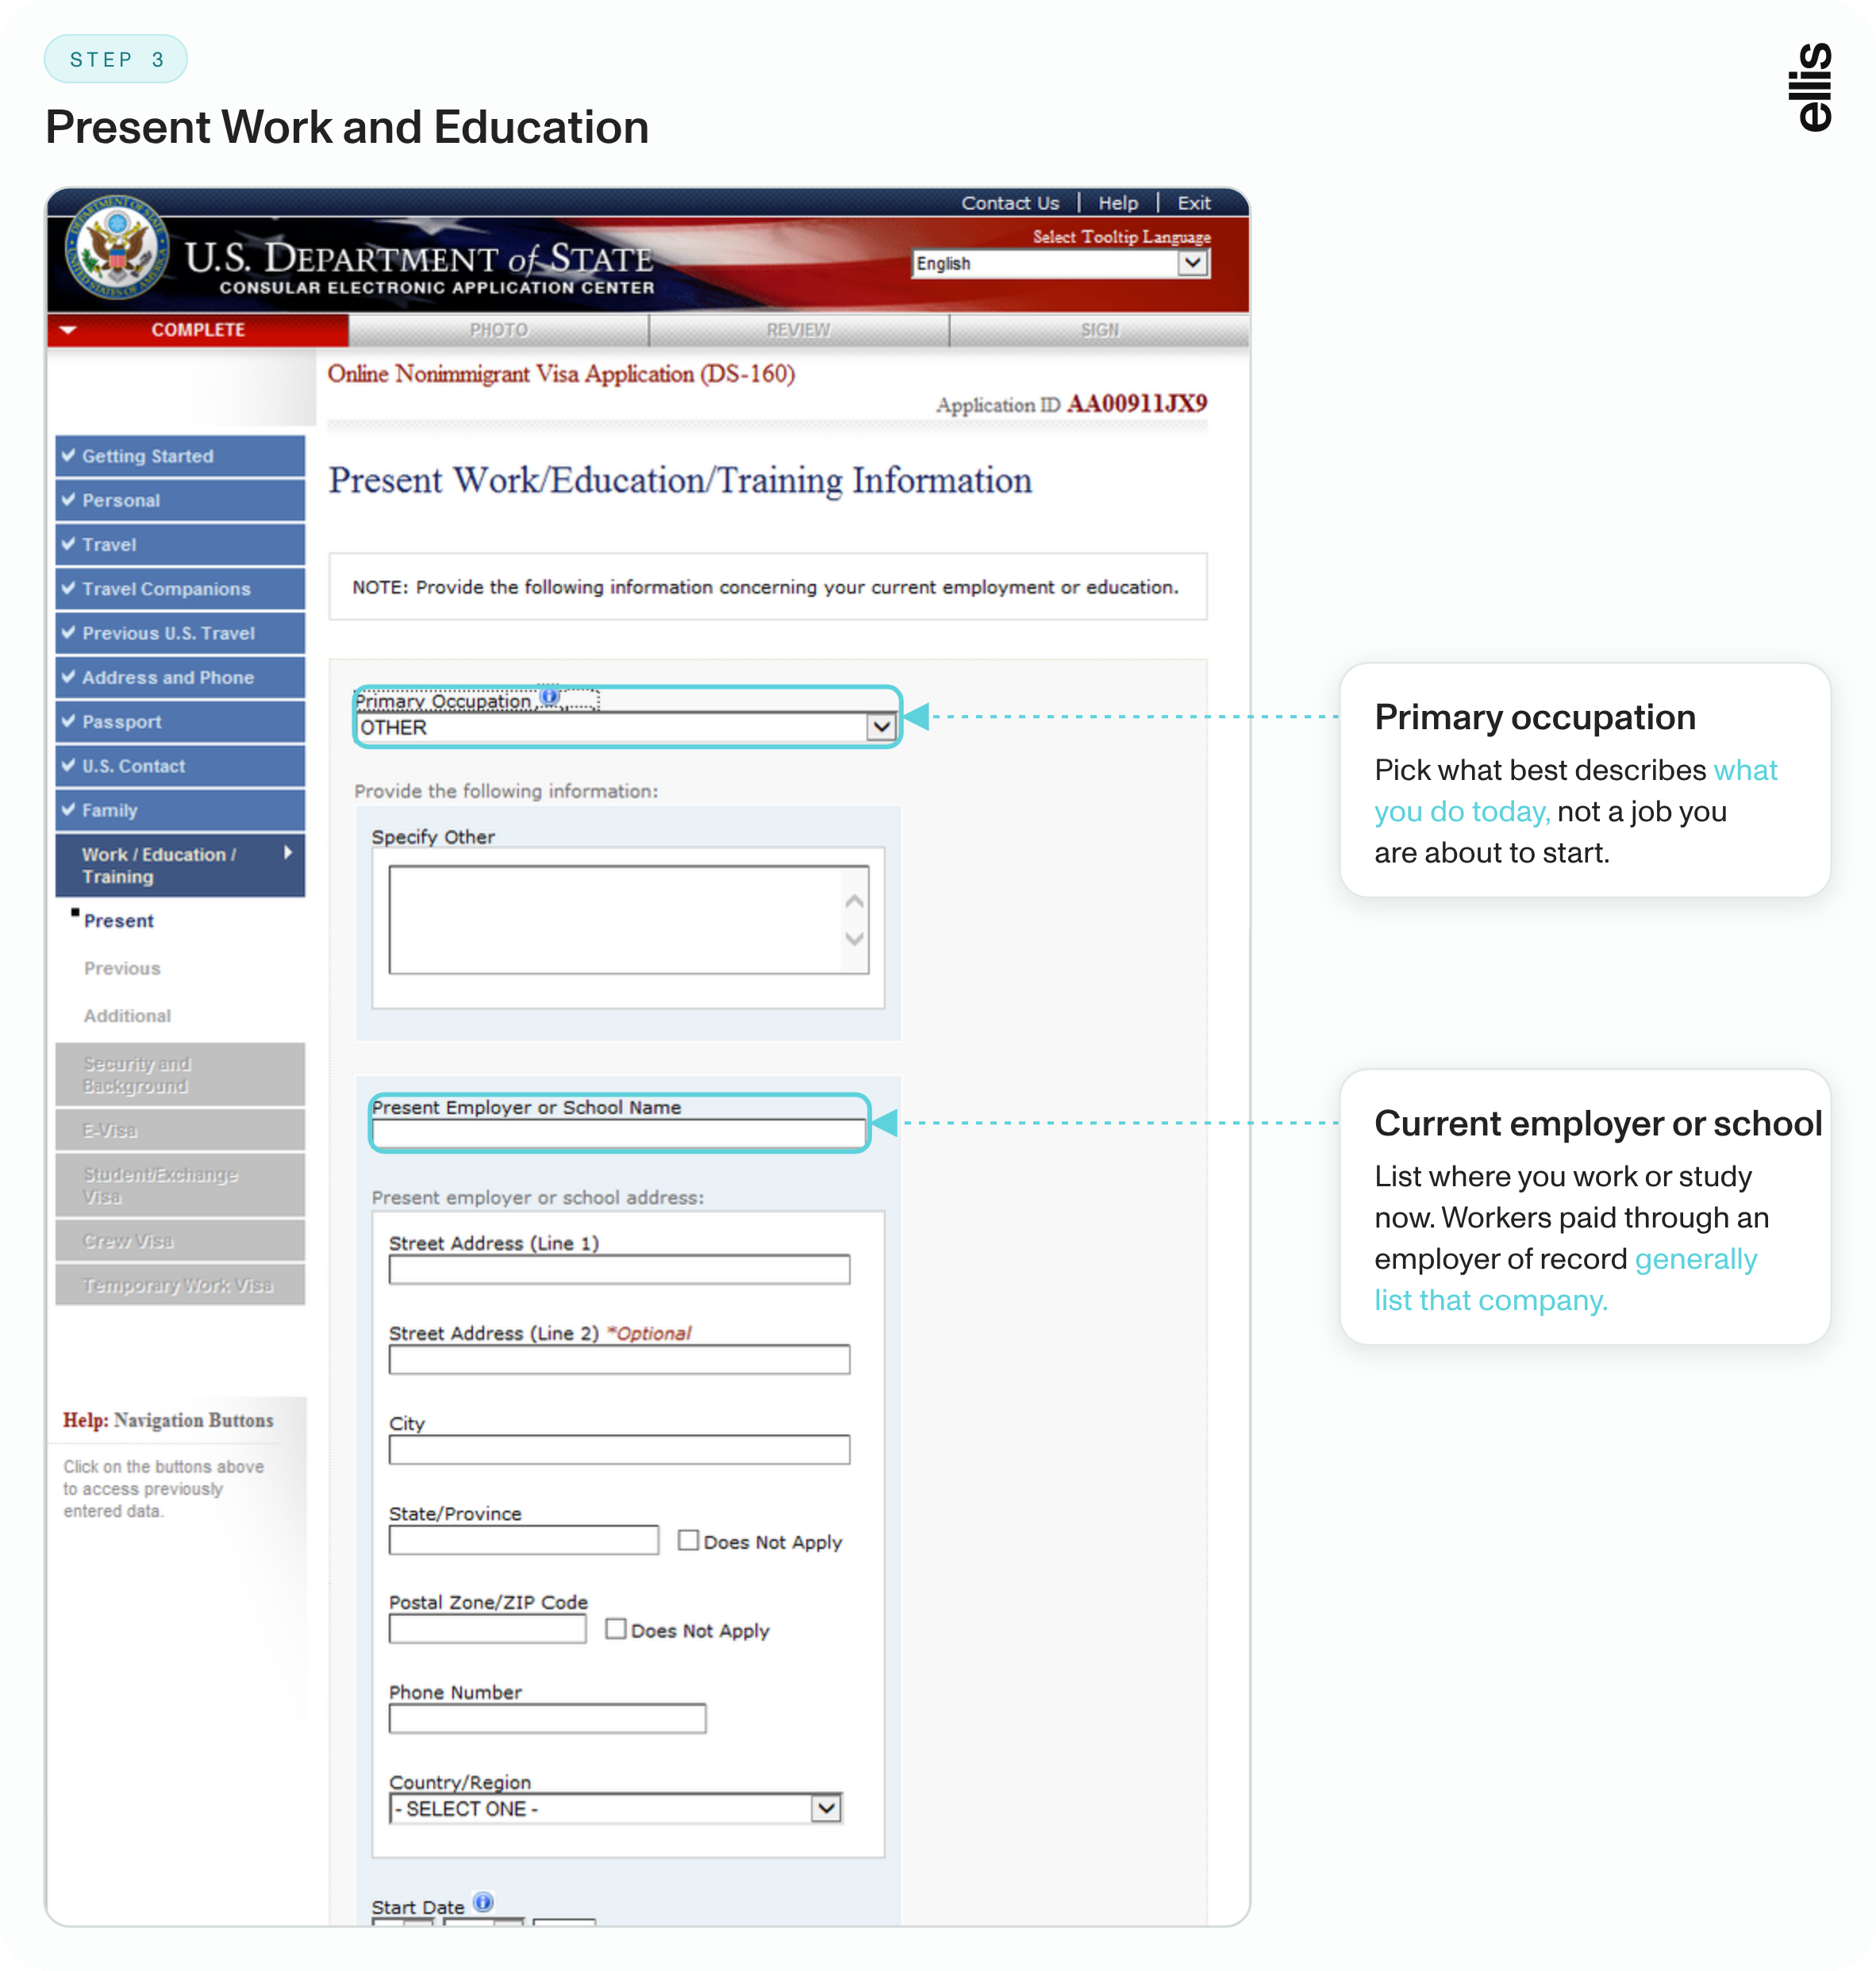
Present Work/Education/Training: List the job or school you're at currently.
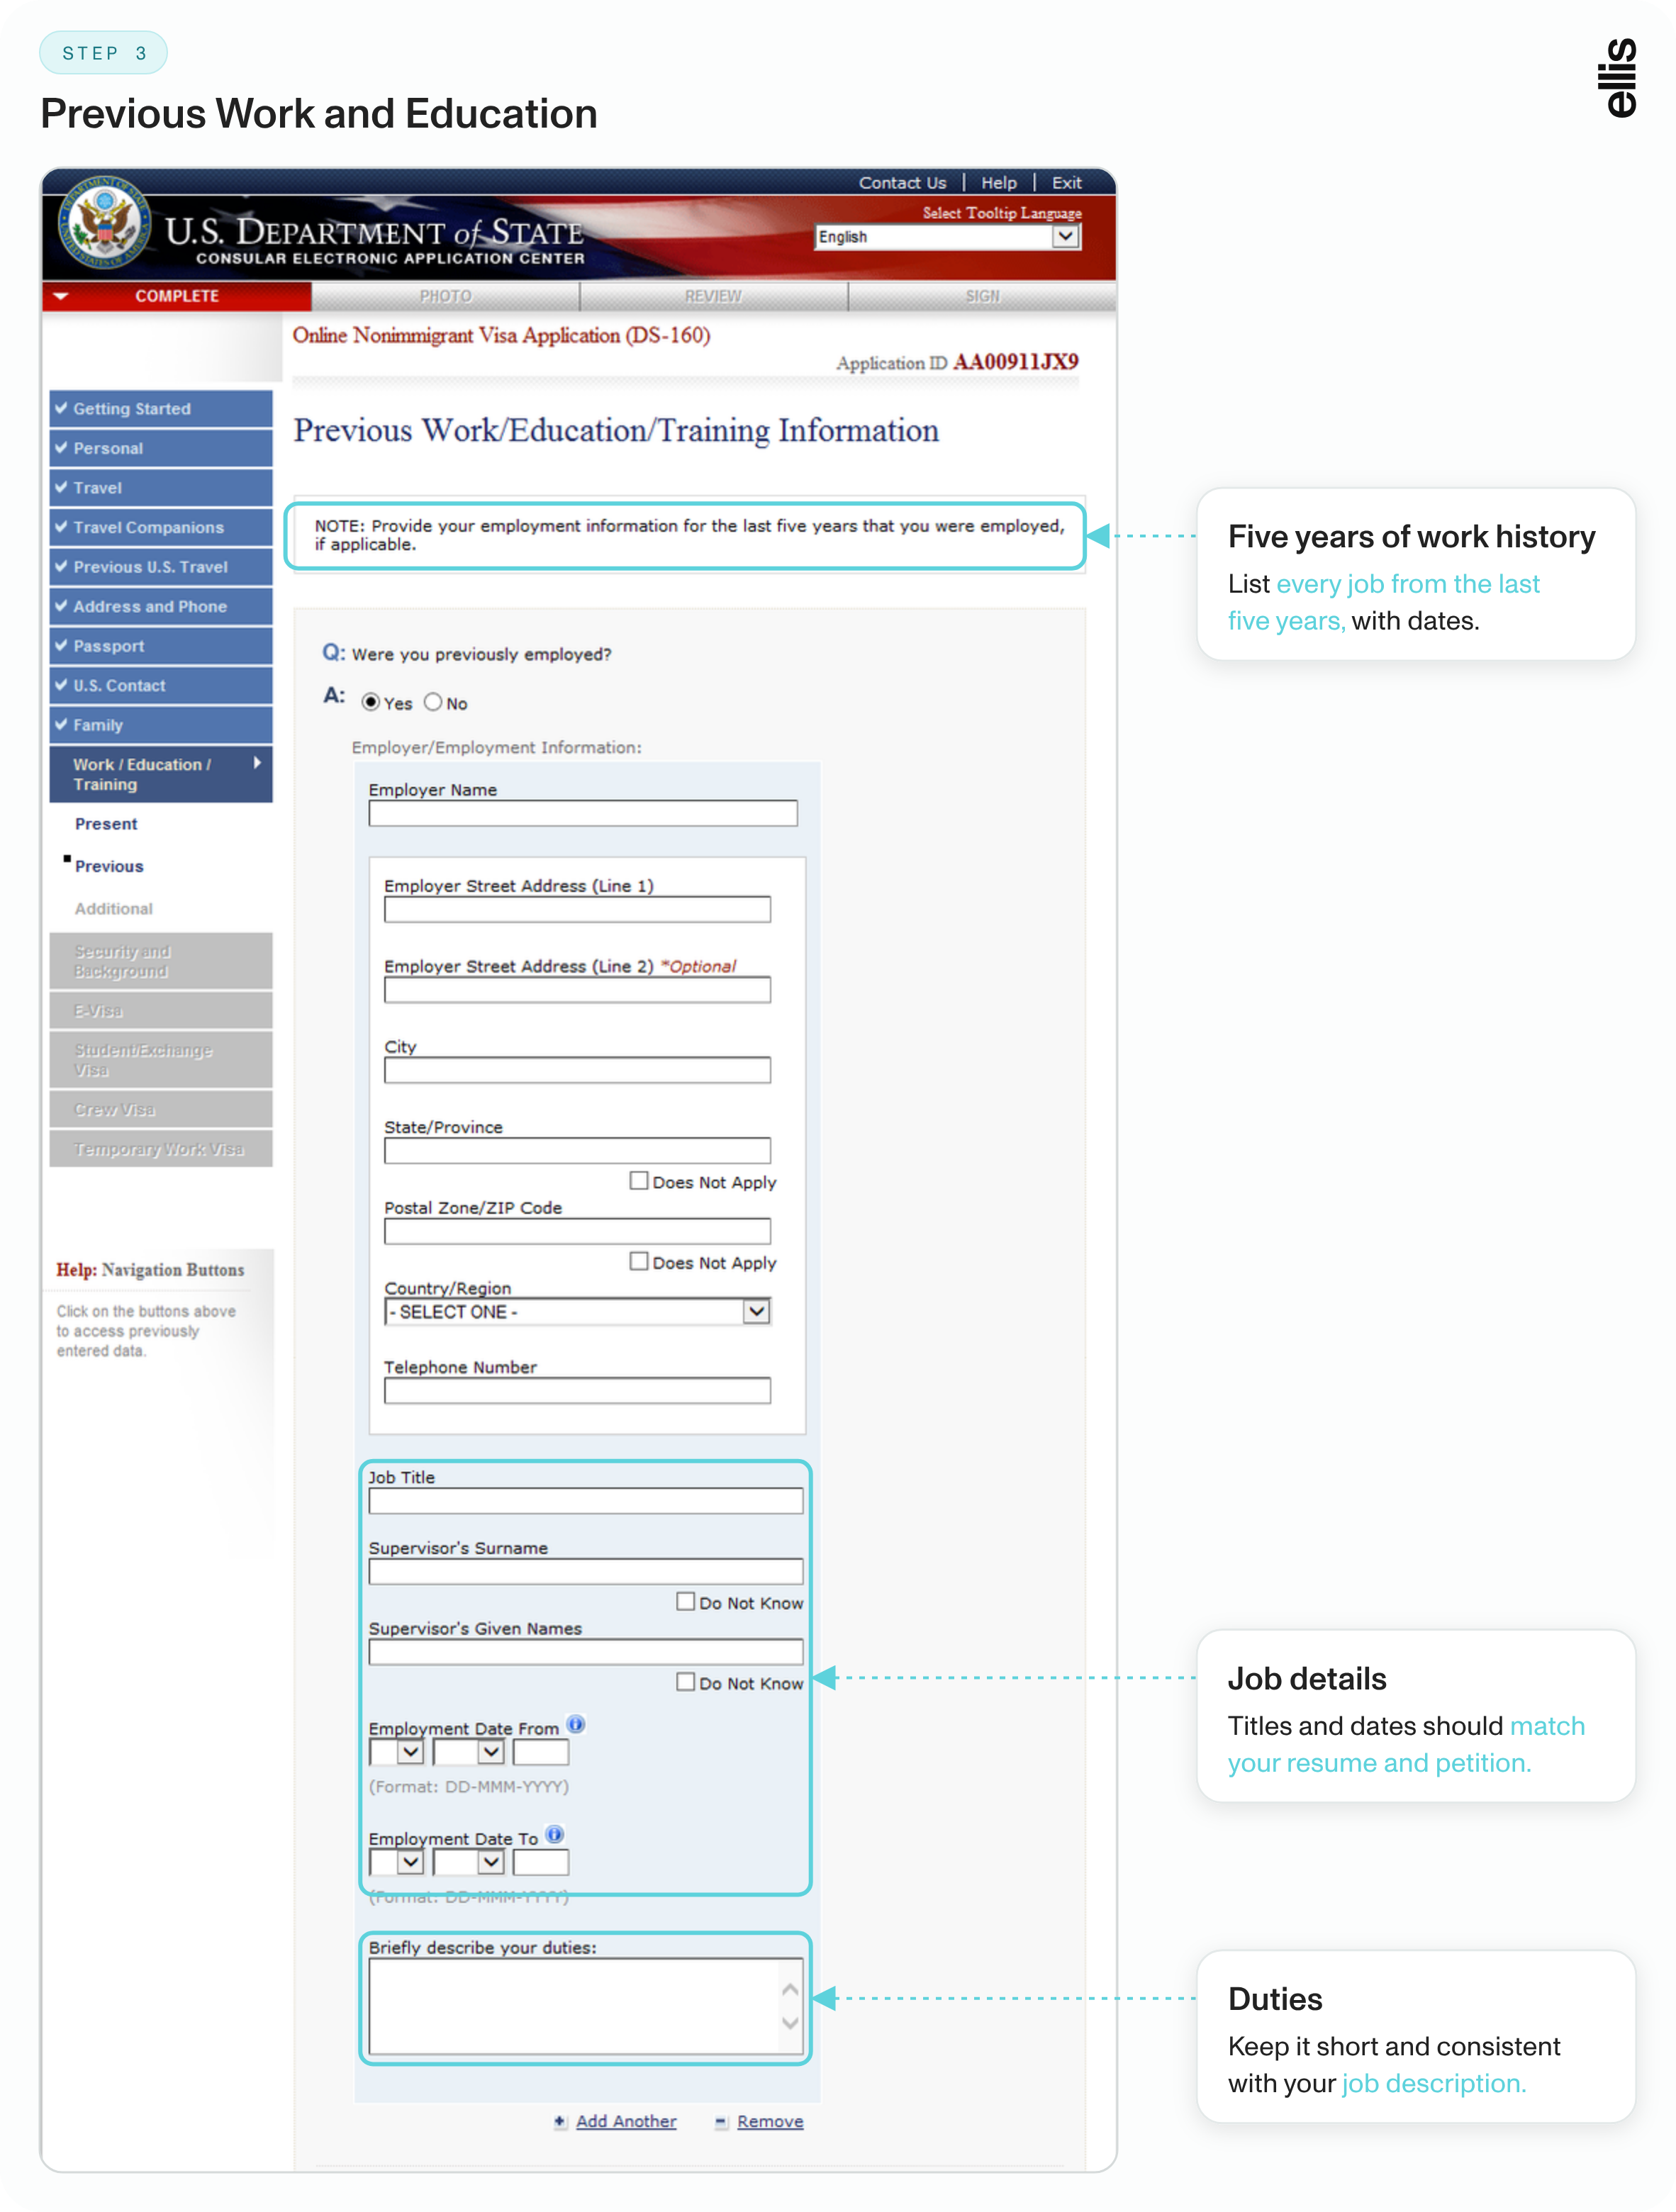
Previous Work/Education/Training: List jobs from the last five years and schools from secondary level up. Gaps are fine, but be ready to explain them.
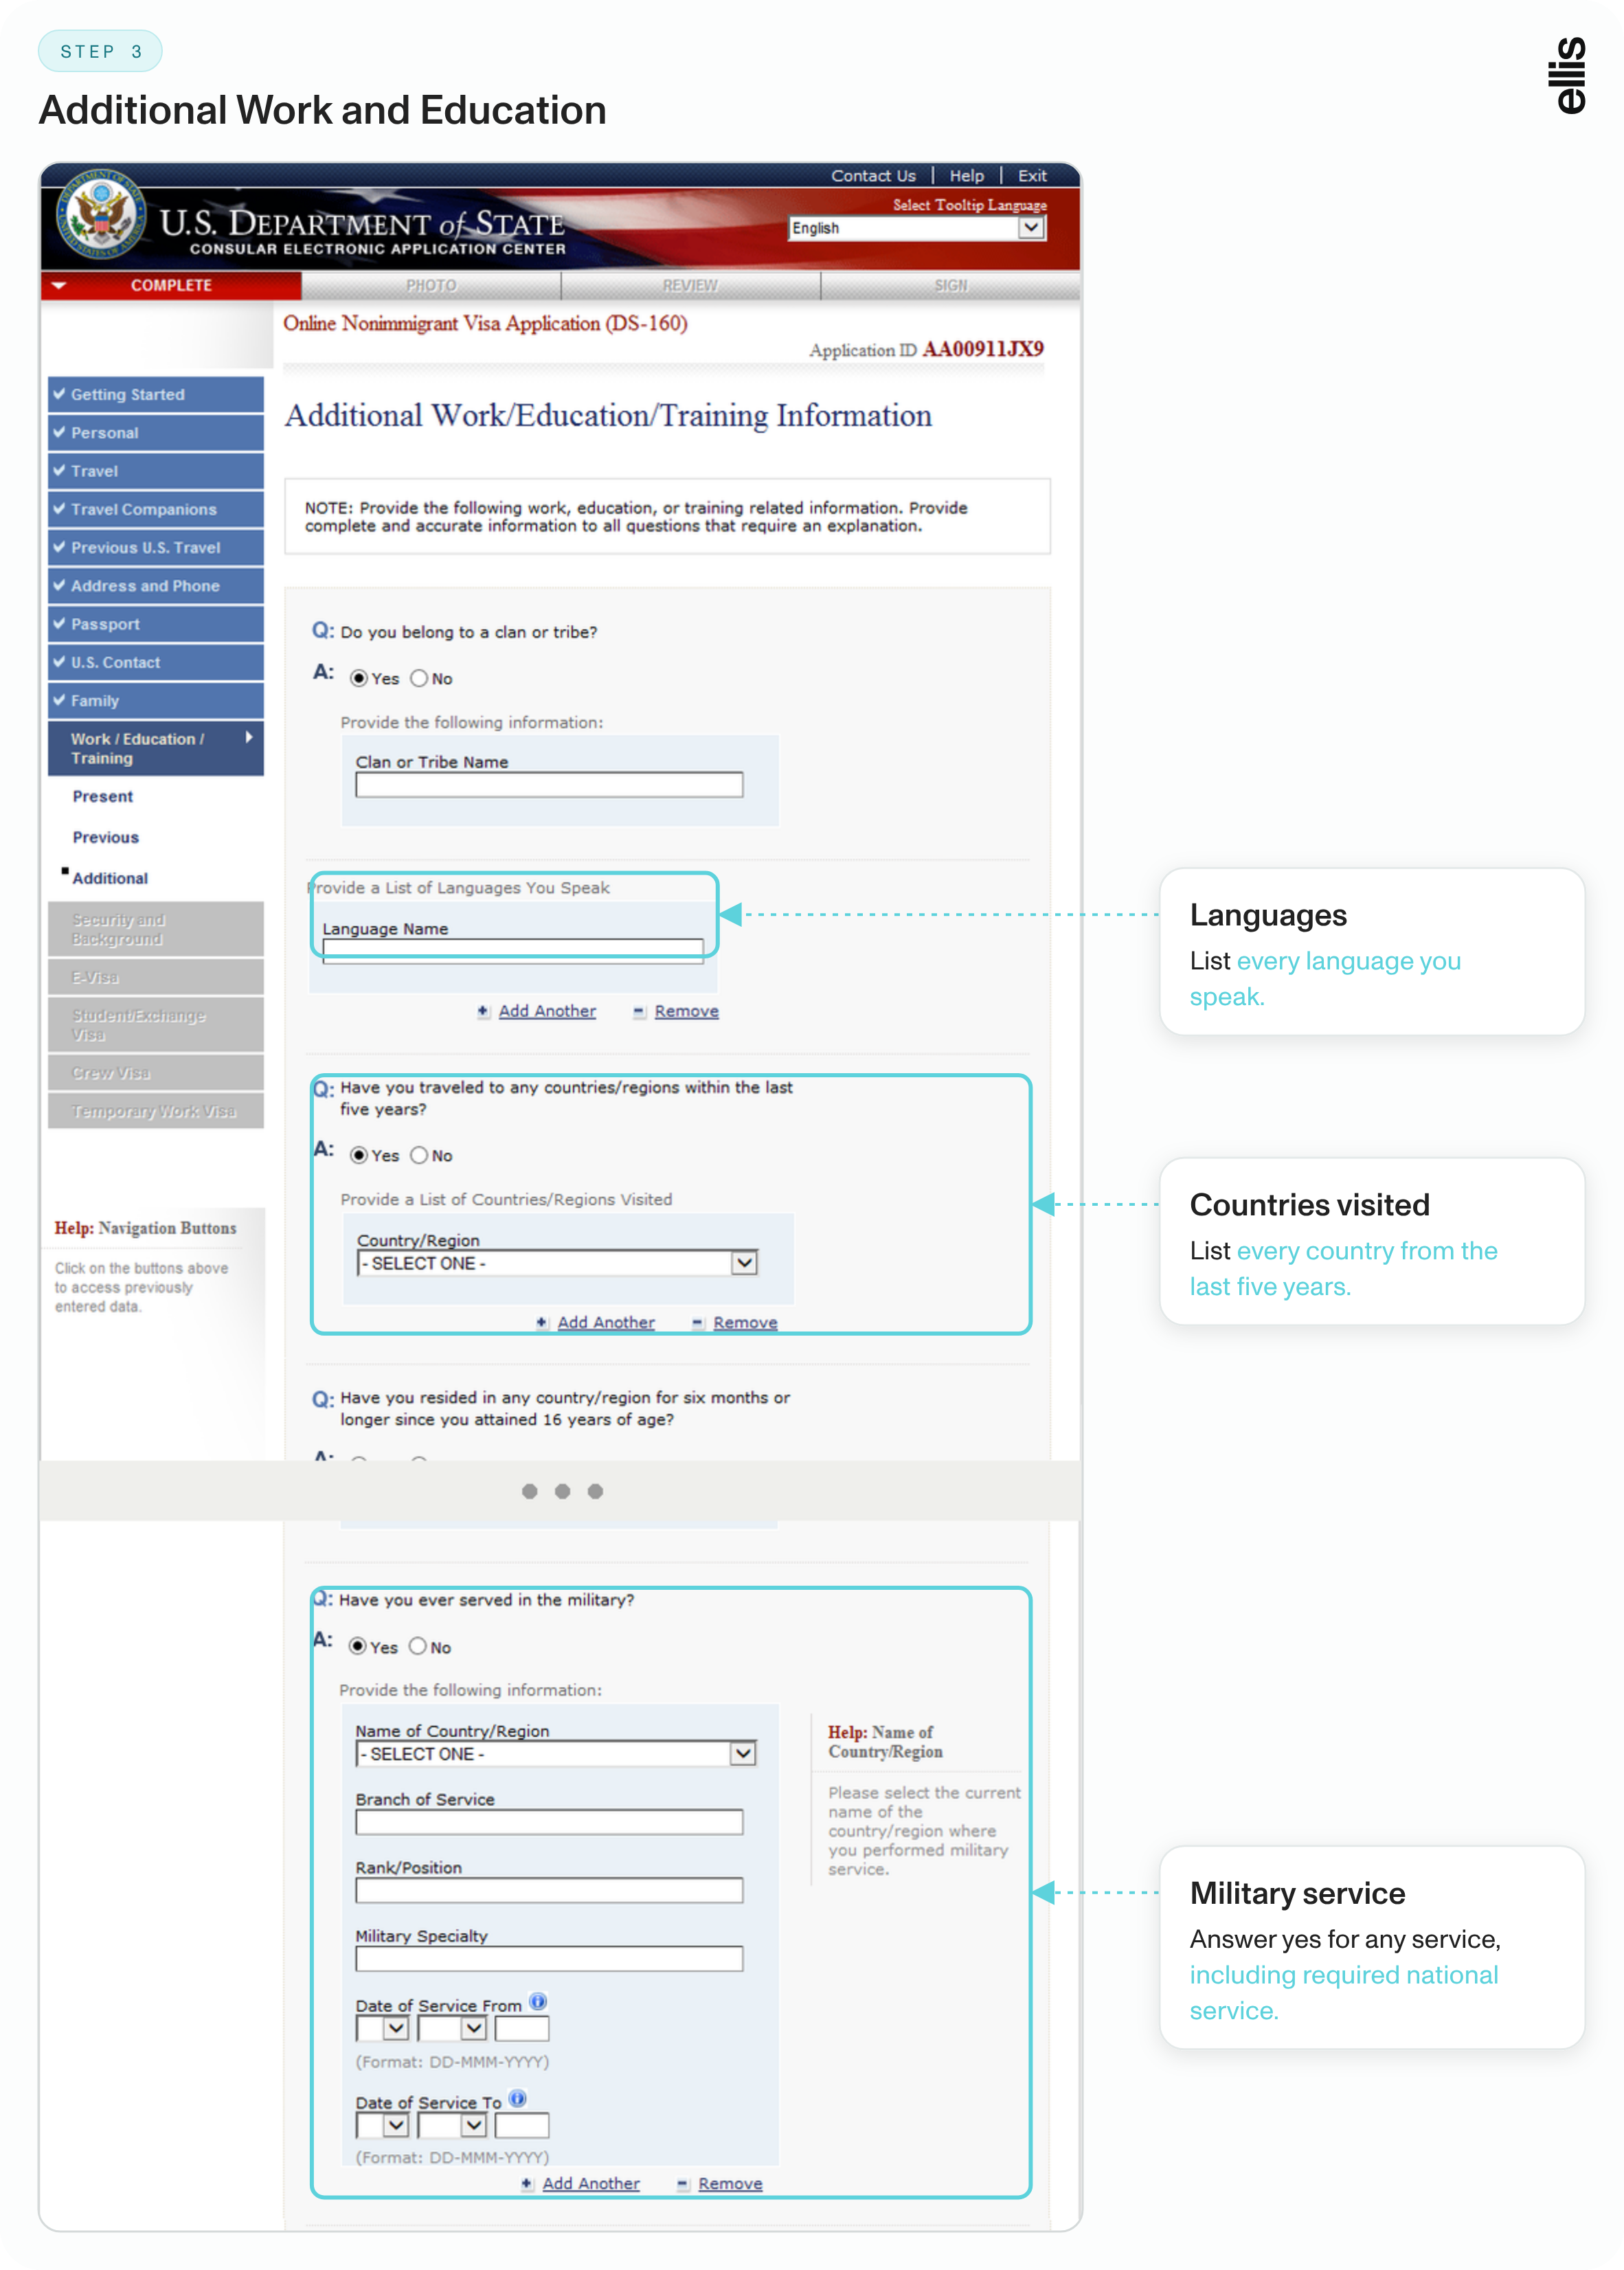
Additional Work/Education/Training: List the languages you speak, countries you visited in the last five years, and any military service.
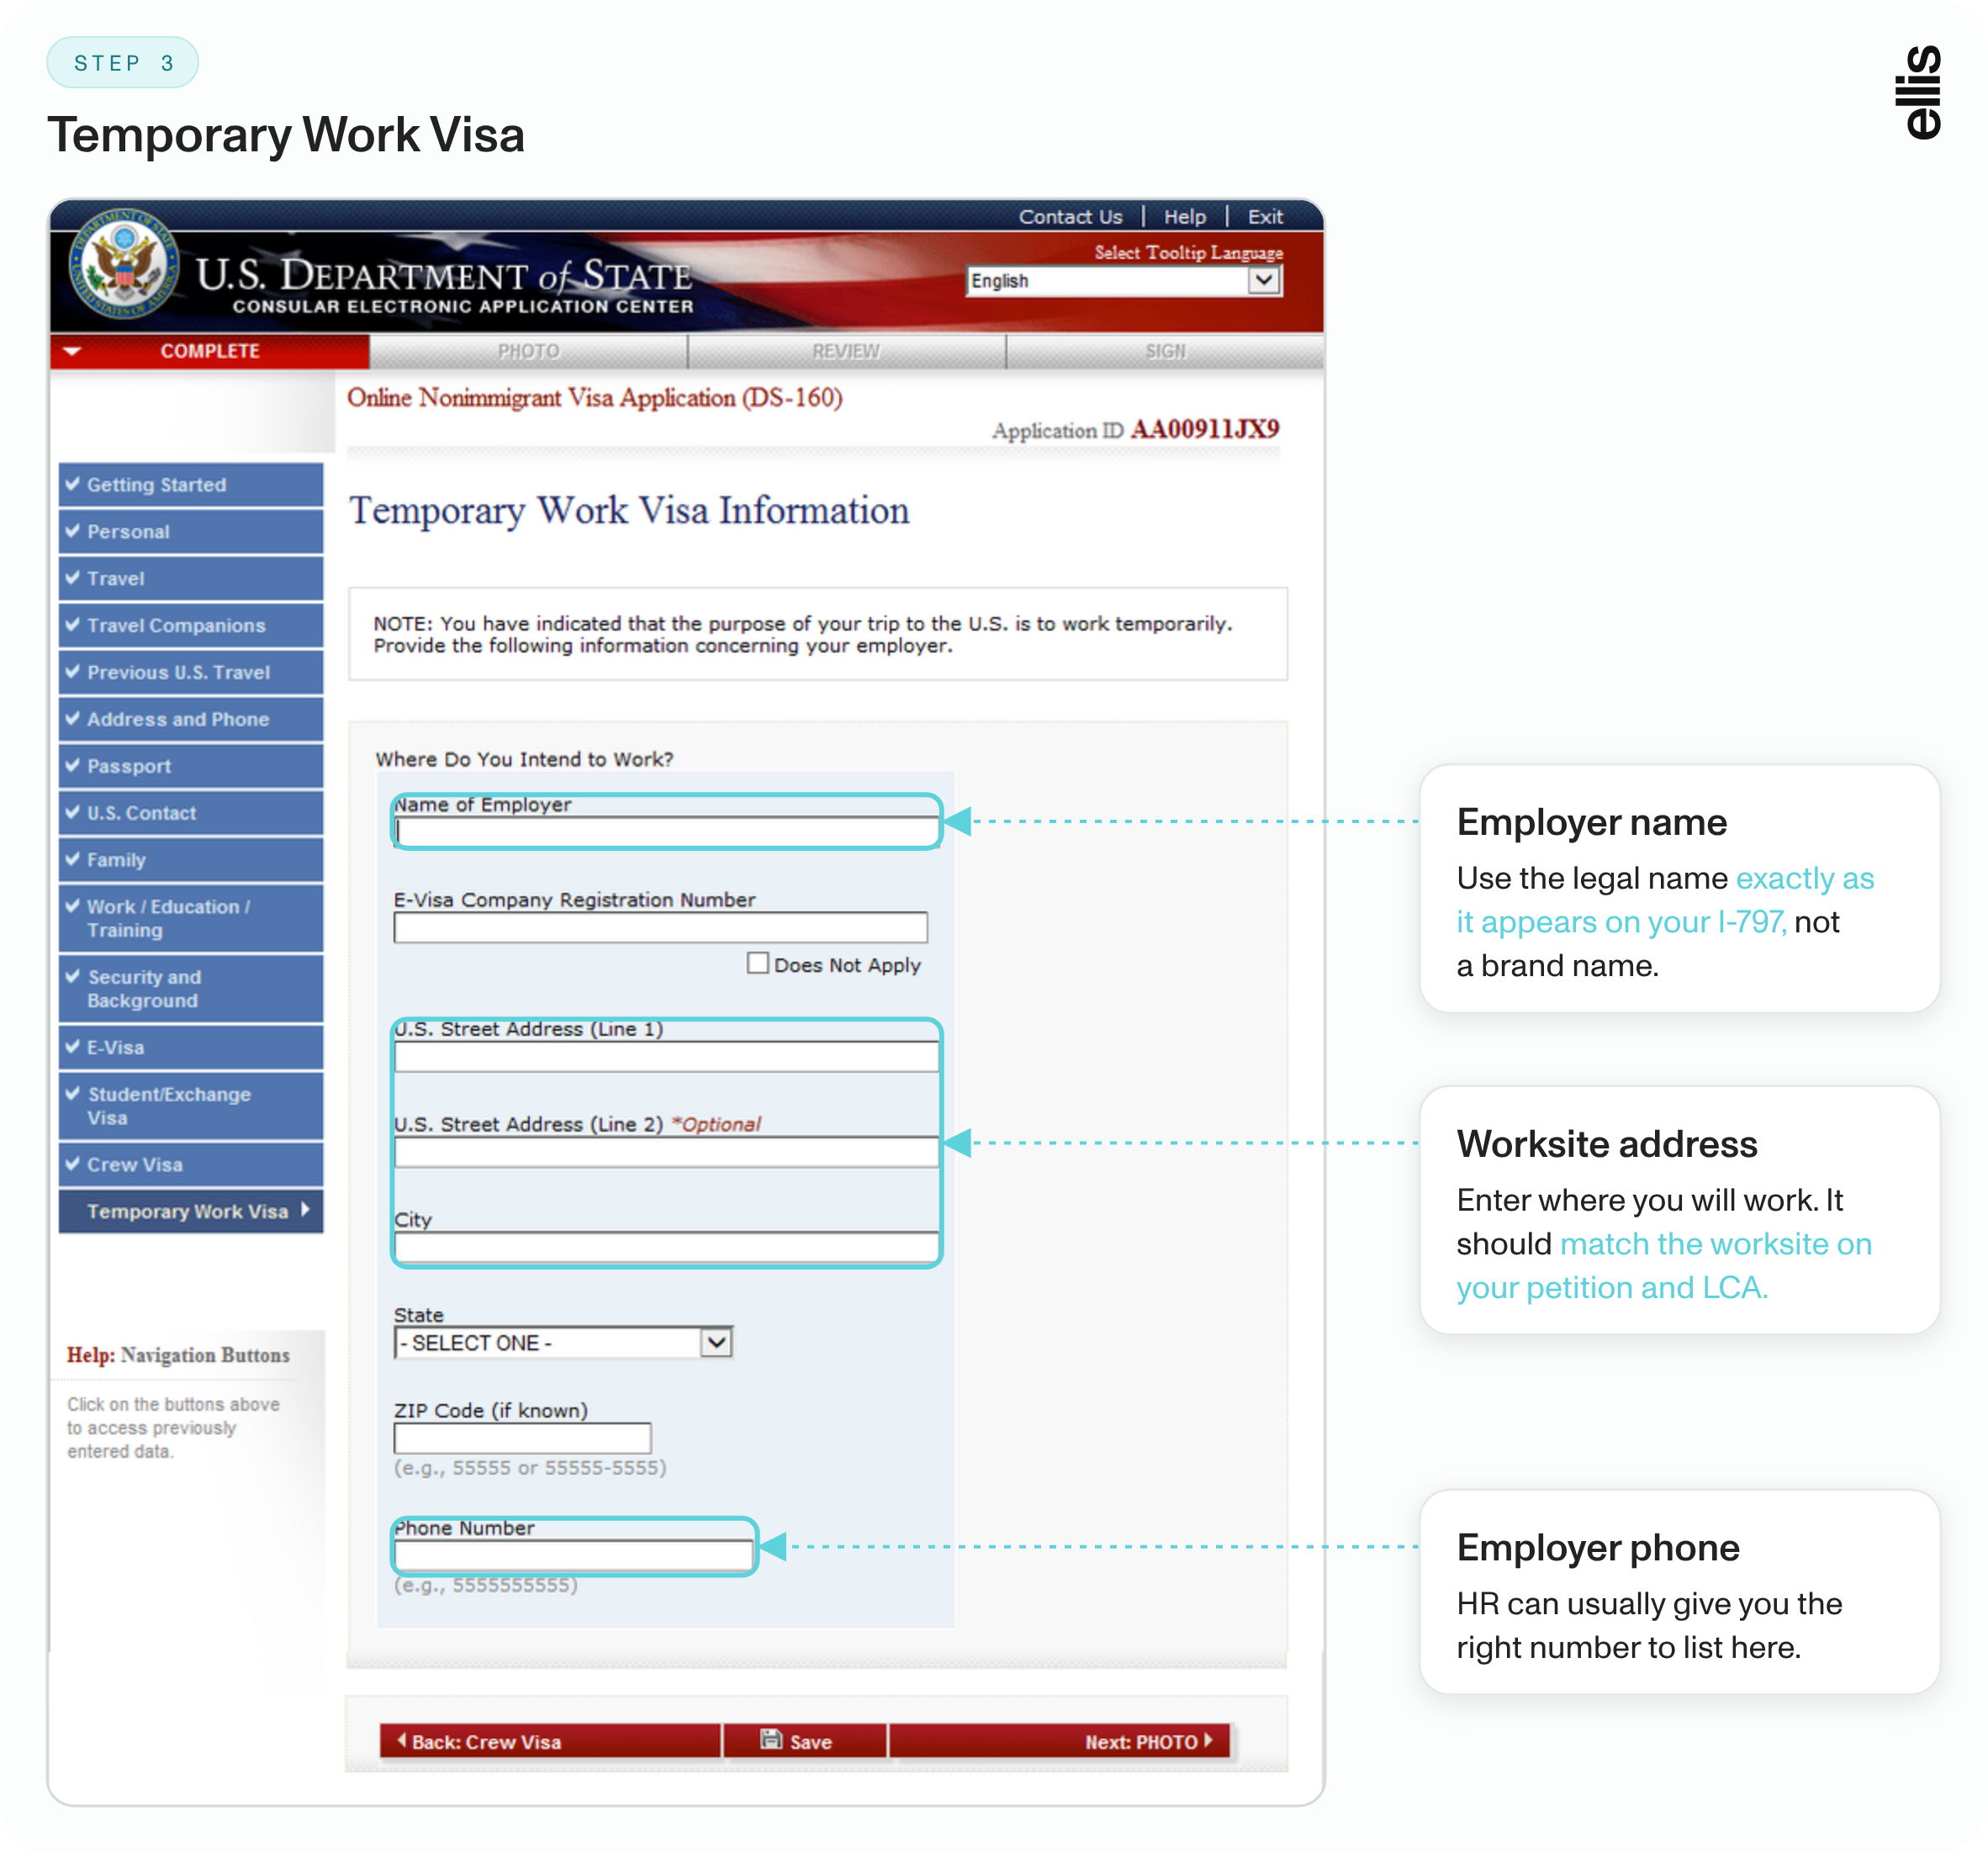
Temporary Work Visa: Enter your employer's details from your petition. Student, exchange, and E visa applicants get similar pages that must match their I-20, DS-2019, or petition.
Applicants in most visitor, student, and exchange categories must demonstrate ties to their home country, such as family, property, or a job they plan to return to. Your family and work answers help show those ties.
Job titles, employer names, and work locations should match your petition word for word. For H-1B visa stamping, the worksite address on the DS-160 should match the LCA and the I-129.
Security and background questions
Security and Background: This part is five pages of yes or no questions. Explain each "yes" in a few honest sentences.
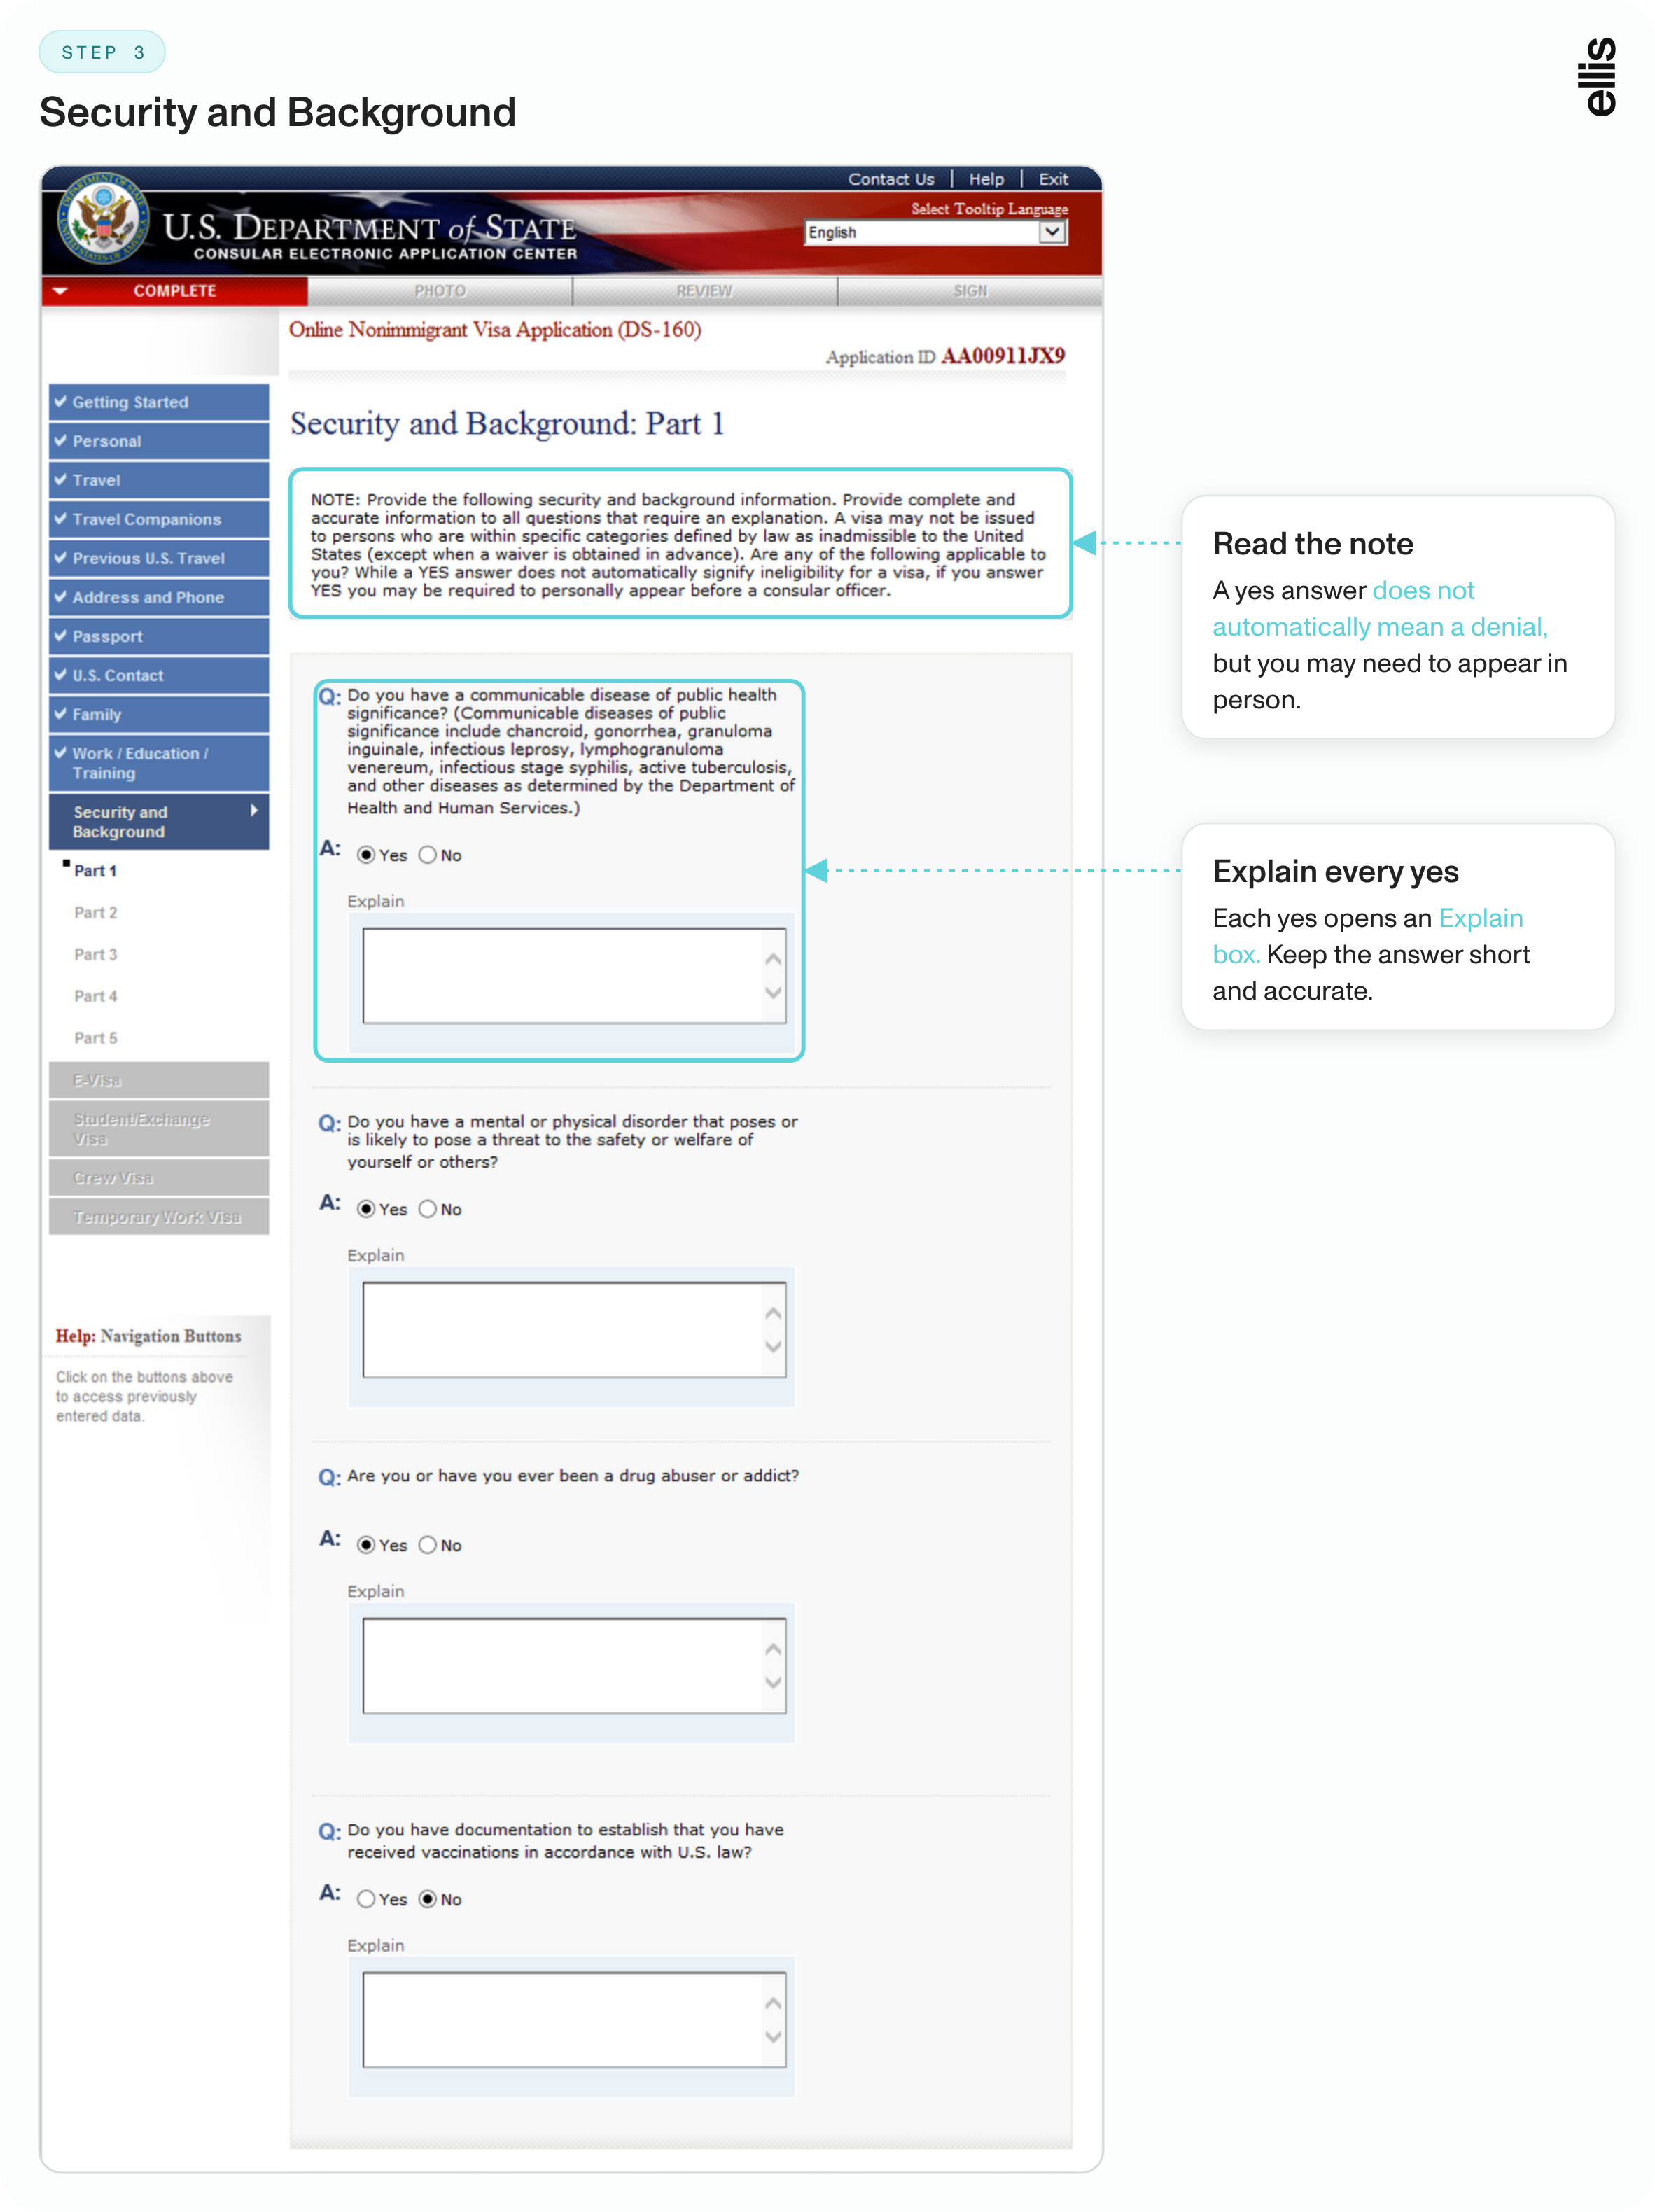
The DS-160 asks for security-related information, including criminal history, prior visa refusals, immigration violations, certain health issues, and membership in certain groups.
Honesty matters a lot here. Officers can see past refusals, overstays, and arrests in government databases, so leaving them off rarely helps and often hurts. If you have ever been refused a visa or stayed past your permitted date, an immigration attorney can help review your answer before you submit.Social media
The DS-160 asks for social media usernames from the past five years. On top of that, the State Department now runs an online presence review for a growing list of visa types. It started with F, M, and J applicants in 2025, added H-1B and H-4 applicants on December 15, 2025, added K, R, H-3, Q, and several other categories on March 30, 2026, and added TN, TD, and I (foreign media) applicants on October 1, 2026. Applicants in these categories are asked to set every social media profile to public. Posts that conflict with your form, such as different job dates on a professional profile, can lead to administrative processing.
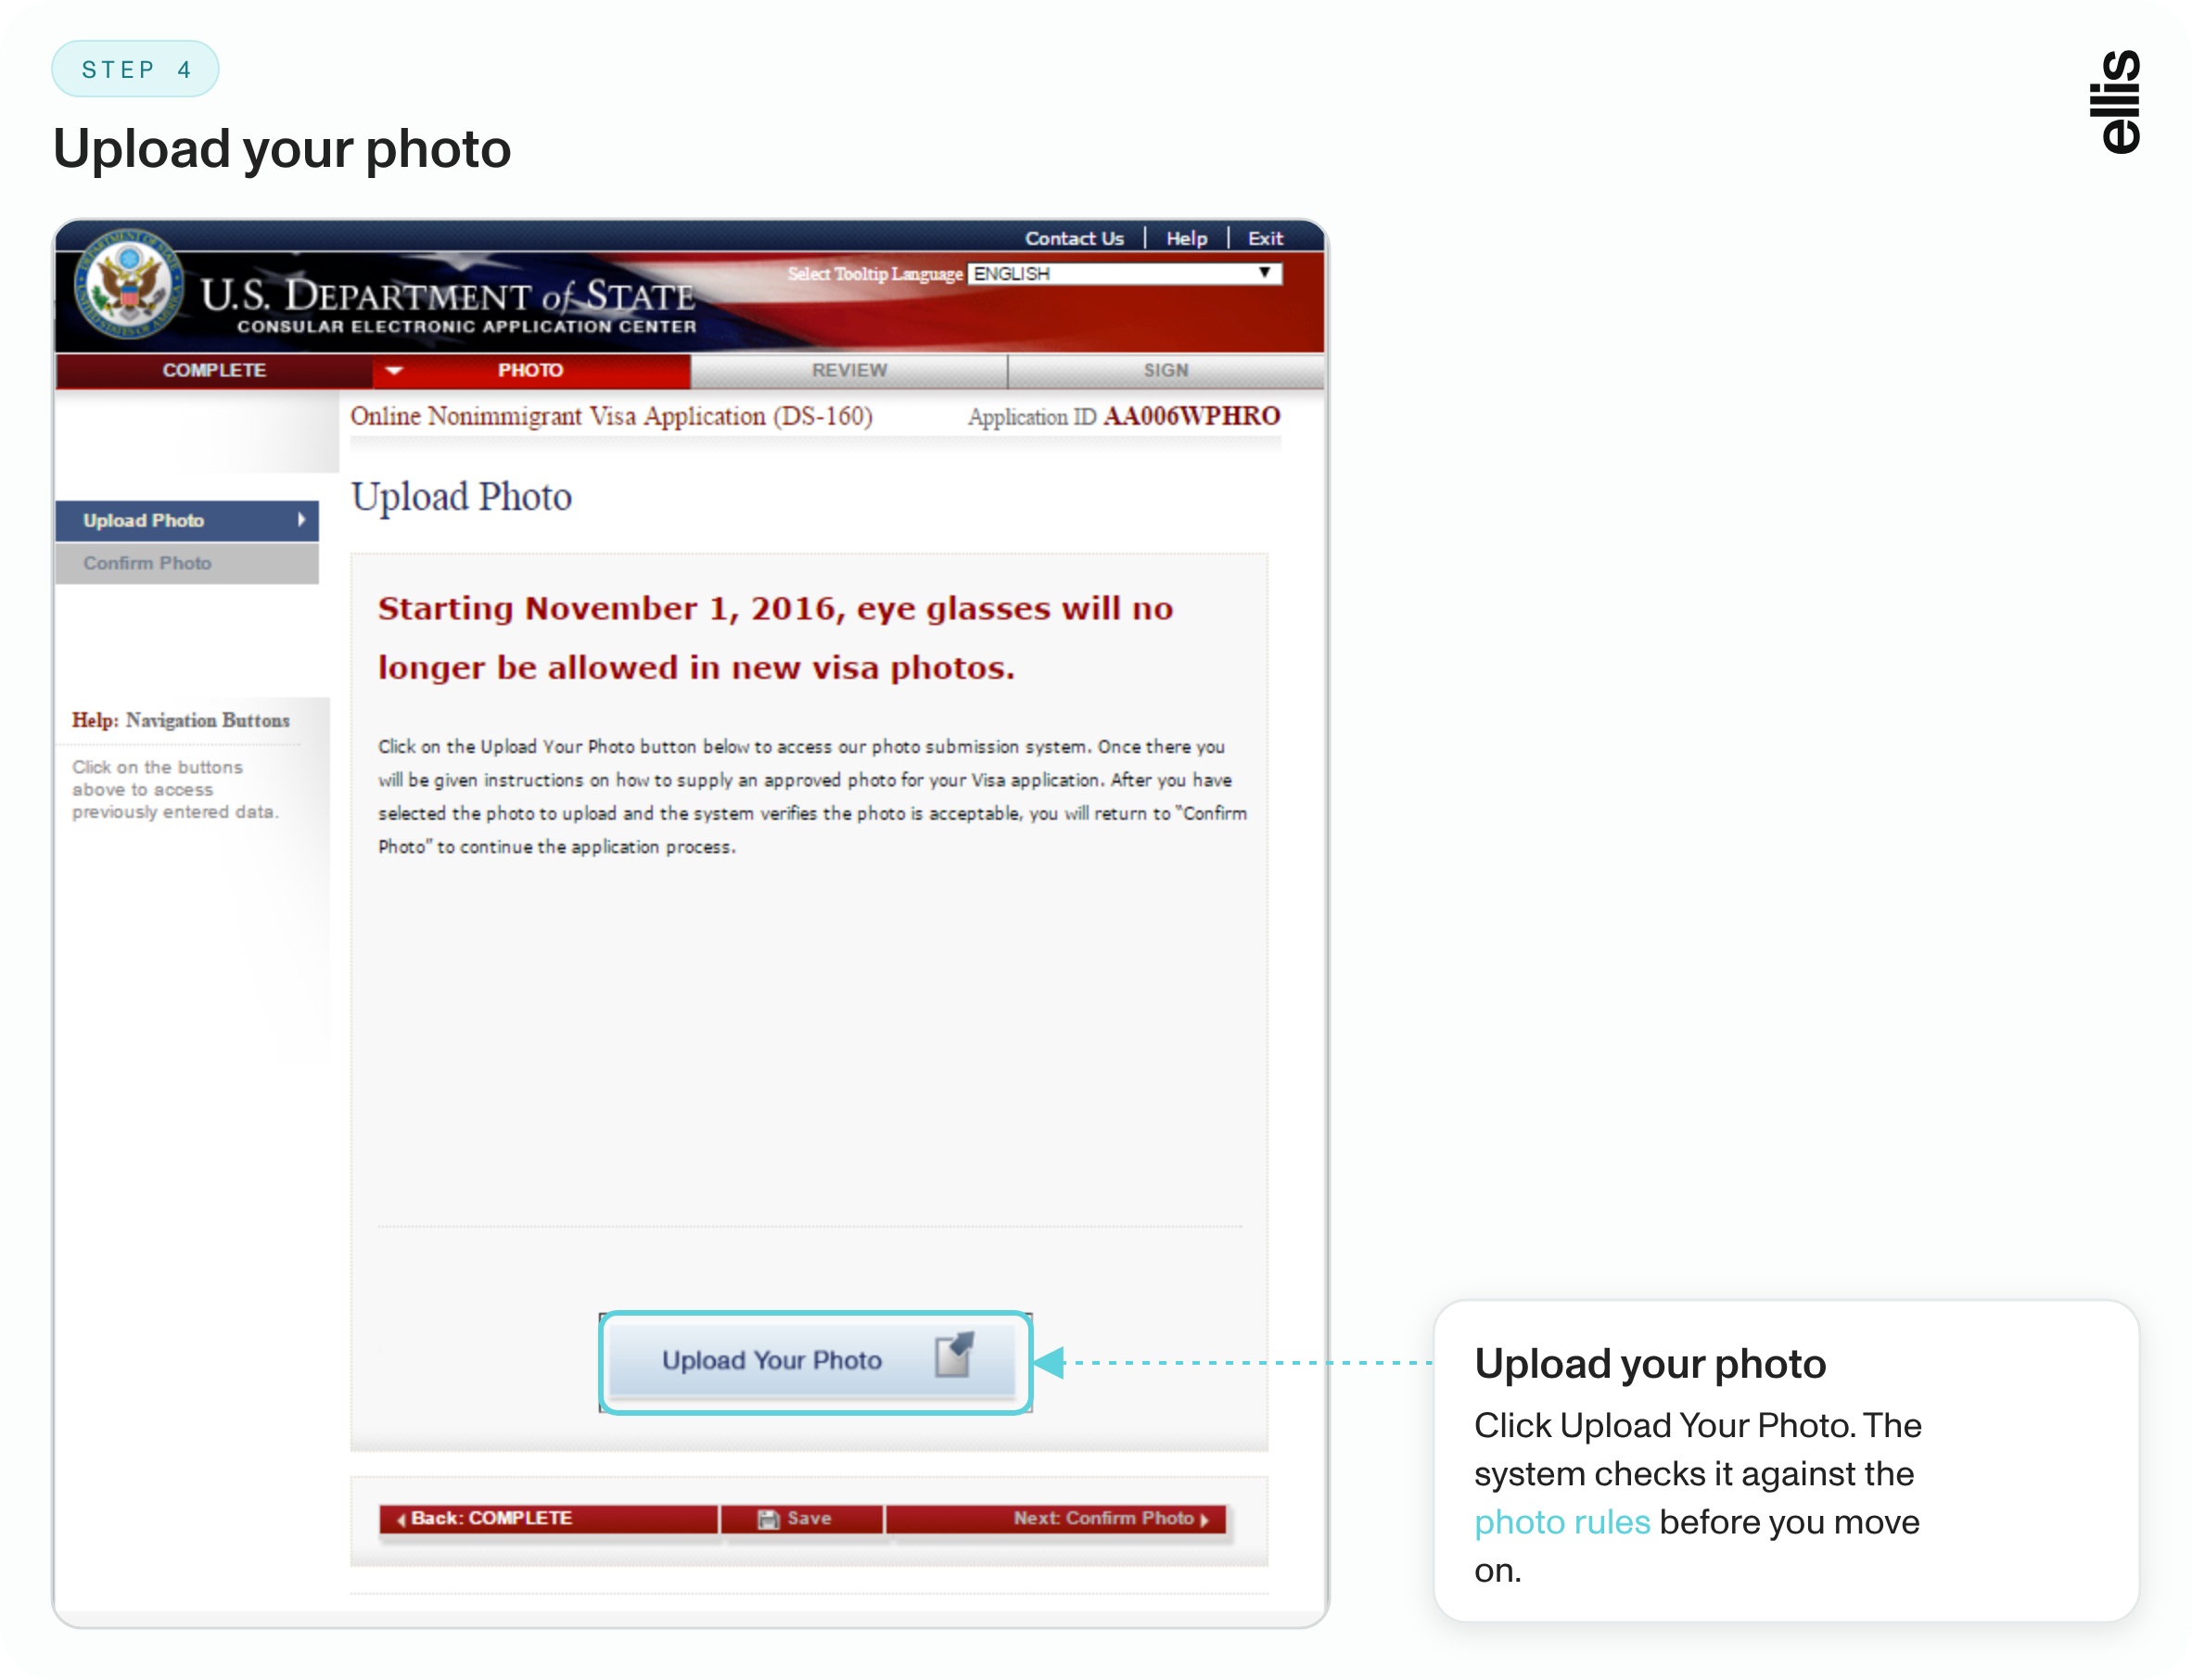
- Upload your photo. The DS-160 requires a digital photo meeting US specifications.
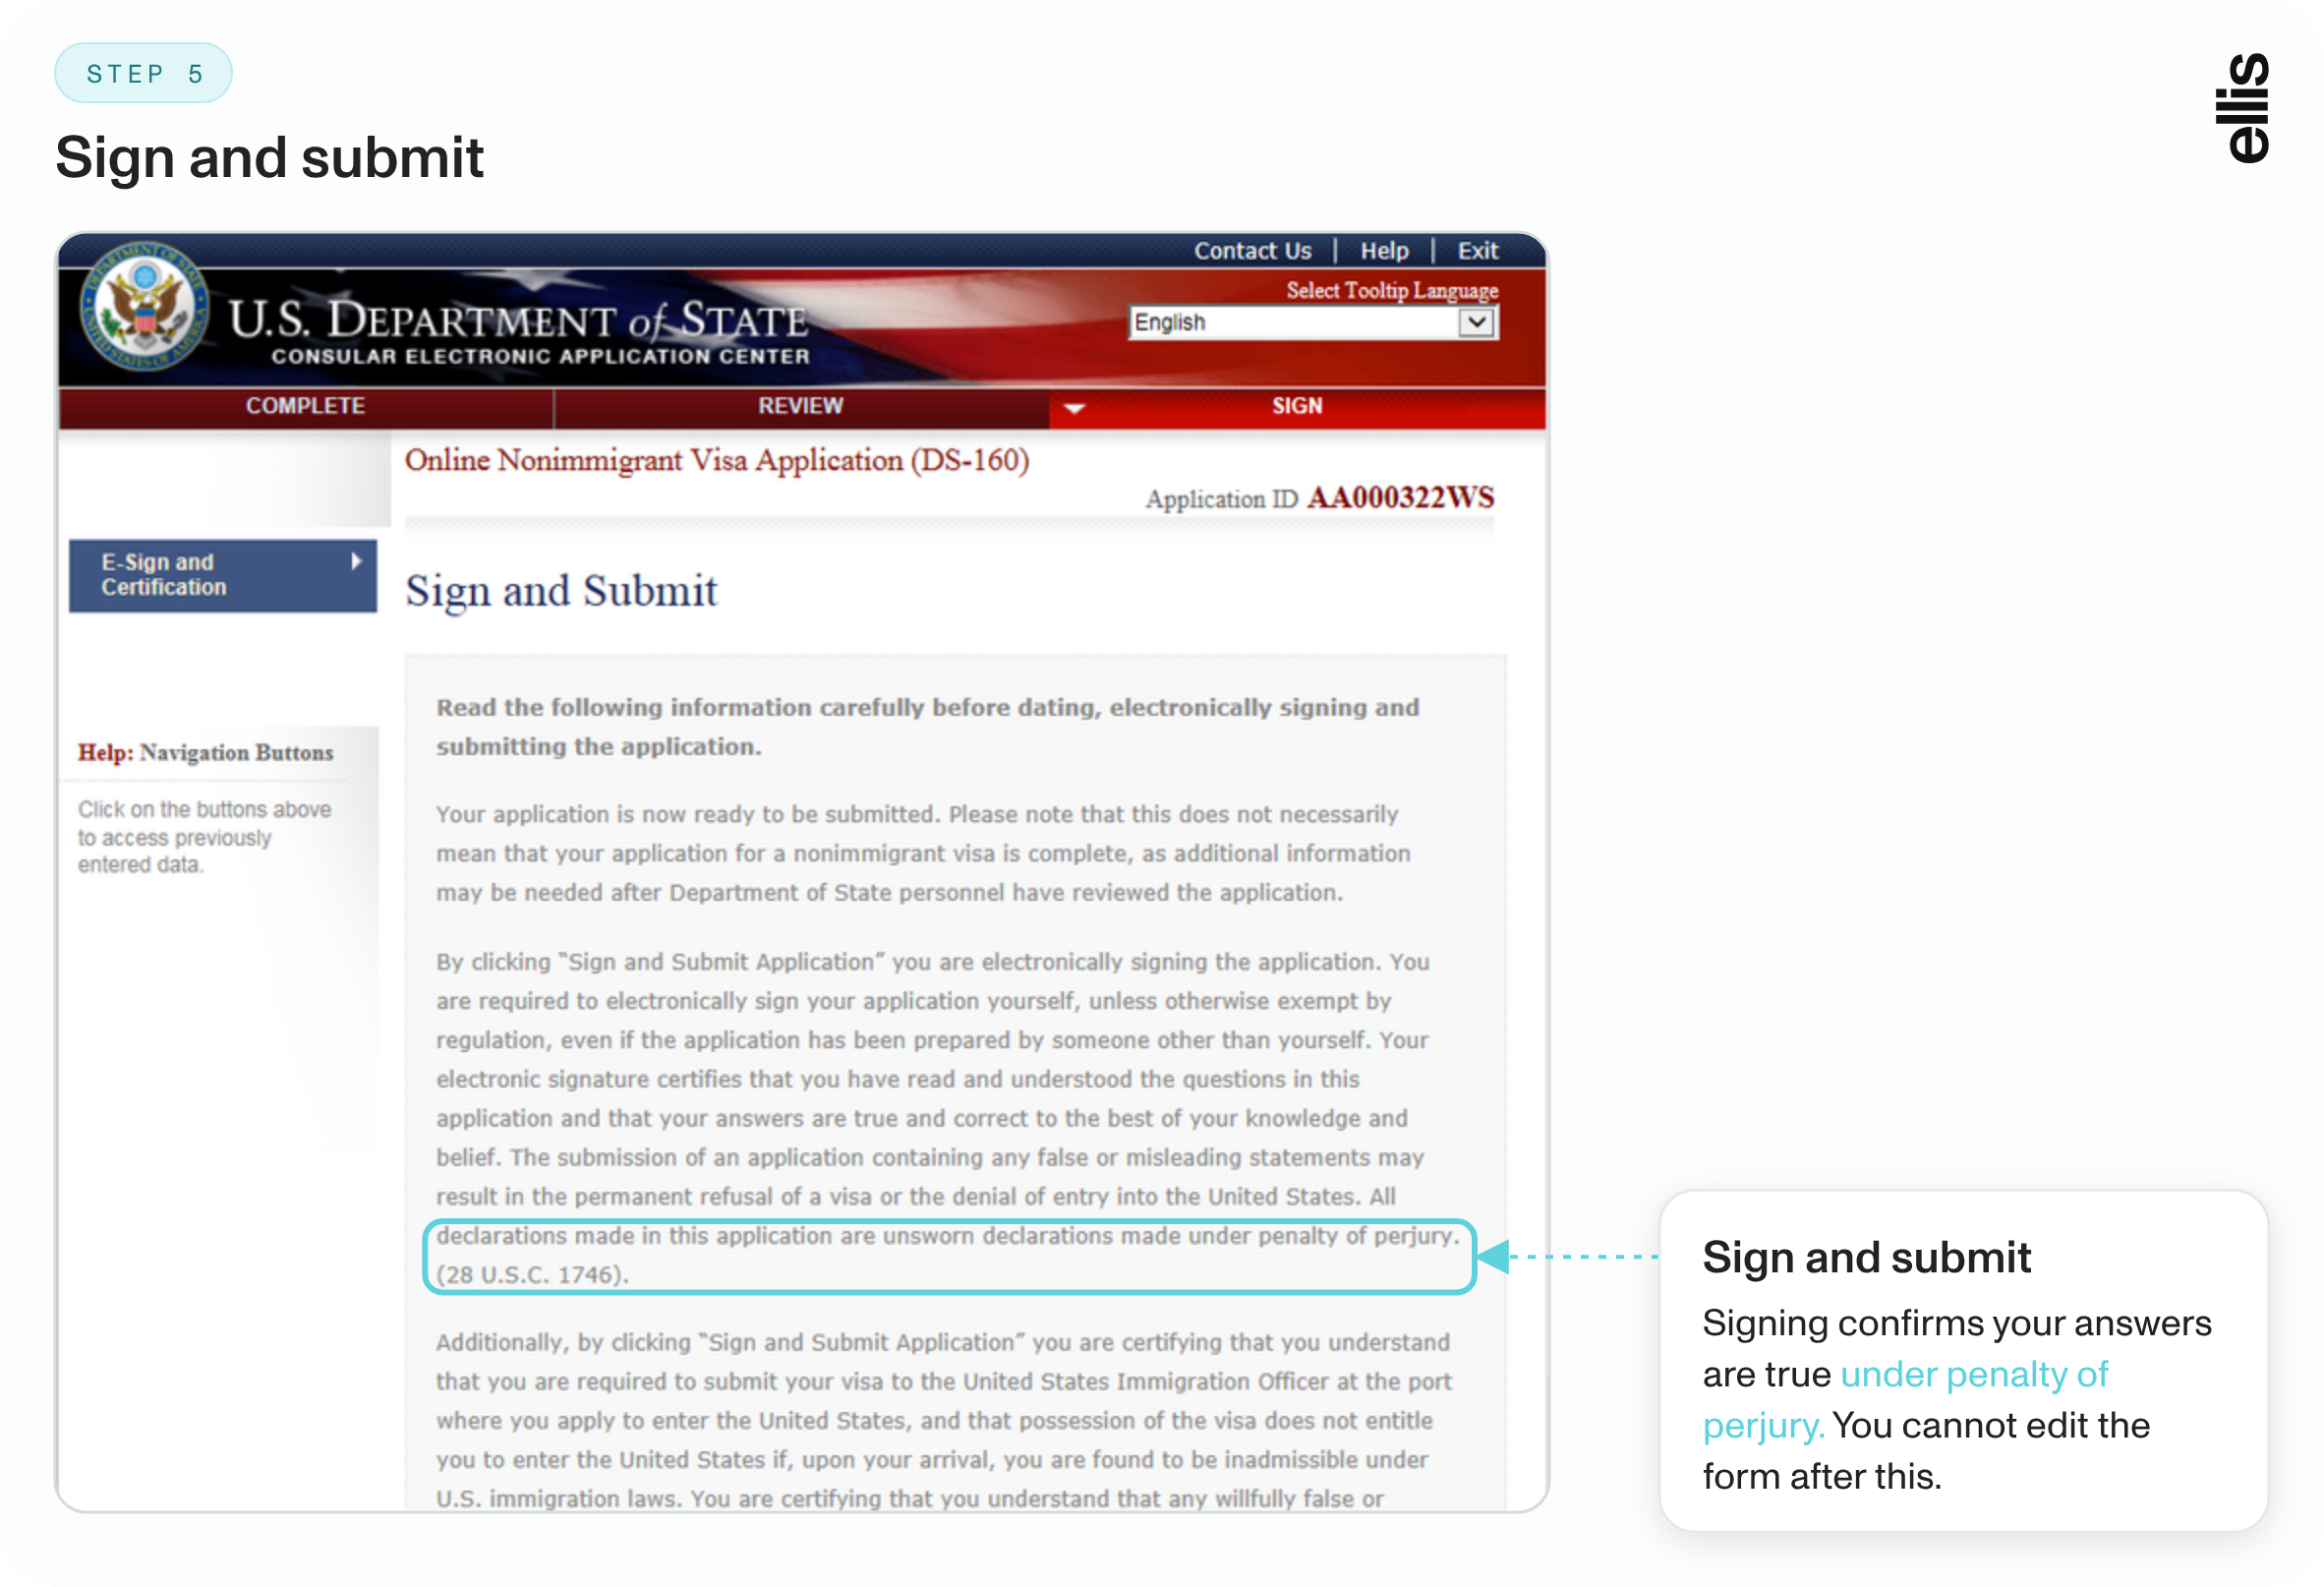
- Review, then sign. You can edit every page until you click Sign Application. After that, the submission is final.
How do you save and retrieve a DS-160 application?
You do not have to finish the DS-160 in one sitting.
- Within 30 days: Go to CEAC, choose Retrieve an Application, and enter your application ID, year of birth, and security answer.
- After 30 days: CEAC deletes unfinished forms after 30 days. Use Save Application to File to keep a copy, then choose Upload an Application to continue.
- After you sign: The form is locked. To fix a mistake, start a new DS-160.
Many applicants and HR teams keep a PDF of the full DS-160, not just the confirmation page, as a record of exactly what was submitted. It is useful when you prepare for the interview.
Why do you need a printed confirmation page?
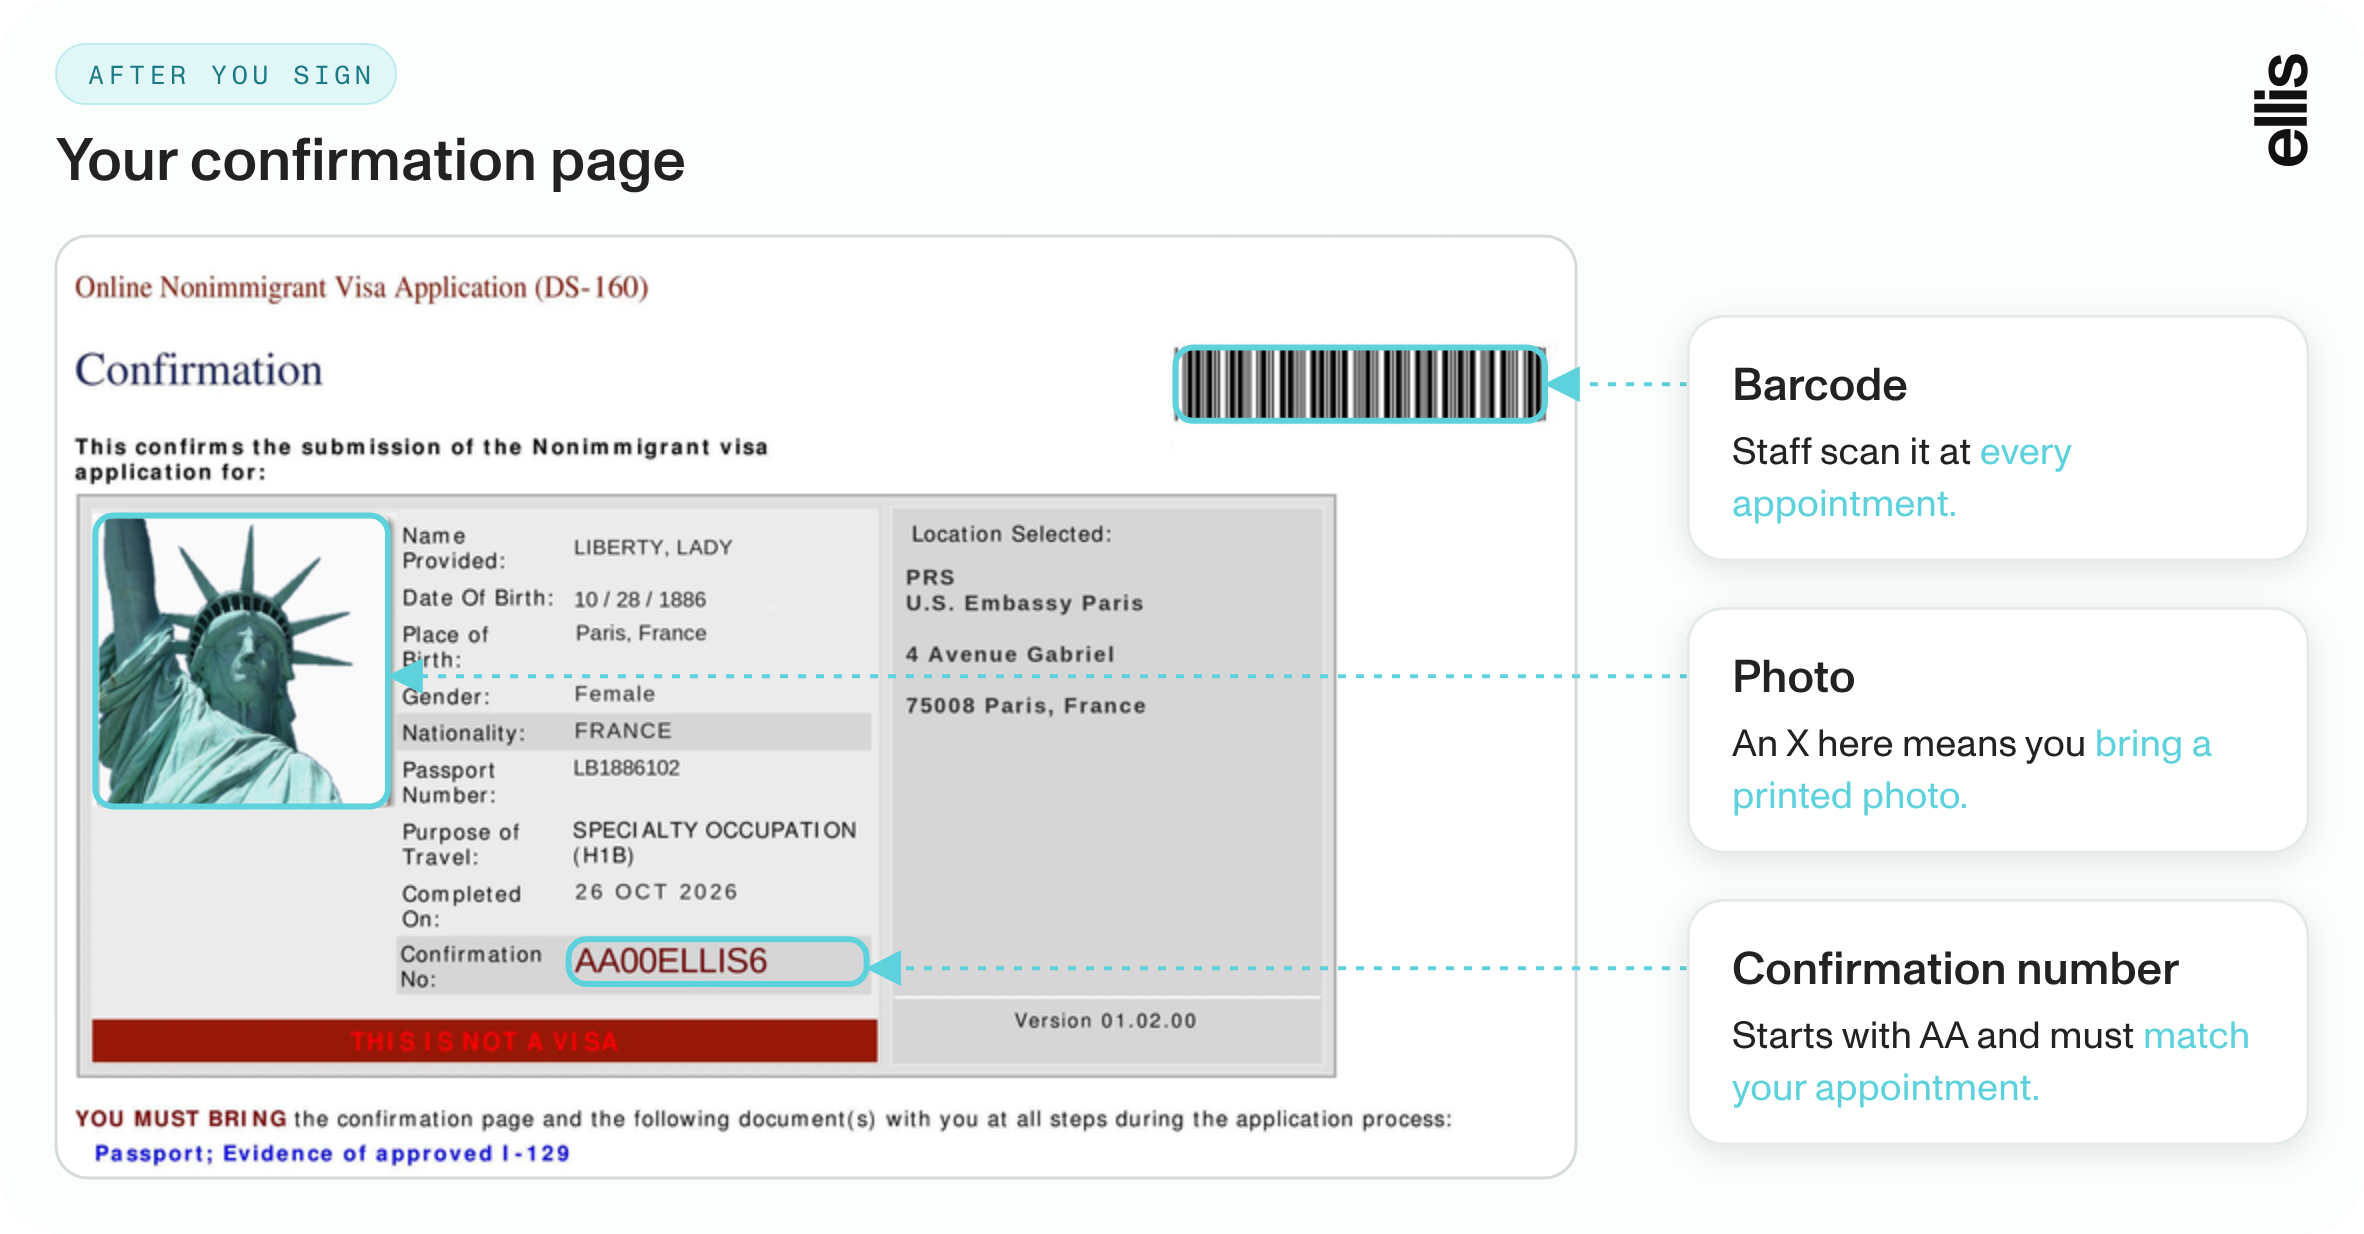
The completed DS-160 generates a confirmation page with a unique barcode, and that page unlocks the rest of the process.
When you click Sign Application, you electronically confirm under penalty of perjury that your answers are true and correct. Federal rules make this click the official signature on the form. A helper who filled out the form for you must be listed on the sign and submit page, but you still click Sign Application yourself, unless you are under 16 or physically unable to.
The confirmation page shows your confirmation number, barcode, and the location you chose. A barcode number from the DS-160 is needed for booking interviews, and most posts ask you to enter it in your scheduling account. You also bring the printed confirmation page to your biometrics appointment and visa interview, where staff scan the barcode to pull up your form. You do not need to print the full application.
What are the DS-160 photo requirements?
The DS-160 requires a digital photo meeting US Department of State photo requirements. The main rules are:
- In color and taken within the last six months
- Plain white or off-white background
- Full face, facing the camera, with a neutral expression and both eyes open
- No eyeglasses
A photo that breaks these rules is one of the most common reasons applicants have to bring a printed photo or redo part of the process.
How much is the visa application fee?
The DS-160 is free, but you pay a visa application fee (also called the MRV fee) before you can book your interview. The amount you pay varies depending on your visa type.
Visa type | Application fee | Notes |
|---|---|---|
B, F, J, M, TN, and most visitor and student visas | $185 | Paid before booking. Students and exchange visitors also pay a separate SEVIS fee. |
H, L, O, P, Q, R (petition-based work visas) | $205 | Separate from USCIS petition fees paid by the employer. |
K (fiancé(e) or spouse of a US citizen) | $265 | Paid before booking. |
E-1, E-2, E-3 | $315 | Paid before booking. |
A few other costs can apply on top of the application fee:
- Reciprocity fee: Some nationalities pay this when the visa is issued.
- Visa integrity fee: A $250 visa integrity fee, adjusted each year for inflation, was set to start October 1, 2025. Collection has been uneven across consulates.
- Visa bond: Since August 3, 2026, the State Department's visa bond program is permanent. B-1/B-2 applicants from designated countries may have to post a bond of $10,000, $15,000, or $20,000, which is returned if they follow the terms of their visa.
- Appointment expedite fee: From July 1 through December 31, 2026, a $750 optional expedite fee lets some B-1/B-2 applicants get an earlier appointment at a limited number of posts. You can only select it after you submit your DS-160 and pay the application fee.
Fees change often, so your embassy's site and State Department guidance are the best places to confirm the current amount before you pay.
How do you book a visa appointment after the DS-160?
The visa application follows this order:
- Submit your DS-160 and get your confirmation page with its barcode.
- Pay the visa application fee.
- Schedule your visa appointment, plus a biometrics appointment if your post uses a separate office for fingerprints and photos.
- Attend your visa interview with your printed confirmation page, passport, and supporting documents.
Timing matters. Many consulates now require you to submit the DS-160 at least two to three business days (48 to 72 working hours) before your interview date. The confirmation number on your DS-160, which starts with "AA," must also match the one on your appointment. If the numbers do not match, the post may turn you away and ask you to rebook.
Visa appointment wait times depend on the consulate and visa type, and some posts have backlogs of several months. For employer-sponsored hires, it helps to start the DS-160 well before the planned start date. If a lot changes while you wait, such as a new employer or a marriage, you may need a new DS-160 that reflects your current situation.
Interview waivers are much narrower than they used to be. As of October 1, 2025, the State Department limits waivers mostly to diplomatic and official visas and to certain renewals of B-1/B-2 and H-2A visas within 12 months of expiration. Even then, consular officers can require an interview at their discretion. Applicants who qualify for a waiver still submit a DS-160.
What should you bring to your visa interview?
Supporting documents are required for the visa interview, along with your passport and printed confirmation page. The exact list depends on your visa type, but common examples include:
- Your I-797 approval notice for petition-based work visas
- An employment verification letter or offer letter
- Your Form I-20 or DS-2019 and SEVIS fee receipt for students and exchange visitors
- Proof of ties to your home country for visitors, such as a job, property, or family
Your interview answers should match your DS-160, and officers often note any differences. Applicants generally provide the documents that support what they wrote on the form. Our guide to preparing for your US nonimmigrant visa interview covers the questions officers commonly ask.
What DS-160 mistakes delay a visa application?
Most problems come from small inconsistencies. The most common are:
- Name or date mismatches: Your name or date of birth does not match your passport or I-797 exactly.
- Wrong visa category: The purpose of trip does not match the visa you are applying for.
- Petition mismatches: Job title, salary, worksite, or employer name differs from the petition and LCA.
- Left-out refusals or overstays: A prior refusal or overstay is missing. Officers often already have this on record.
- Private or missing social media: A username from the past five years is missing, a profile is set to private, or a profile conflicts with your answers.
- Photo problems: The photo is too old, has the wrong background, or shows glasses.
- Technical errors: The wrong consulate is selected, the browser is unsupported, or the session times out before you sign.
If you find a serious mistake after you submit, you complete a new DS-160. Bring both the old and new printed confirmation pages to the interview. Some consulates also ask you to update your appointment with the new confirmation number.
How do employers keep DS-160 answers consistent with the petition?
For employer-sponsored workers, the DS-160 is where petition details get tested. An H-1B or L-1 worker's job title, salary, worksite, and start date on the DS-160 need to match the I-129 and LCA. If you are weighing H-1B vs. L-1, the same consistency rule applies to both. A mismatch can lead to a refusal or administrative processing that pushes back a start date.
Employers that handle this well usually share a single source of truth for job details, keep copies of every filed petition, and track each employee's interview date and biometrics appointment. Budgeting for H-1B fees and visa costs early also helps avoid last-minute surprises.
How Ellis can help
A DS-160 that does not match the petition can stall a hire for weeks. Ellis attorneys review each employee's DS-160 answers against the H-1B, L-1, or O-1 filing before submission, catching mismatches in job titles, salaries, worksites, and dates. The Ellis platform keeps employee records, past petitions, documents, and interview reminders in one place, so HR teams and employees work from the same information. Schedule a free consult →
This article is for general informational purposes only. It is not legal advice.